
Connect CallHippo directly inside LeadSquared to place click-to-call outbound calls, receive incoming calls in an embedded dialer, and log every call activity automatically. This guide walks you through the full telephony setup end to end.
Prerequisites
Before you begin, make sure the following are in place:
- Your CallHippo and LeadSquared integration is active.
- You have admin-level access in both CallHippo and LeadSquared.
- The user performing the setup has a LeadSquared account and a CallHippo account that use the same email ID.
- The required API access is enabled in your LeadSquared account.
- CallHippo agent numbers are assigned to the relevant users.
Configure the Agent Profile in LeadSquared
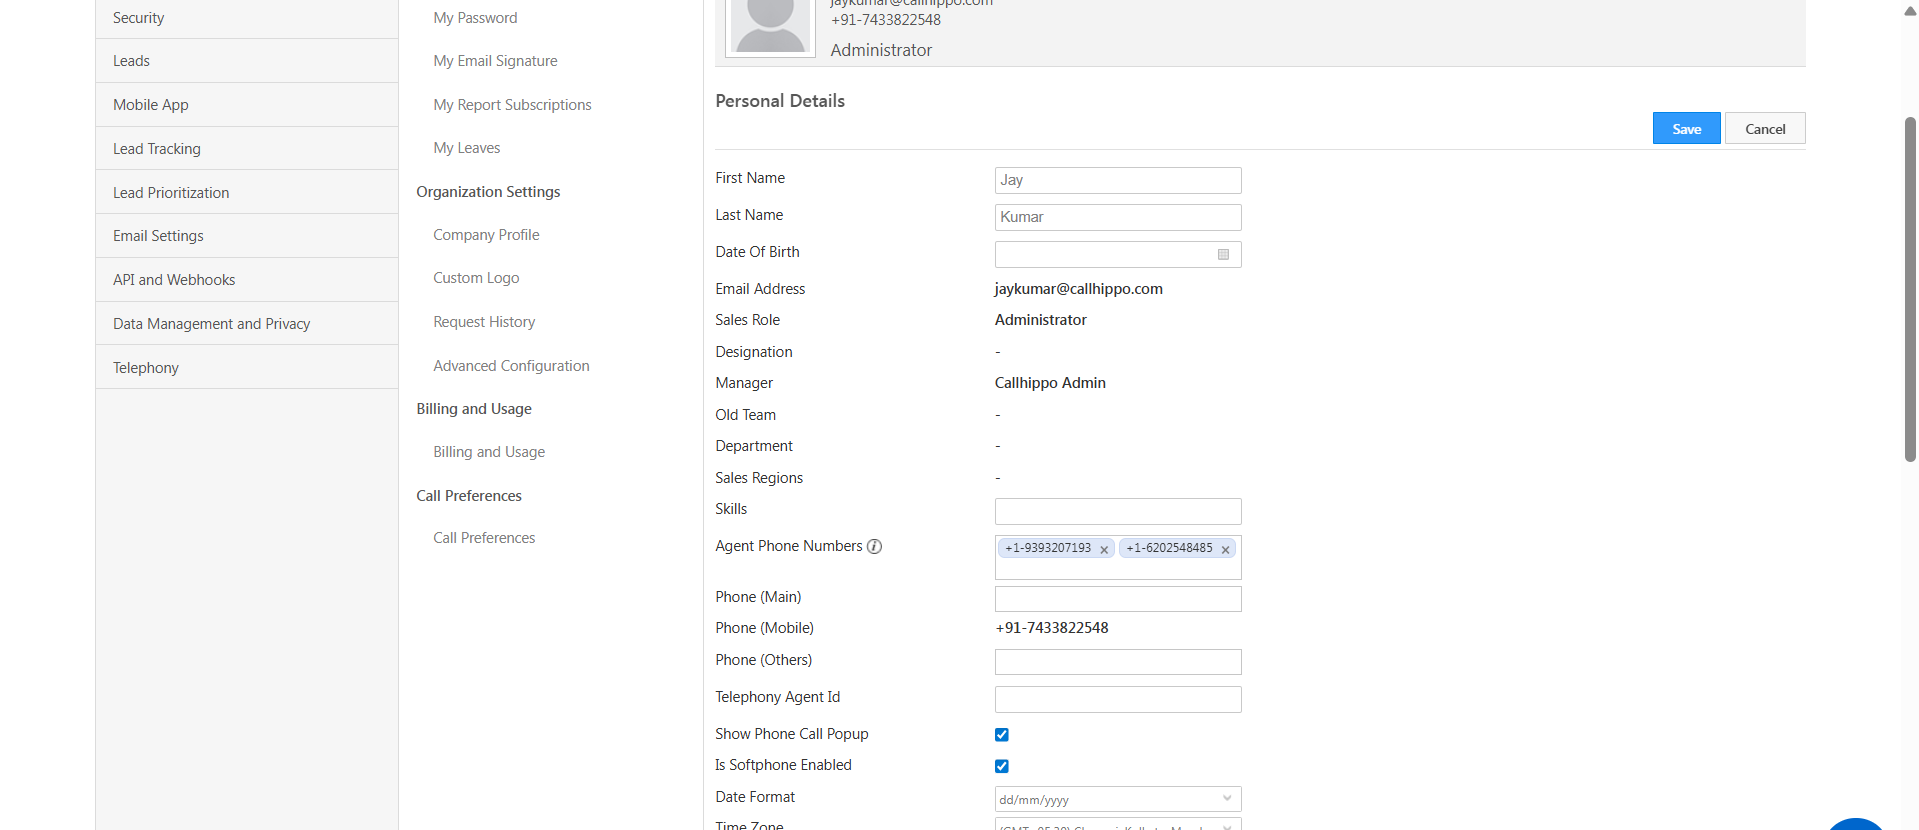
- In LeadSquared, go to Settings → My Profile and click Edit.
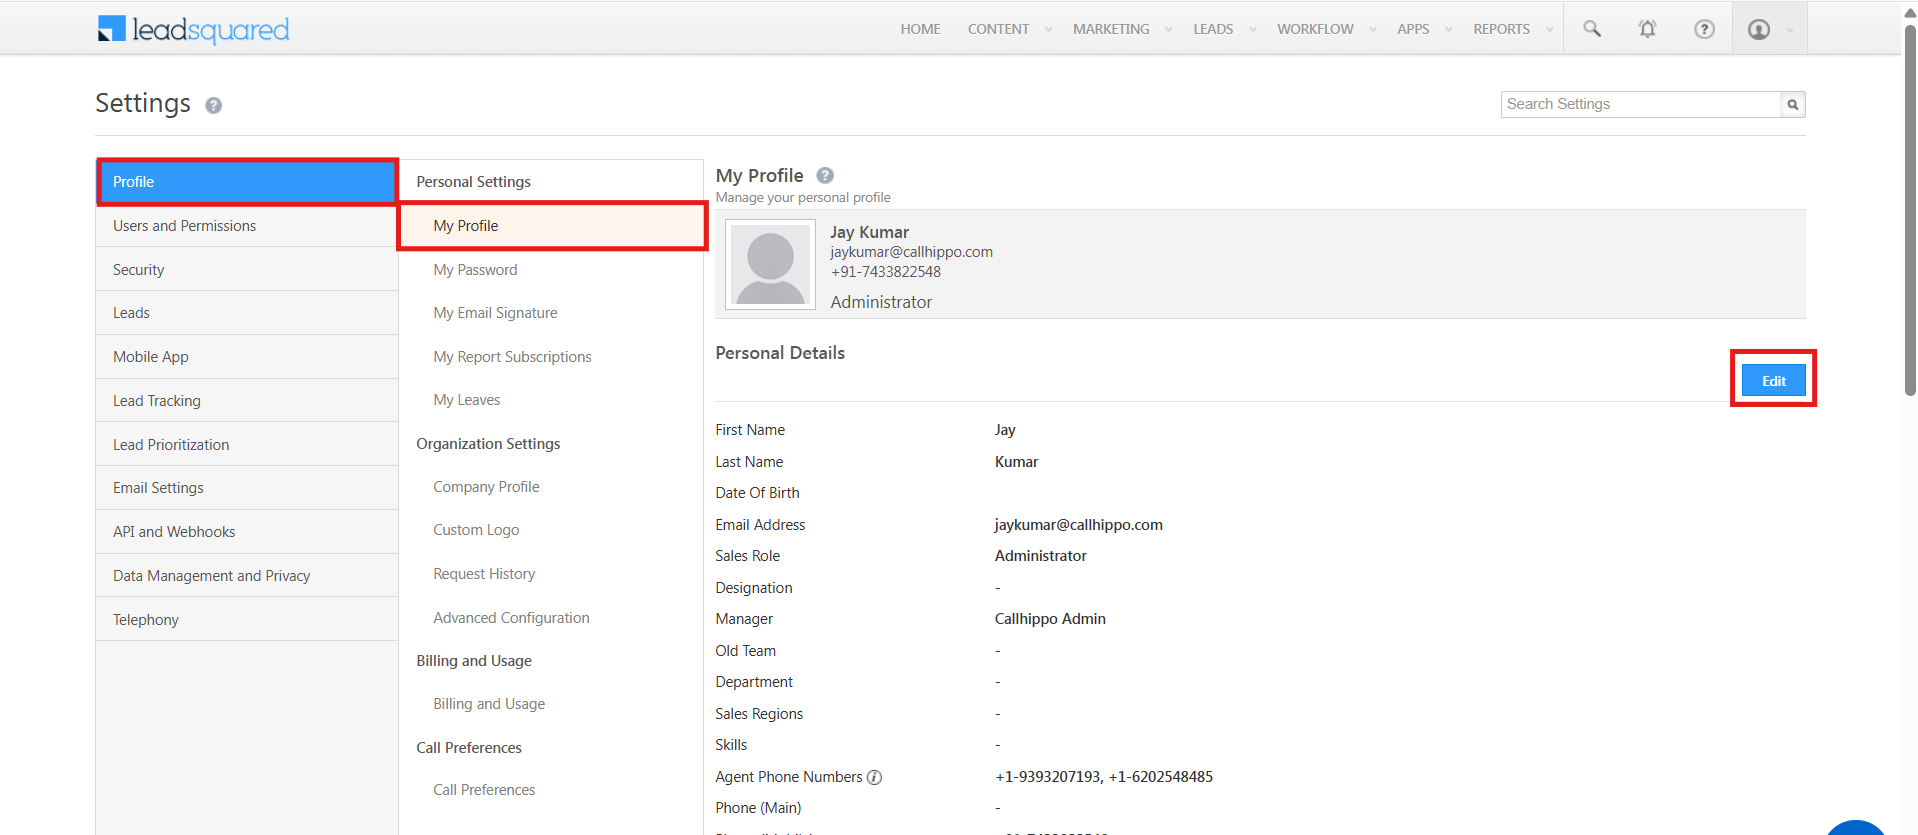
- Add your CallHippo agent number in the Agent Phones field, using the format
+<CountryCode>-<PhoneNumber>. Enable the Show phone call popup option and click Save.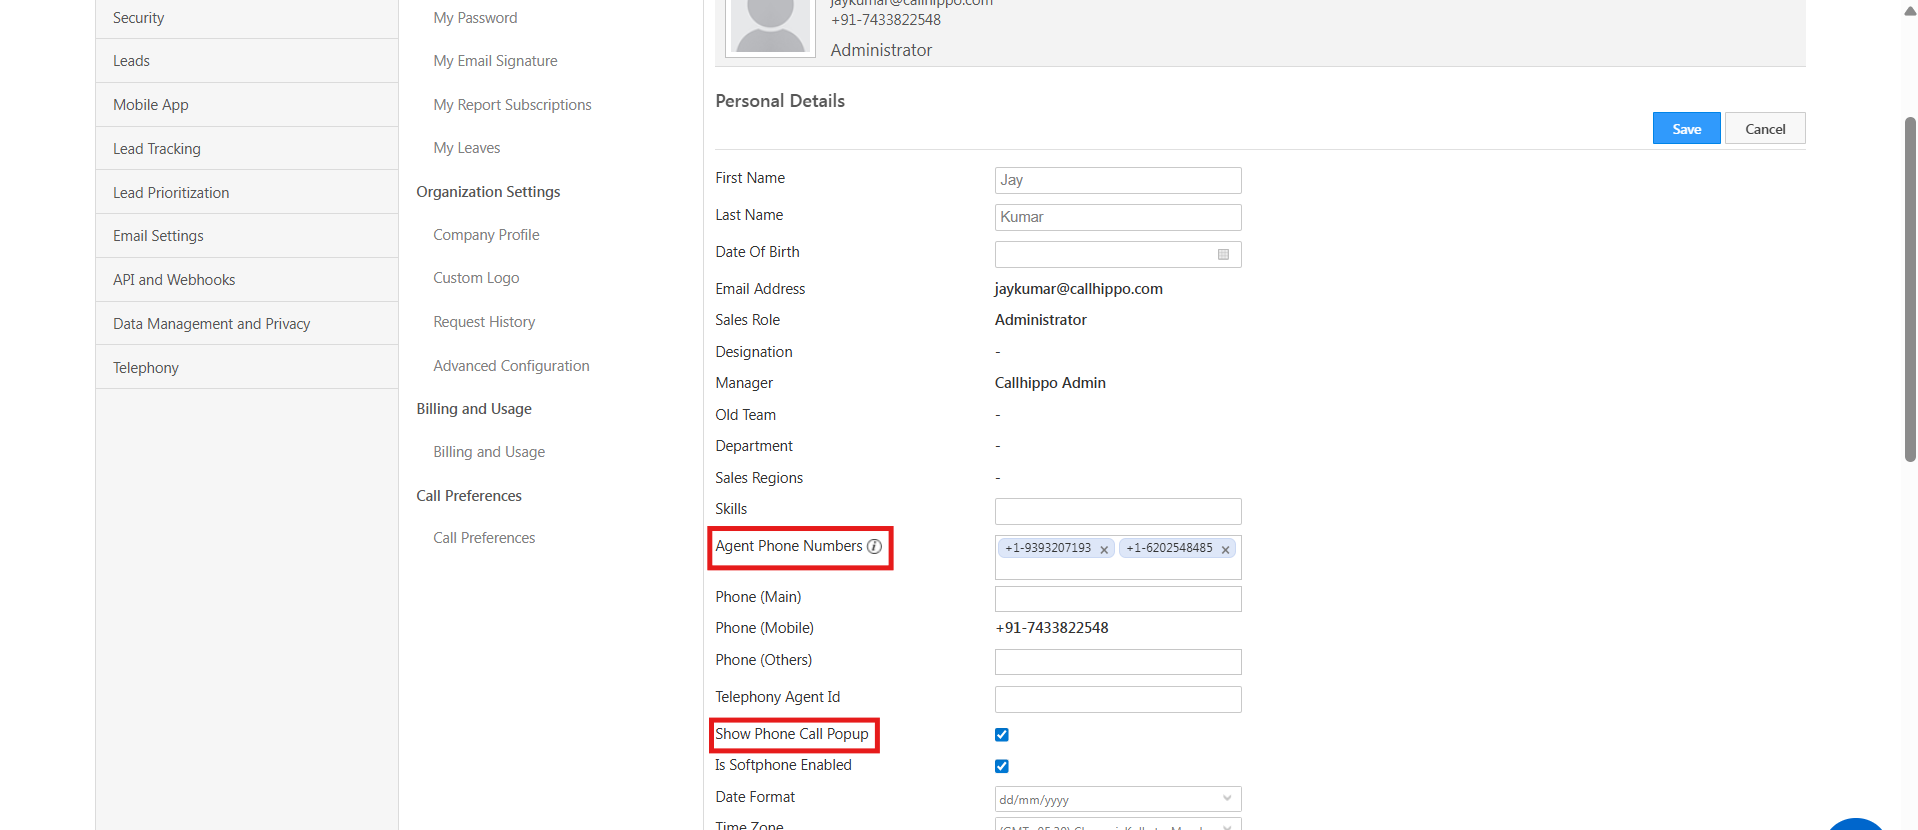
This step ensures LeadSquared can correctly identify the agent during incoming and outgoing calls.
Install the Universal Telephony Connector
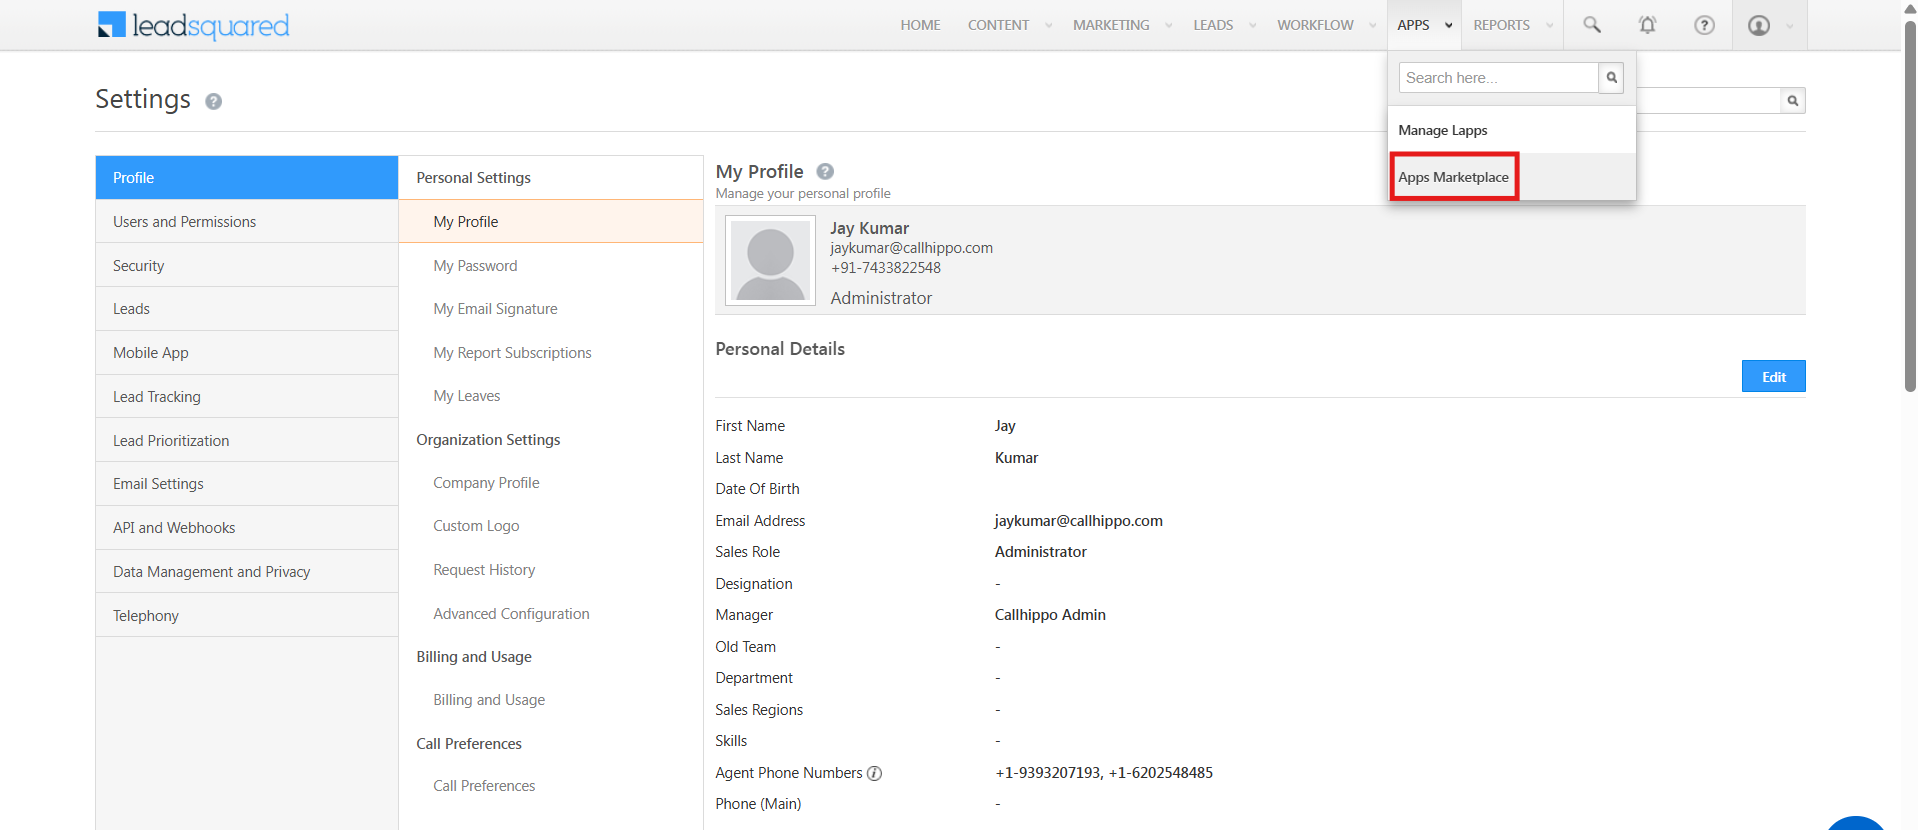
- Navigate to Apps → Apps Marketplace in LeadSquared.
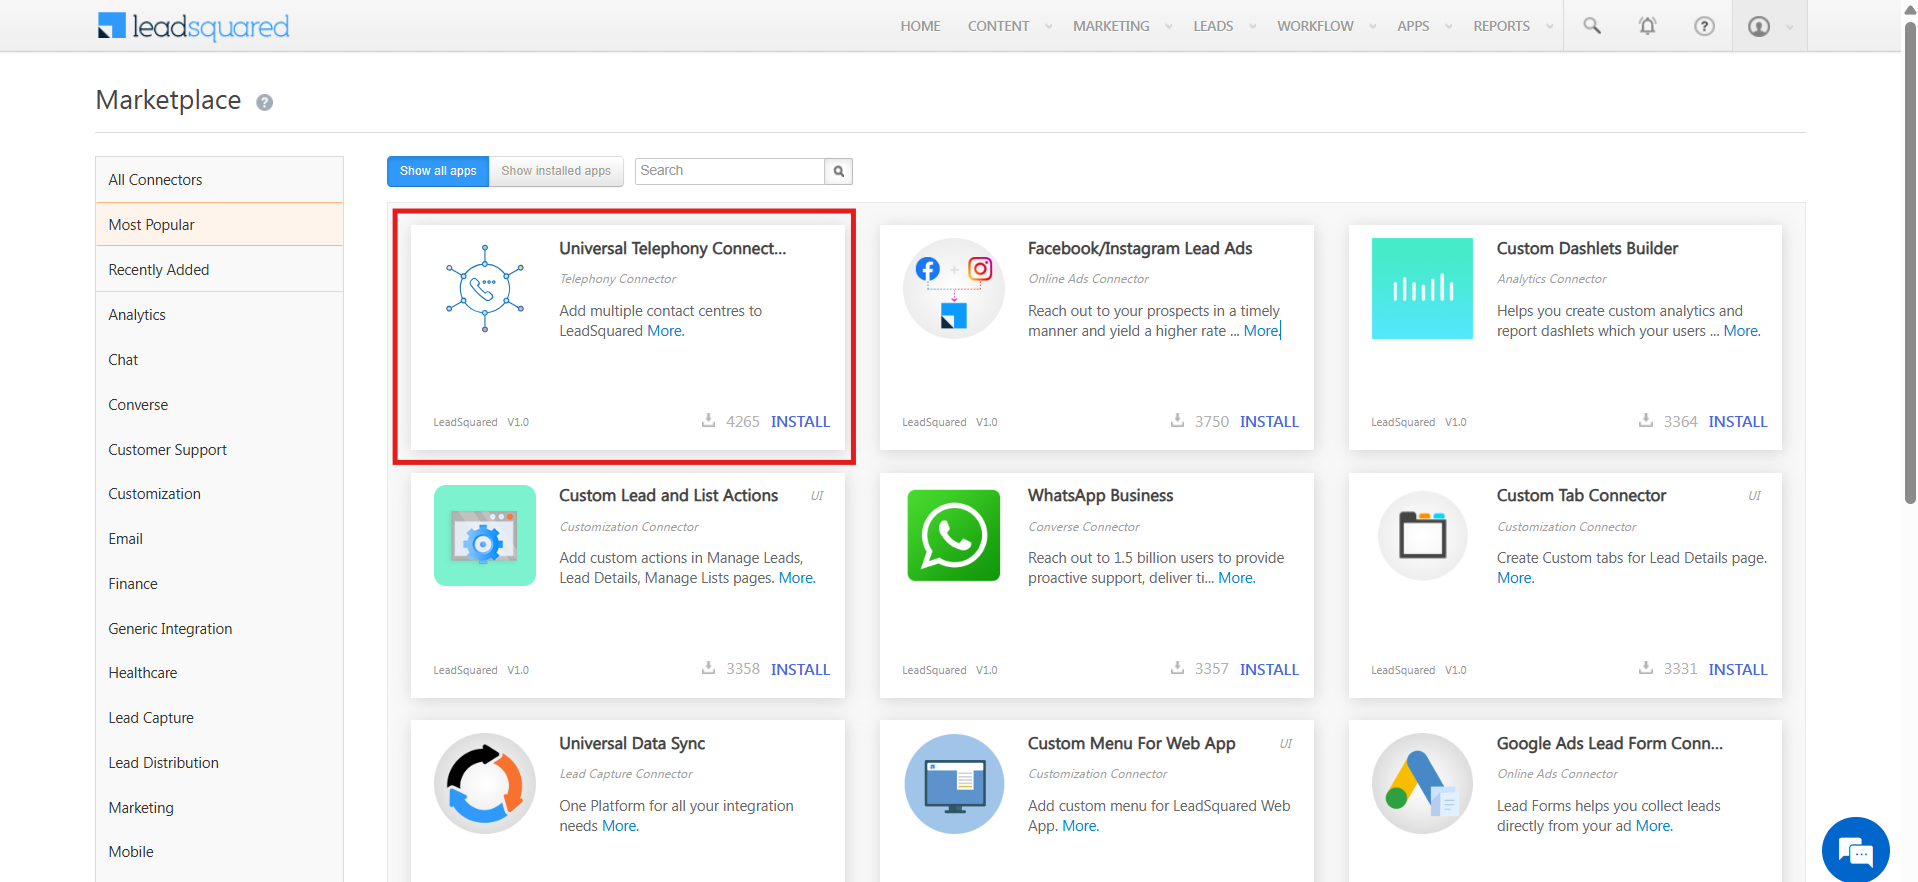
- Find and install the Universal Telephony Connector.
Open the Connector Configuration
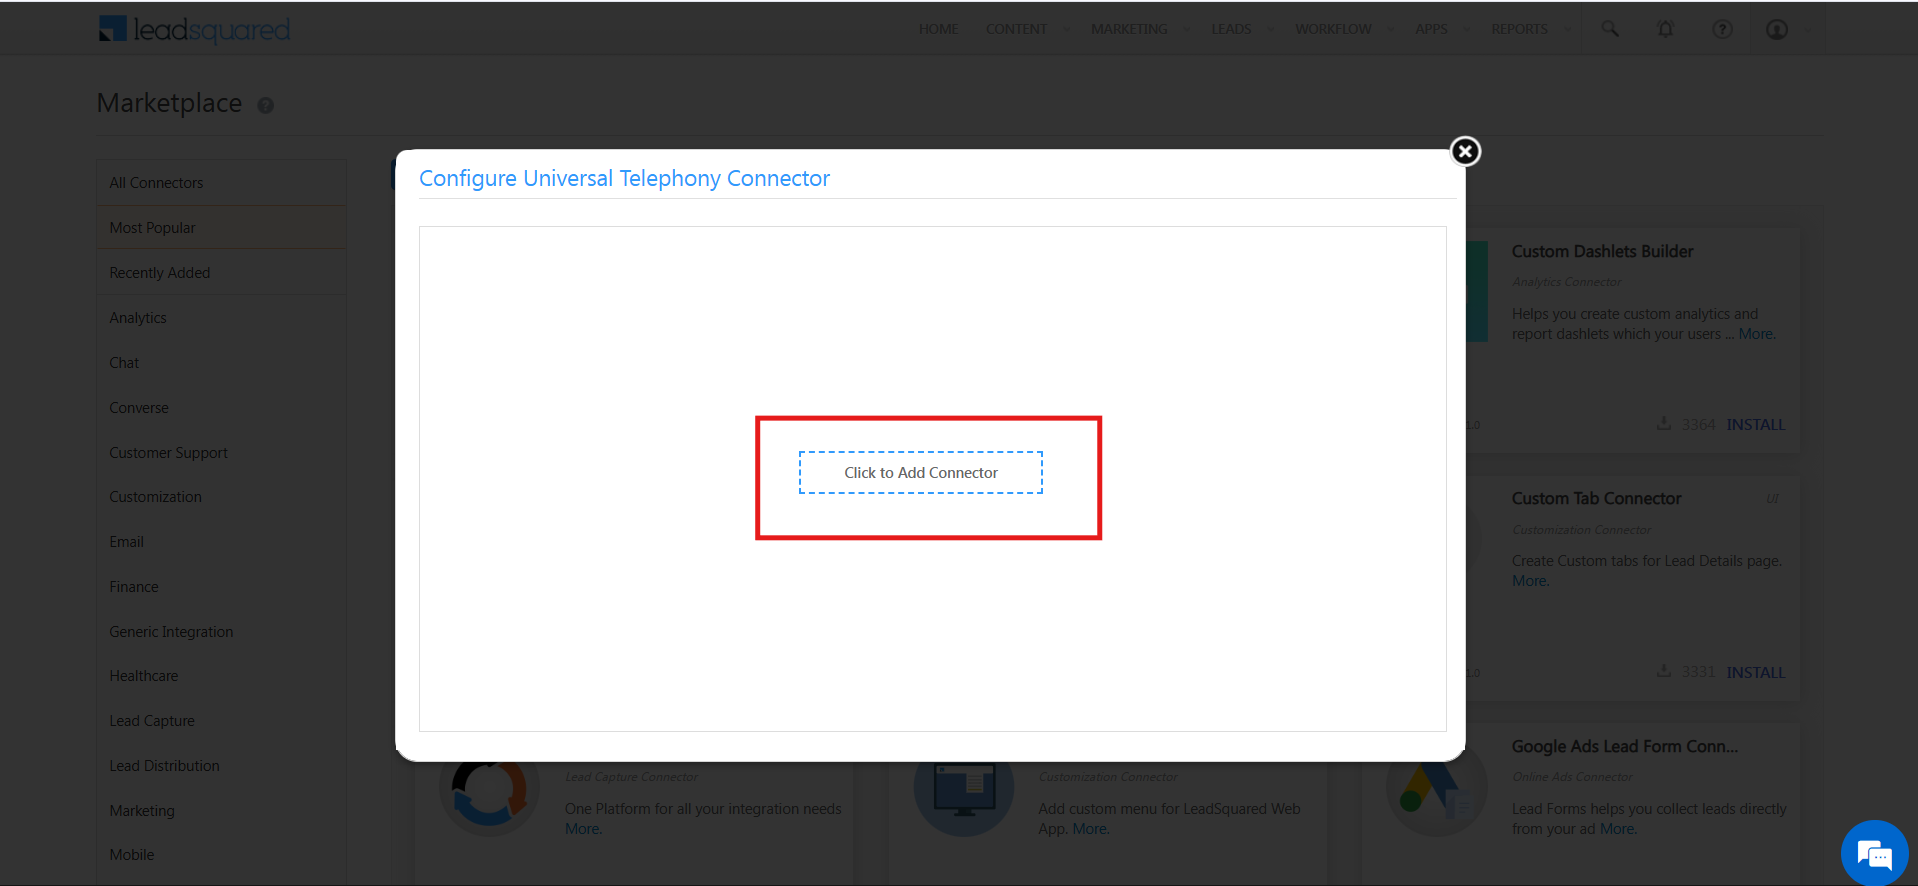
After installation, go to Settings → Configure under the Universal Telephony Connector. Clicking Configure opens the connector setup popup.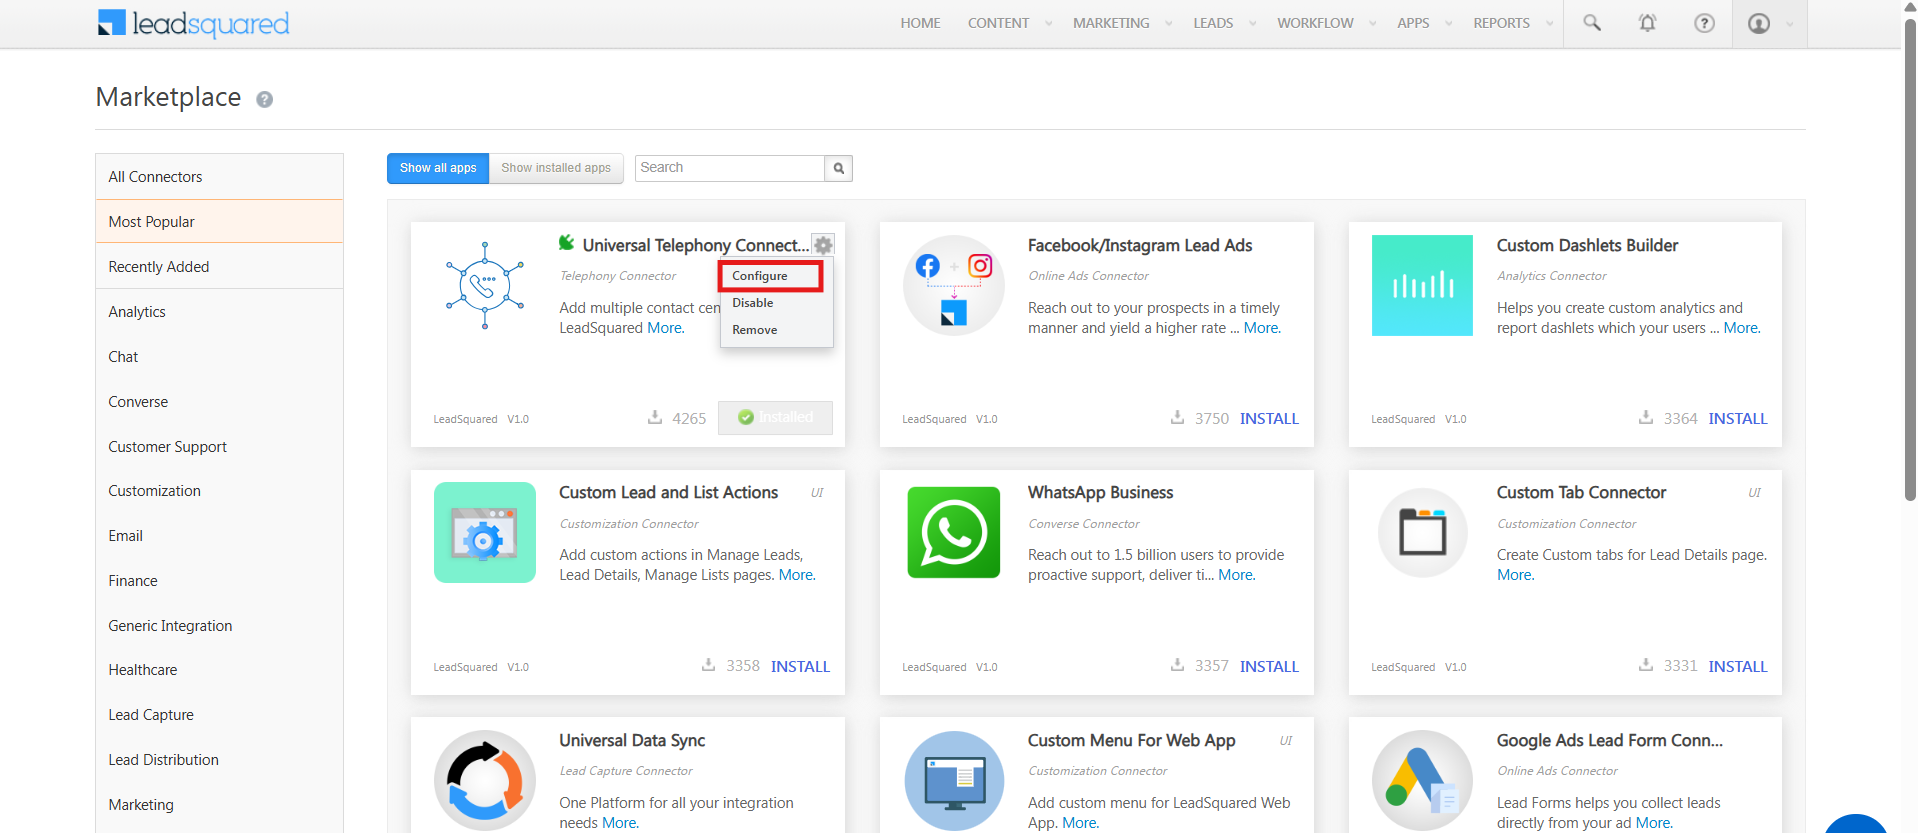
Add CallHippo as a Telephony Connector
- Click Add Connector.
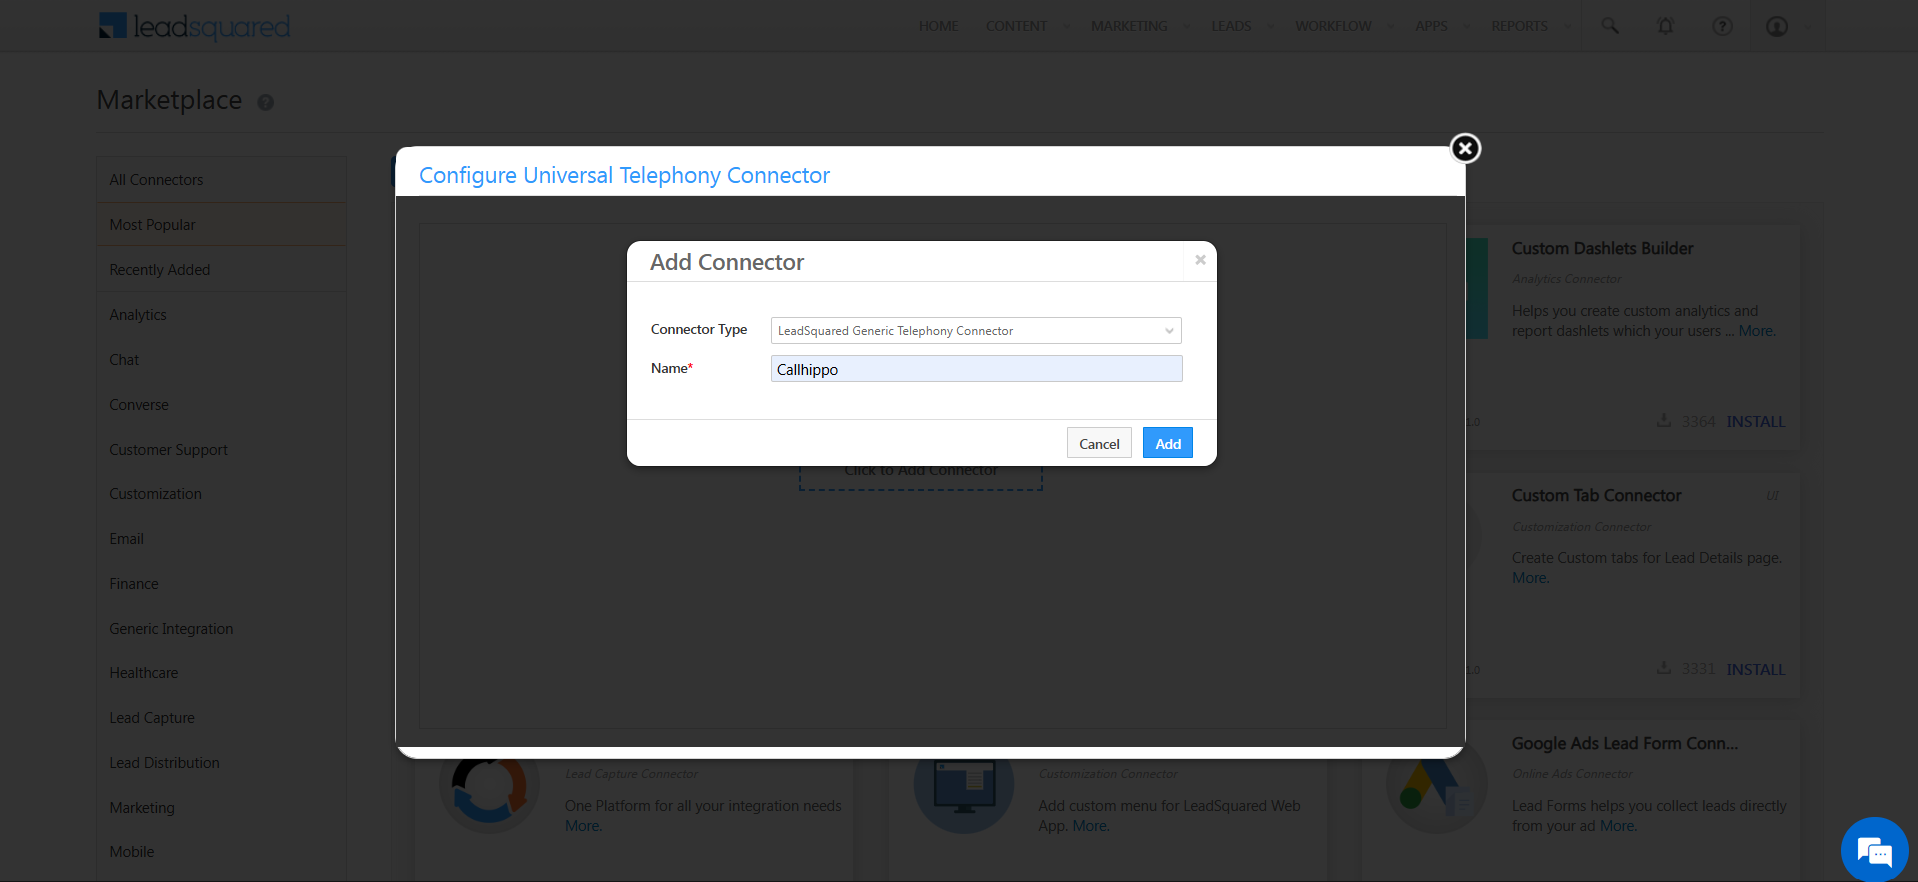
- Select LeadSquared Generic Telephony Connector from the connector type dropdown, set the connector name to CallHippo, and save.
Add CallHippo Virtual Numbers
In the connector configuration, add all your CallHippo virtual numbers in the Virtual Numbers section, using the format +<CountryCode>-<PhoneNumber>. These numbers are required for correct call routing and logging.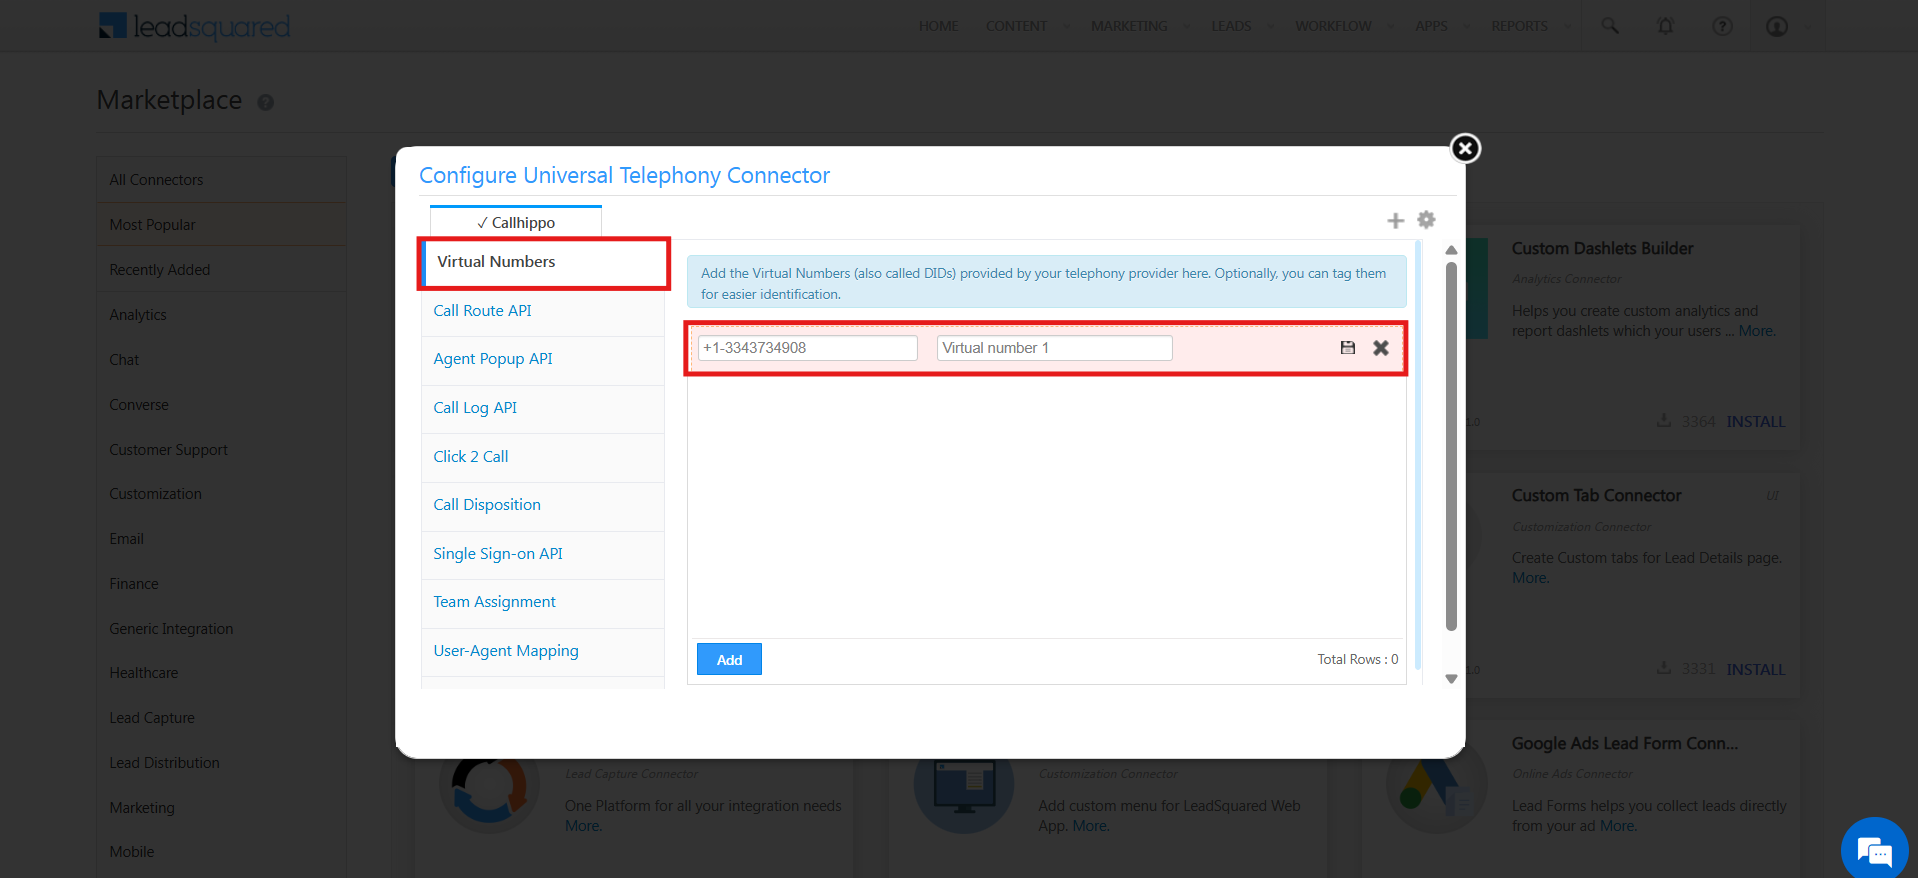
Configure Click-to-Call
Click-to-Call lets agents place outbound calls directly from LeadSquared. When an agent starts a call, CallHippo first rings the agent; once the agent answers, the call connects to the lead.
- In CallHippo, go to Integrations and open the LeadSquared integration settings. Open the Telephony tab and copy the Click-to-Call URL.
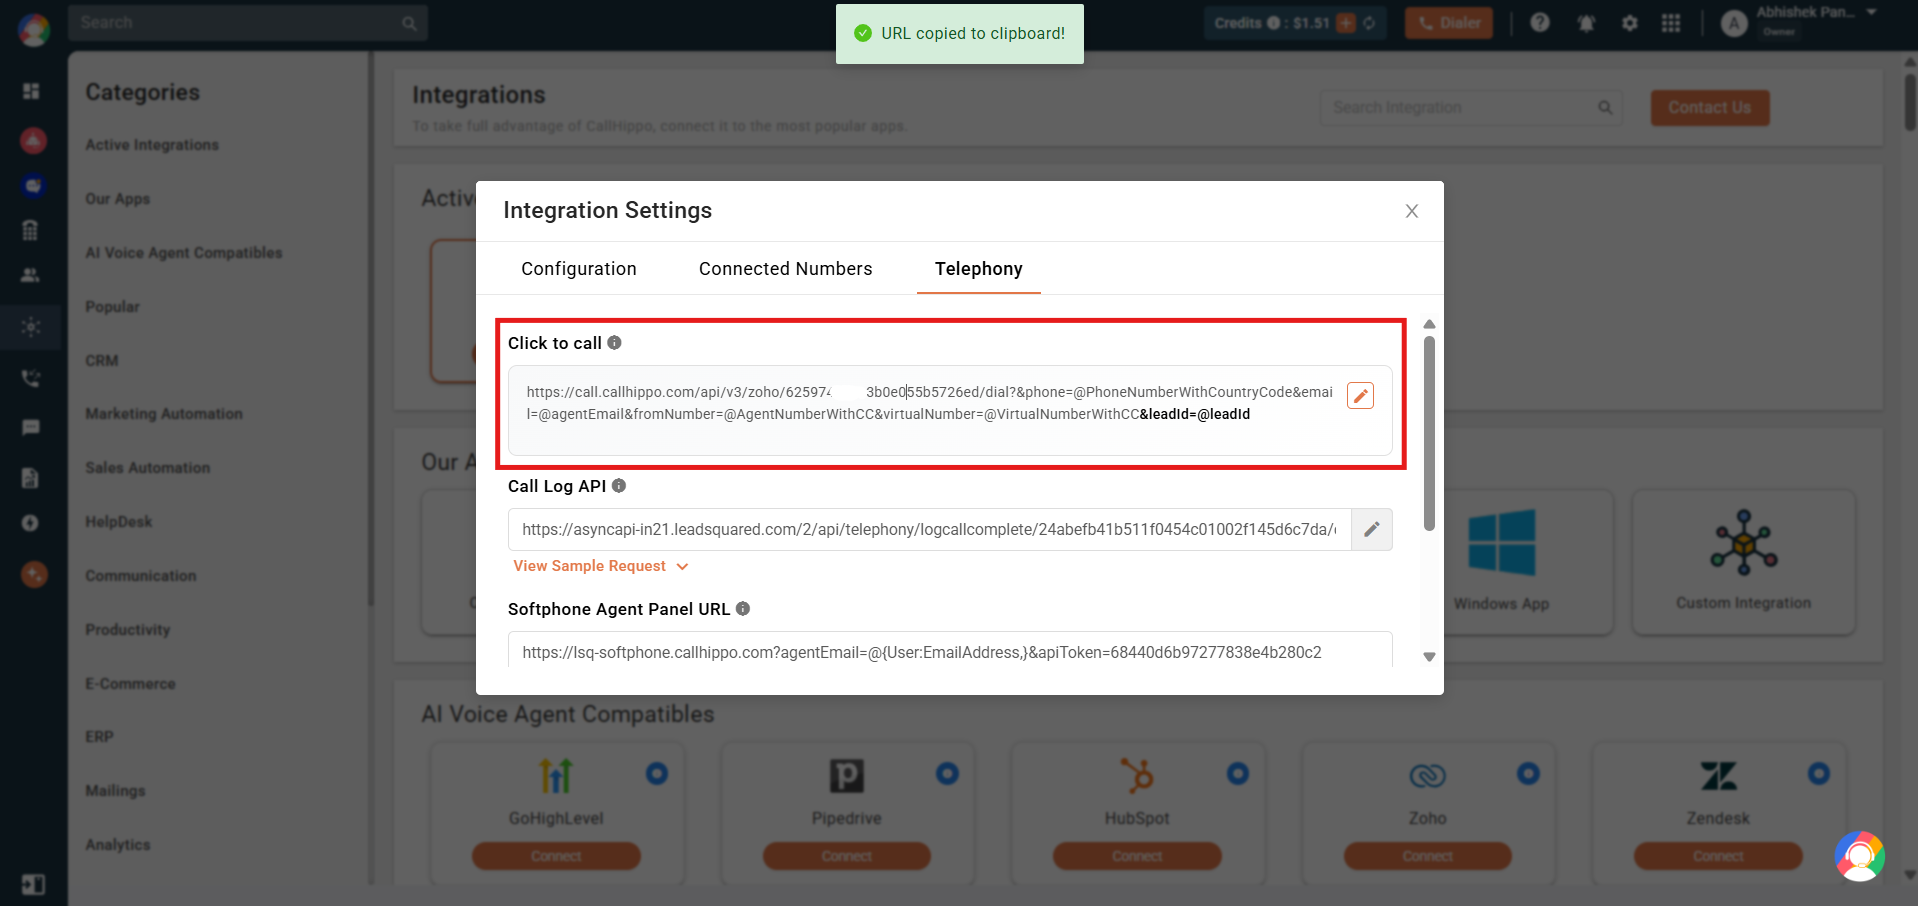
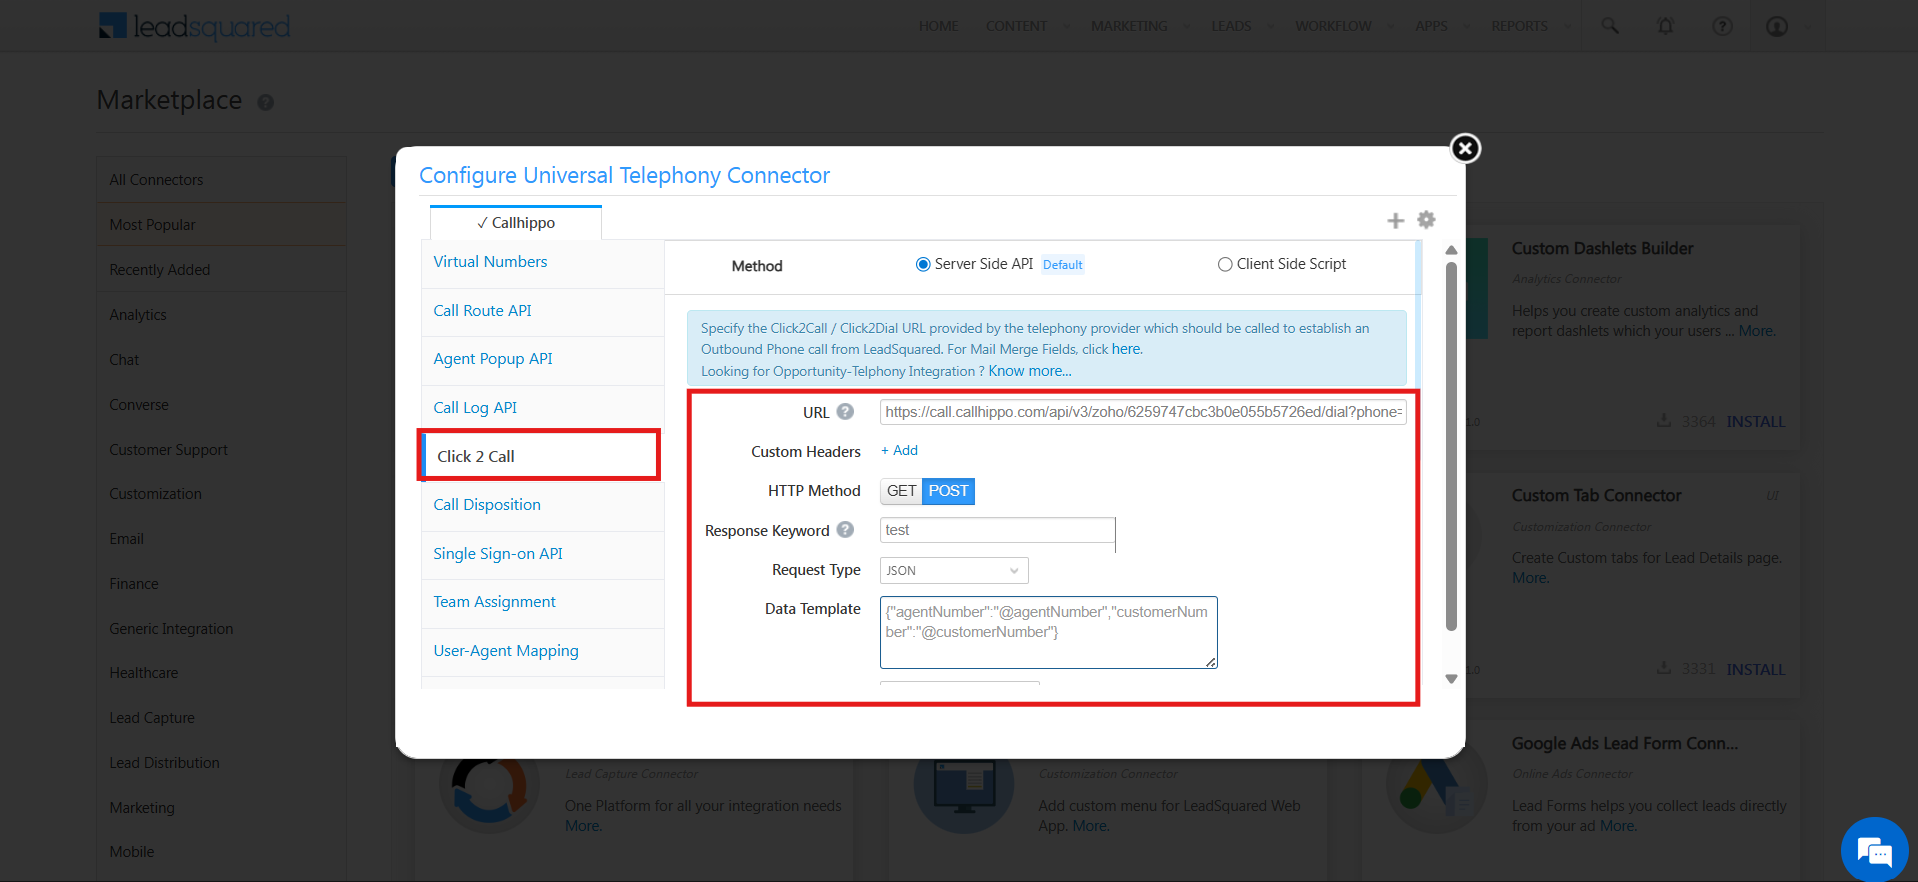
- Return to LeadSquared, open Universal Telephony Connector → Configure → Click 2 Call, paste the URL into the URL field, and set the following:
- HTTP Method: POST
- Request Type: JSON
- Response Keyword: test
- Response Type: JSON
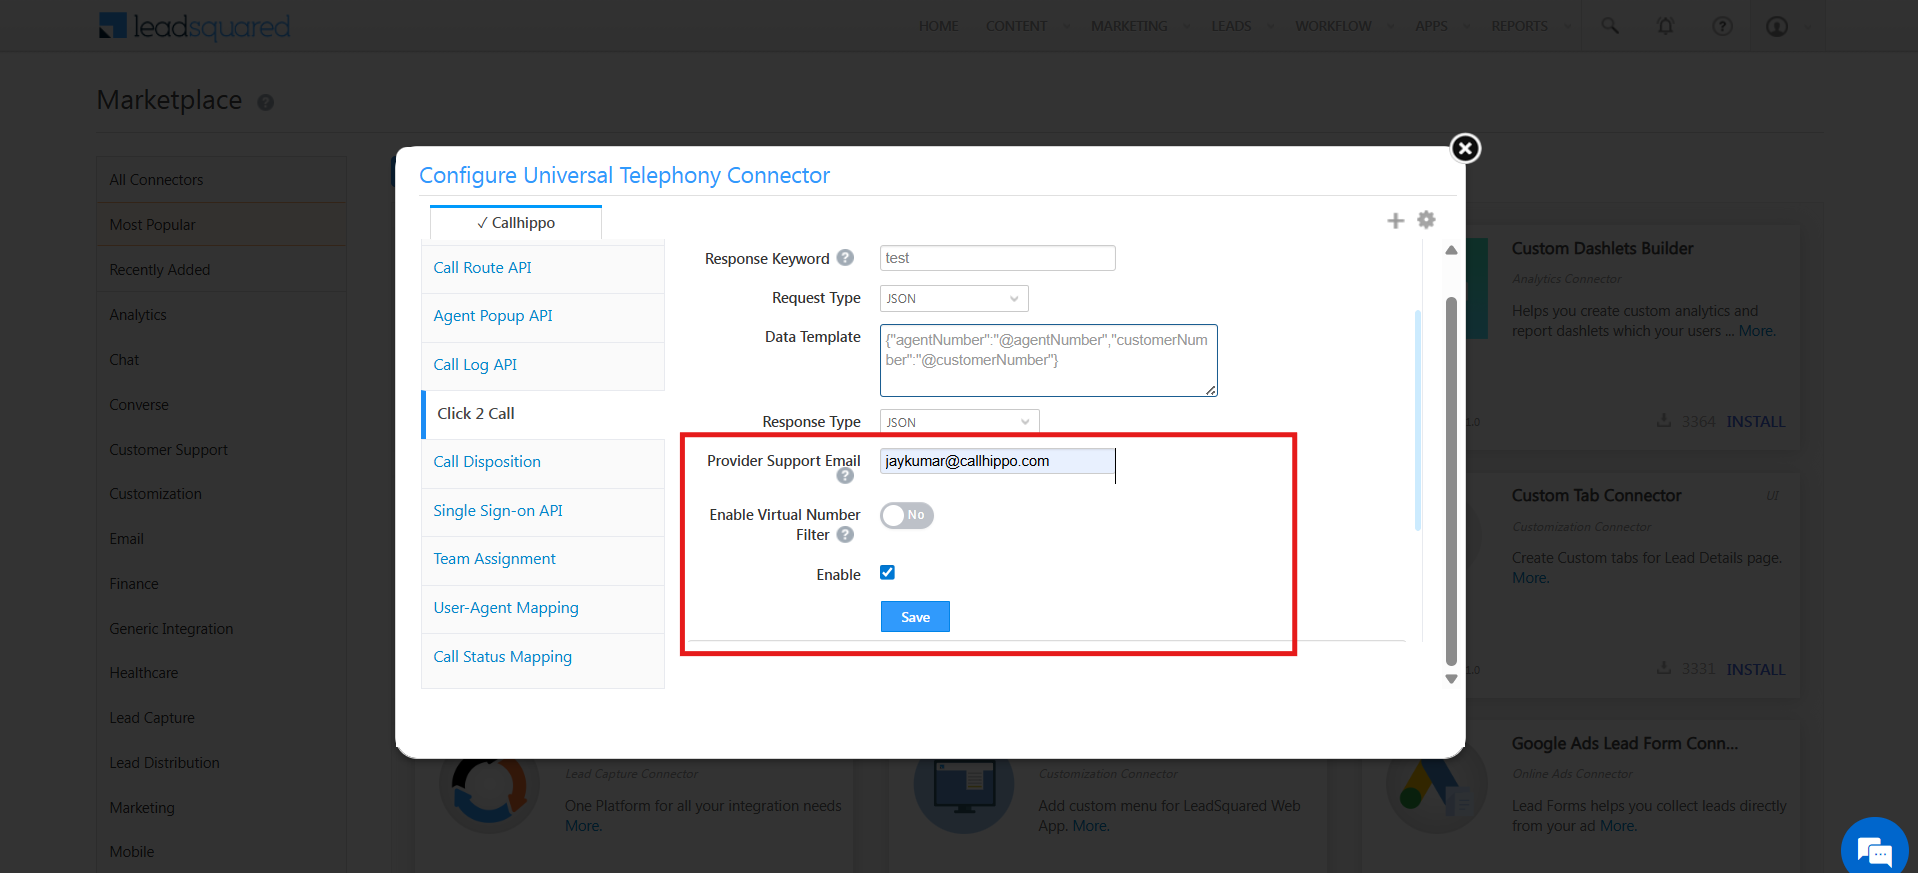
- Enter your email ID in the Provider Support Email field, turn on Enable, and click Save. Click-to-Call is now enabled.
Passing Custom Parameters in Click-to-Call
CallHippo supports passing custom parameters through the Click-to-Call URL. Append your parameters to the URL in CallHippo before pasting it into LeadSquared.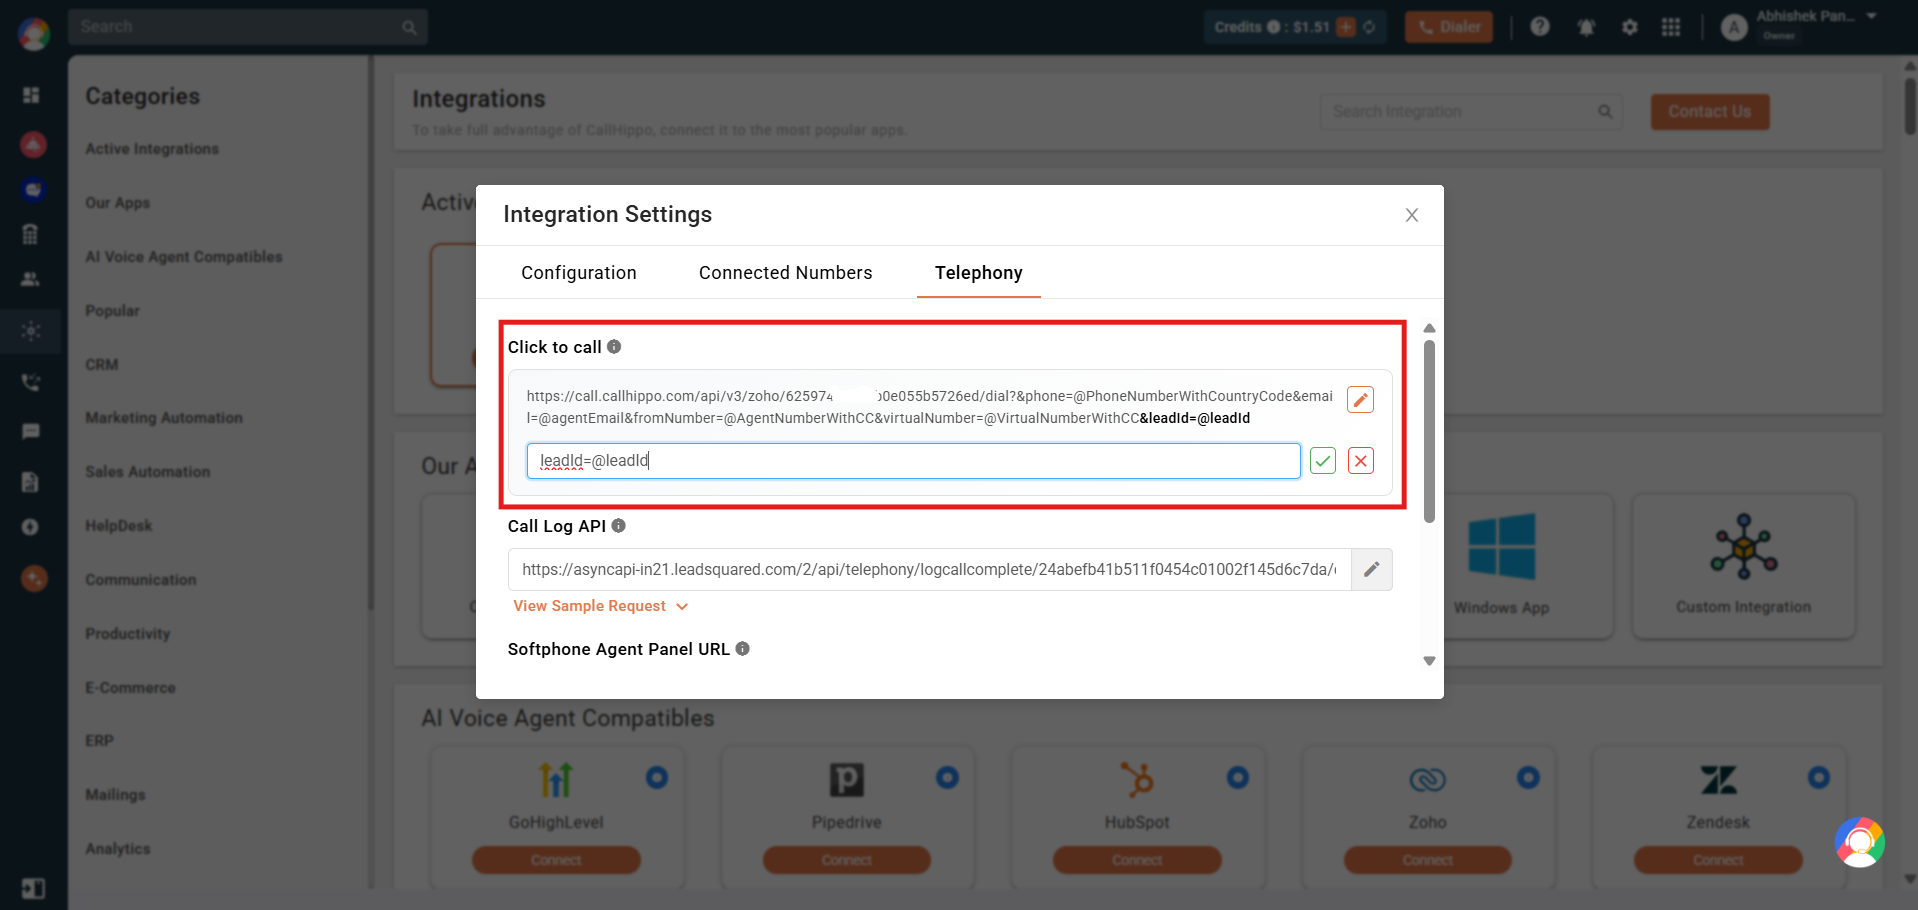
These parameters travel with the call request and become available in:
- The call log activity created in LeadSquared
- The Agent Popup shown to the agent during the call
This is useful for sending extra context such as campaign name, source, workflow identifier, or any custom reference your business process requires.
Configure the Call Log API
To log call activity from CallHippo into LeadSquared, copy the Call Log API from the Universal Telephony Connector and paste it into the CallHippo LeadSquared integration settings.
- Go to Universal Telephony Connector → Call Log API, copy the Call Log API URL, and paste it into the Call Log API field in the CallHippo integration settings.
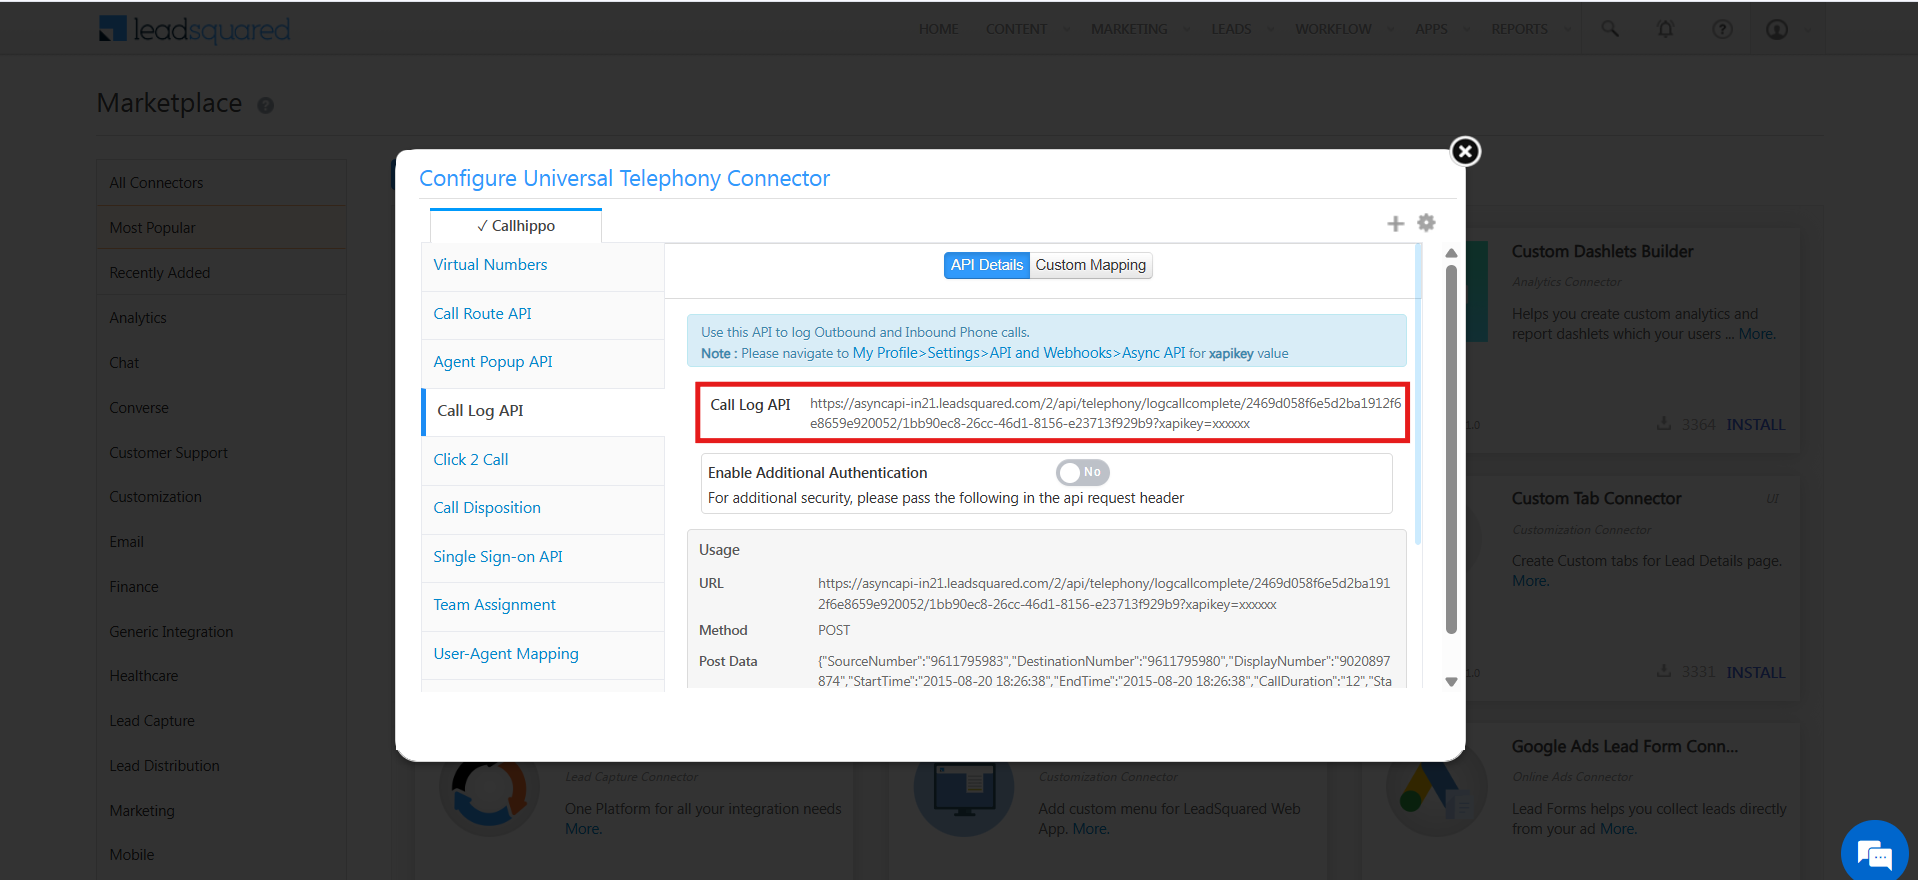
The LeadSquared-generated Call Log API looks similar to this:
https://asyncapi-in21.leadsquared.com/2/api/telephony/logcallcomplete/2469d058f6e5d2ba1912f6e8659e920052/1bb90ec8-26cc-46d1-8156-e23713f929b9?xapikey=xxxxxx
You need to replace the xapikey value with your actual API key generated by LeadSquared. To find it, go to My Profile → Settings → API and Webhooks → Async API.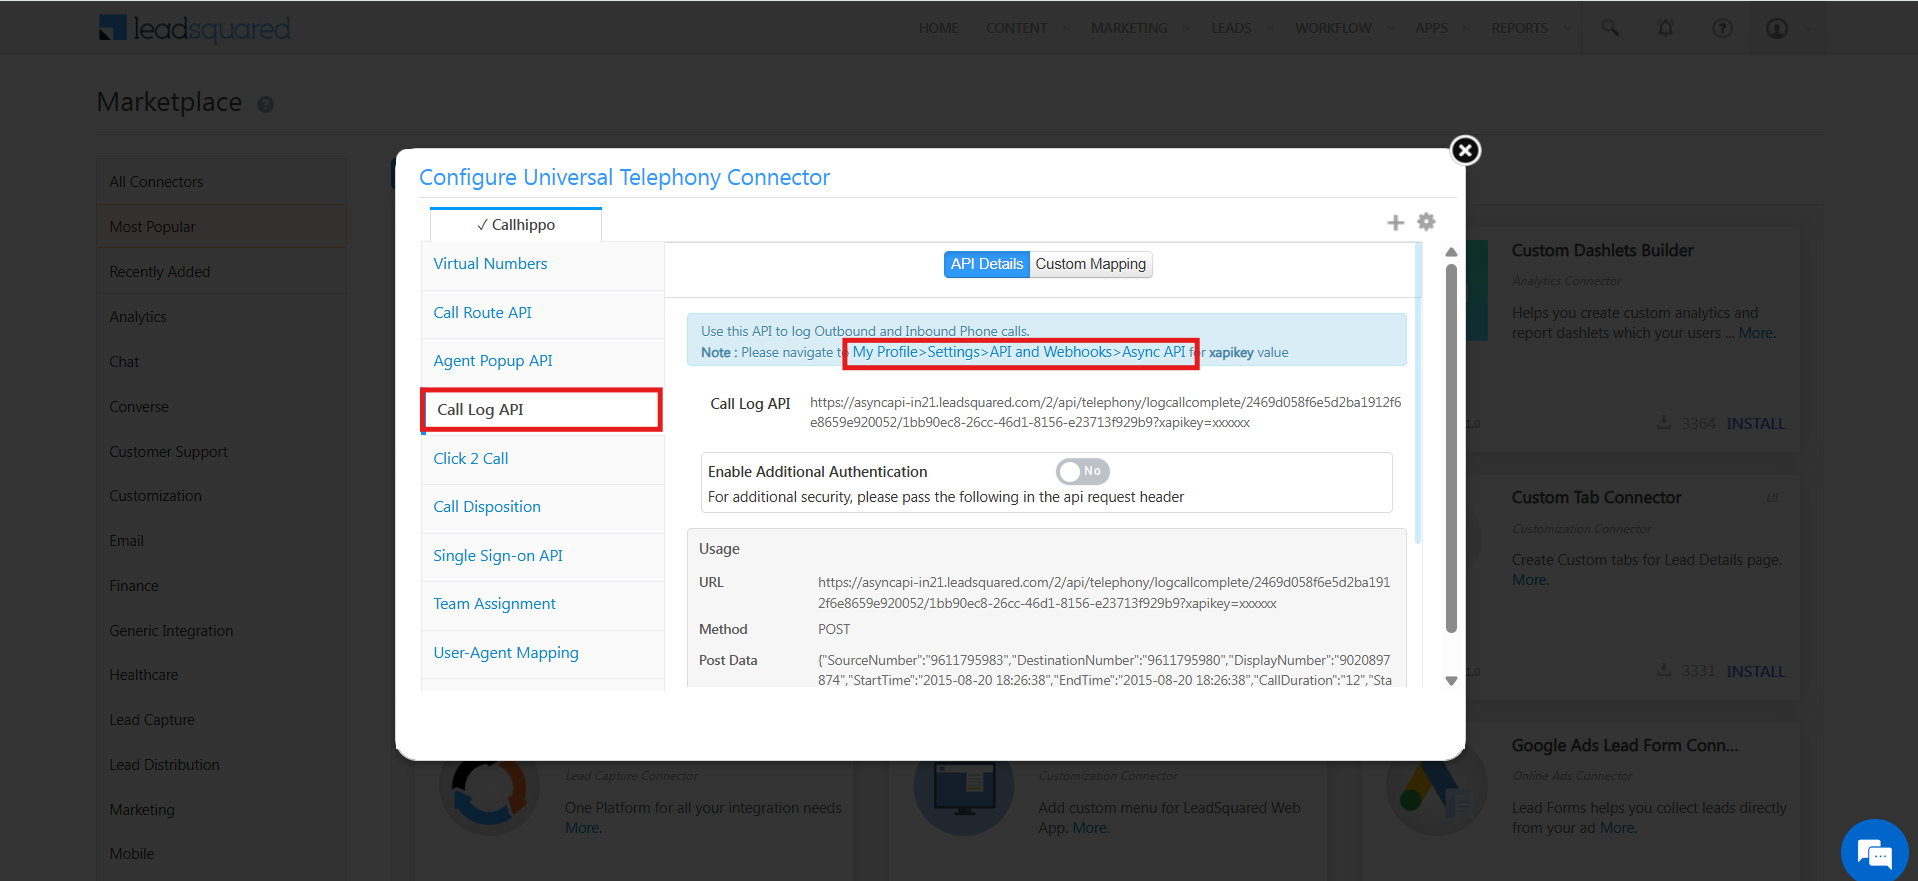
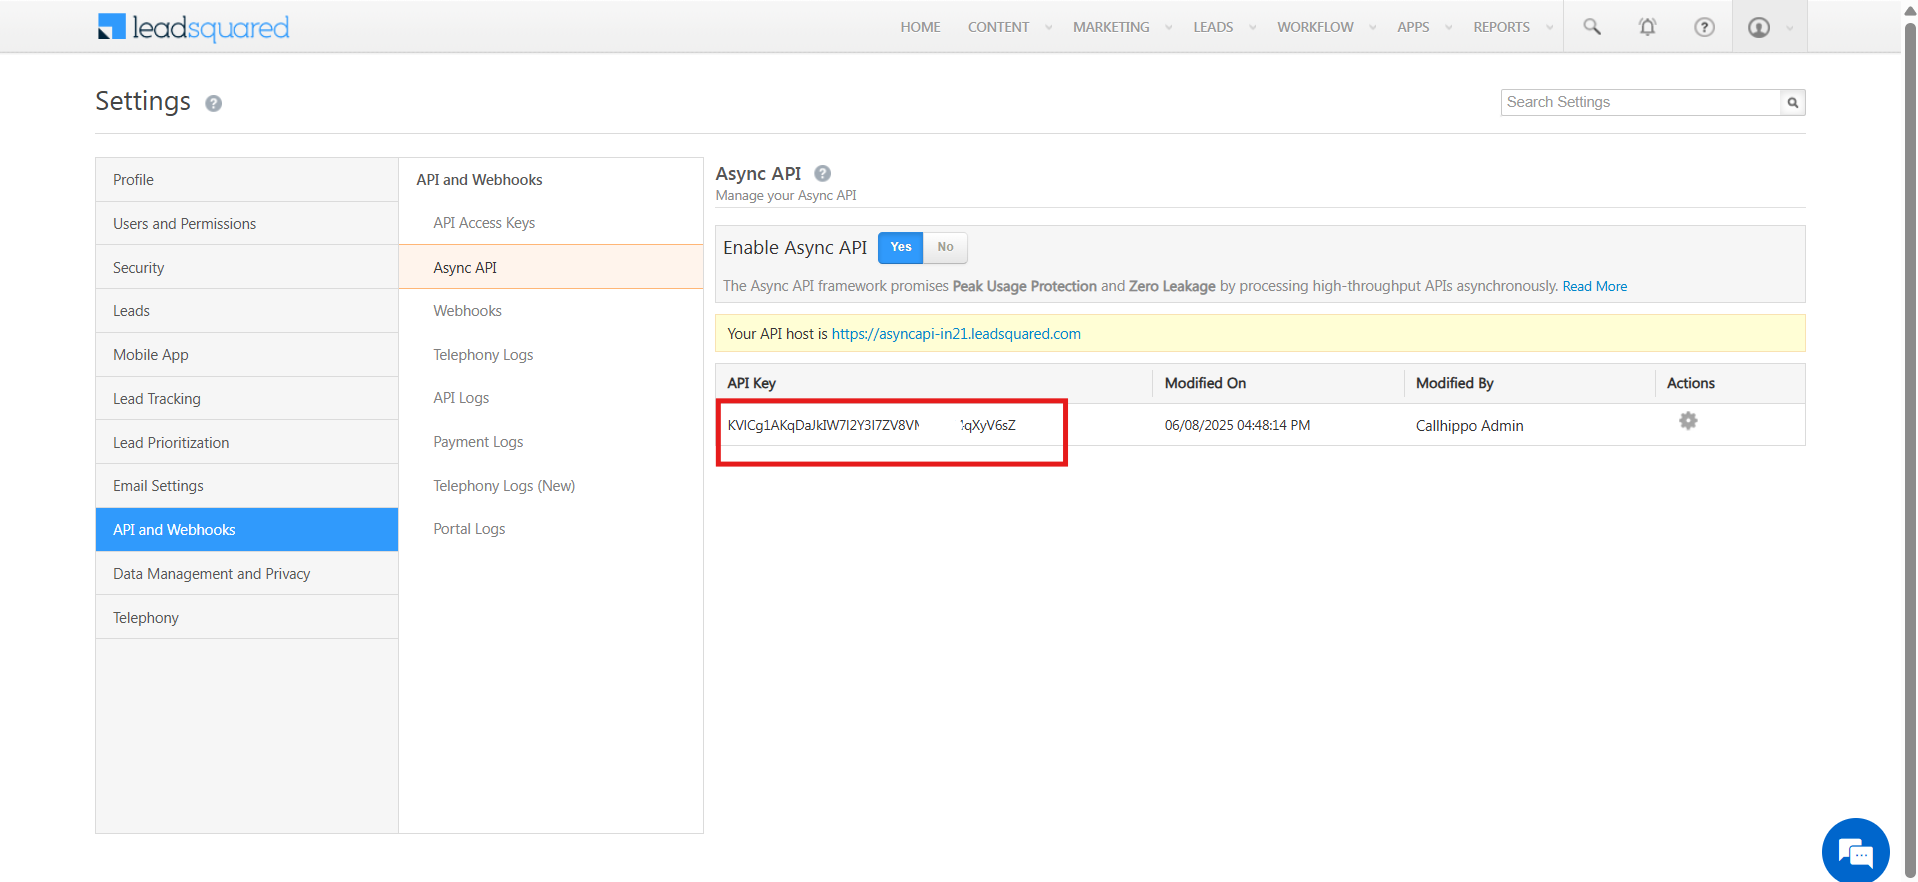
- On the Async API screen, Enable Async API, copy the Async API key, and replace
xxxxxxin the Call Log API URL with this key in CallHippo. Save the configuration again.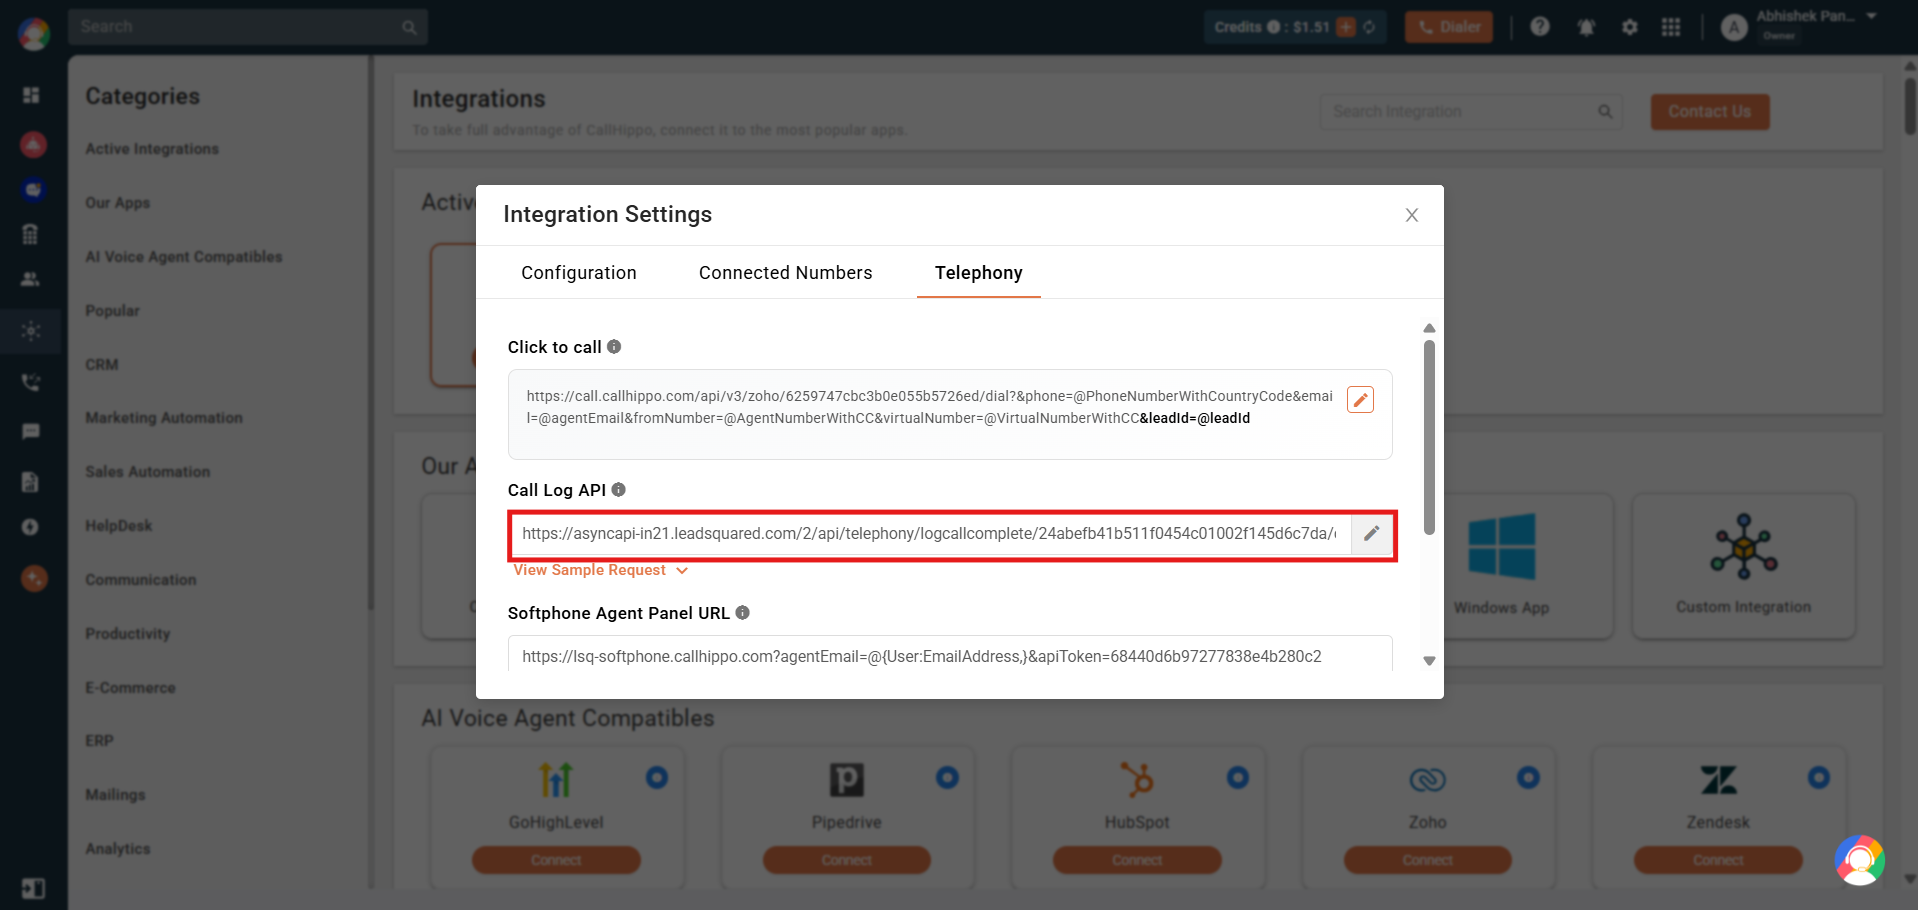
Configure the Agent Popup
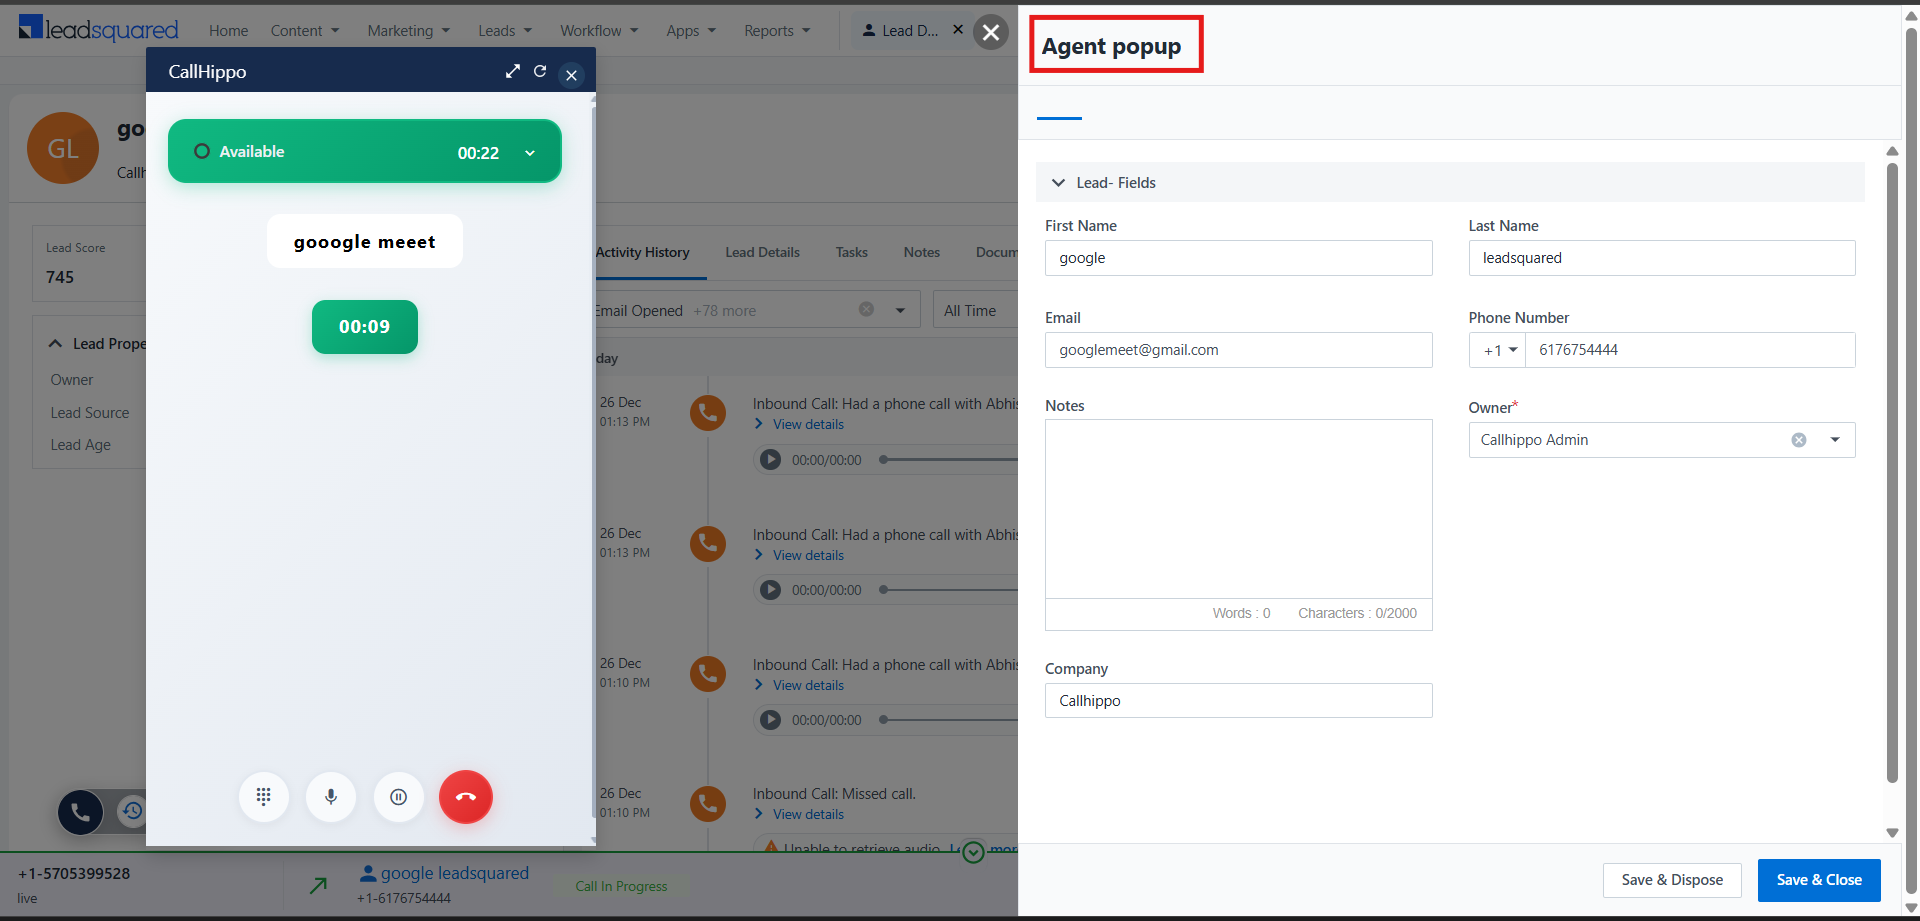
The Agent Popup lets agents view and update lead details during incoming and outgoing calls.
LeadSquared side
Go to Universal Telephony Connector → Agent Popup API. Copy the Agent Popup API URL, turn on Enable, and click Save.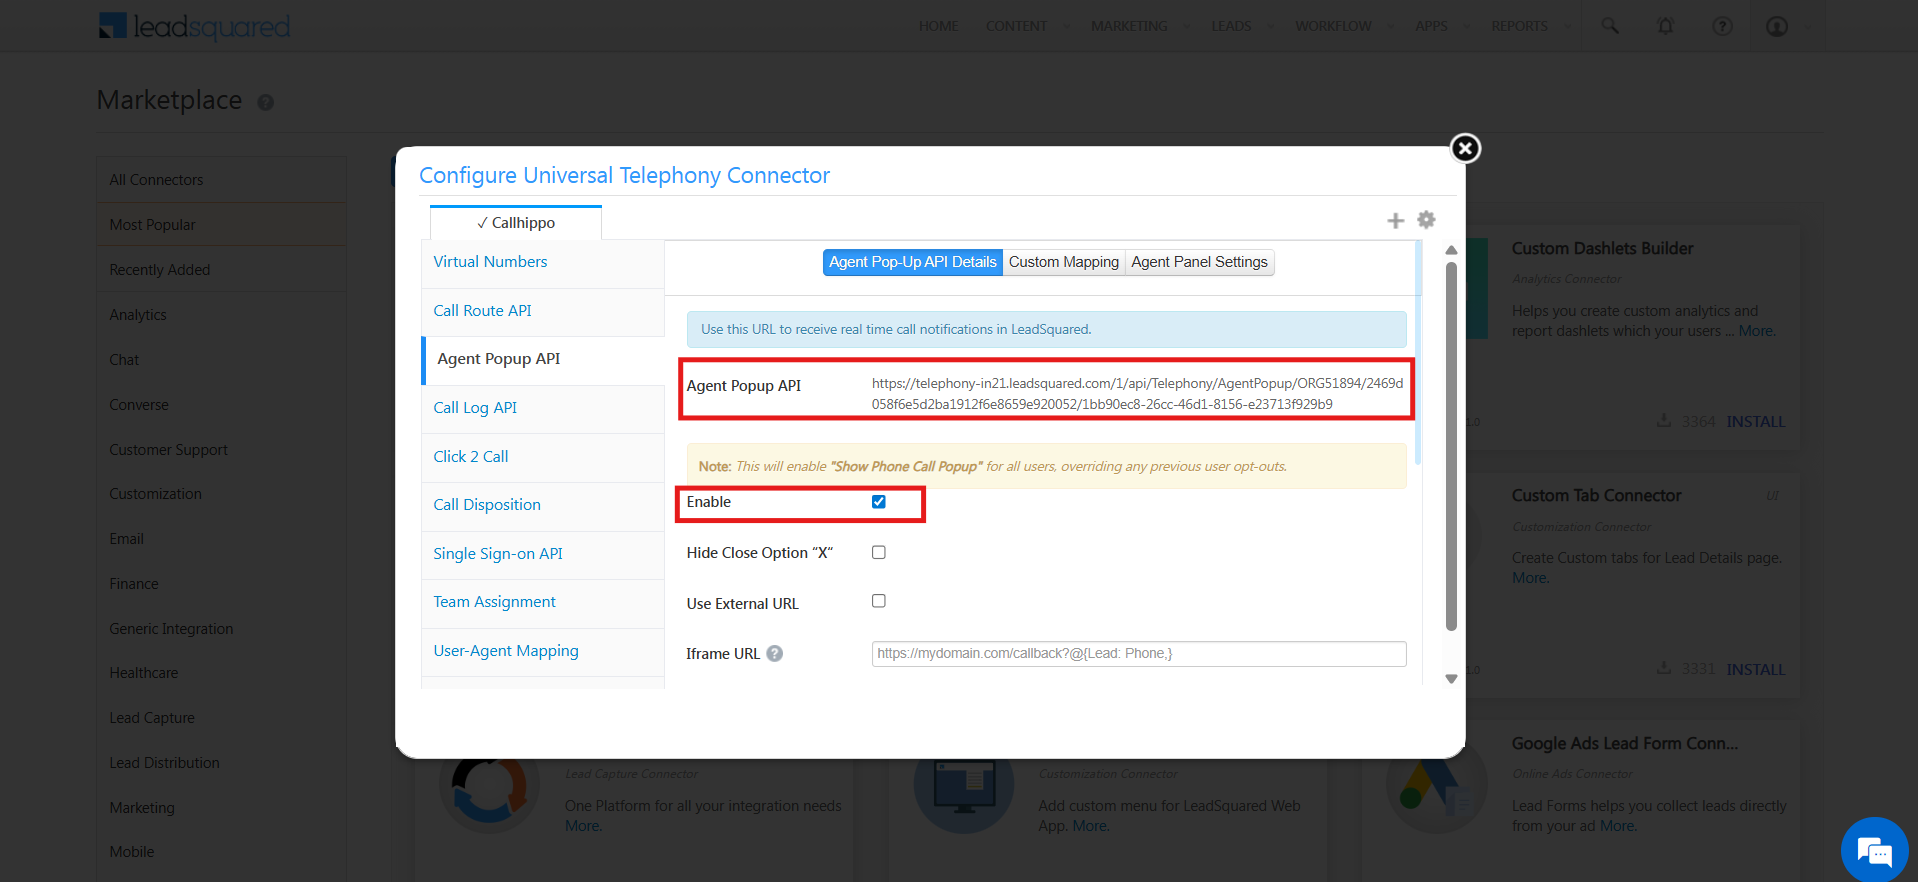
CallHippo side
Go back to CallHippo Integrations and open the LeadSquared integration settings. In the Agent Pop-up section, click Edit, paste the copied Agent Popup API URL, and click Save.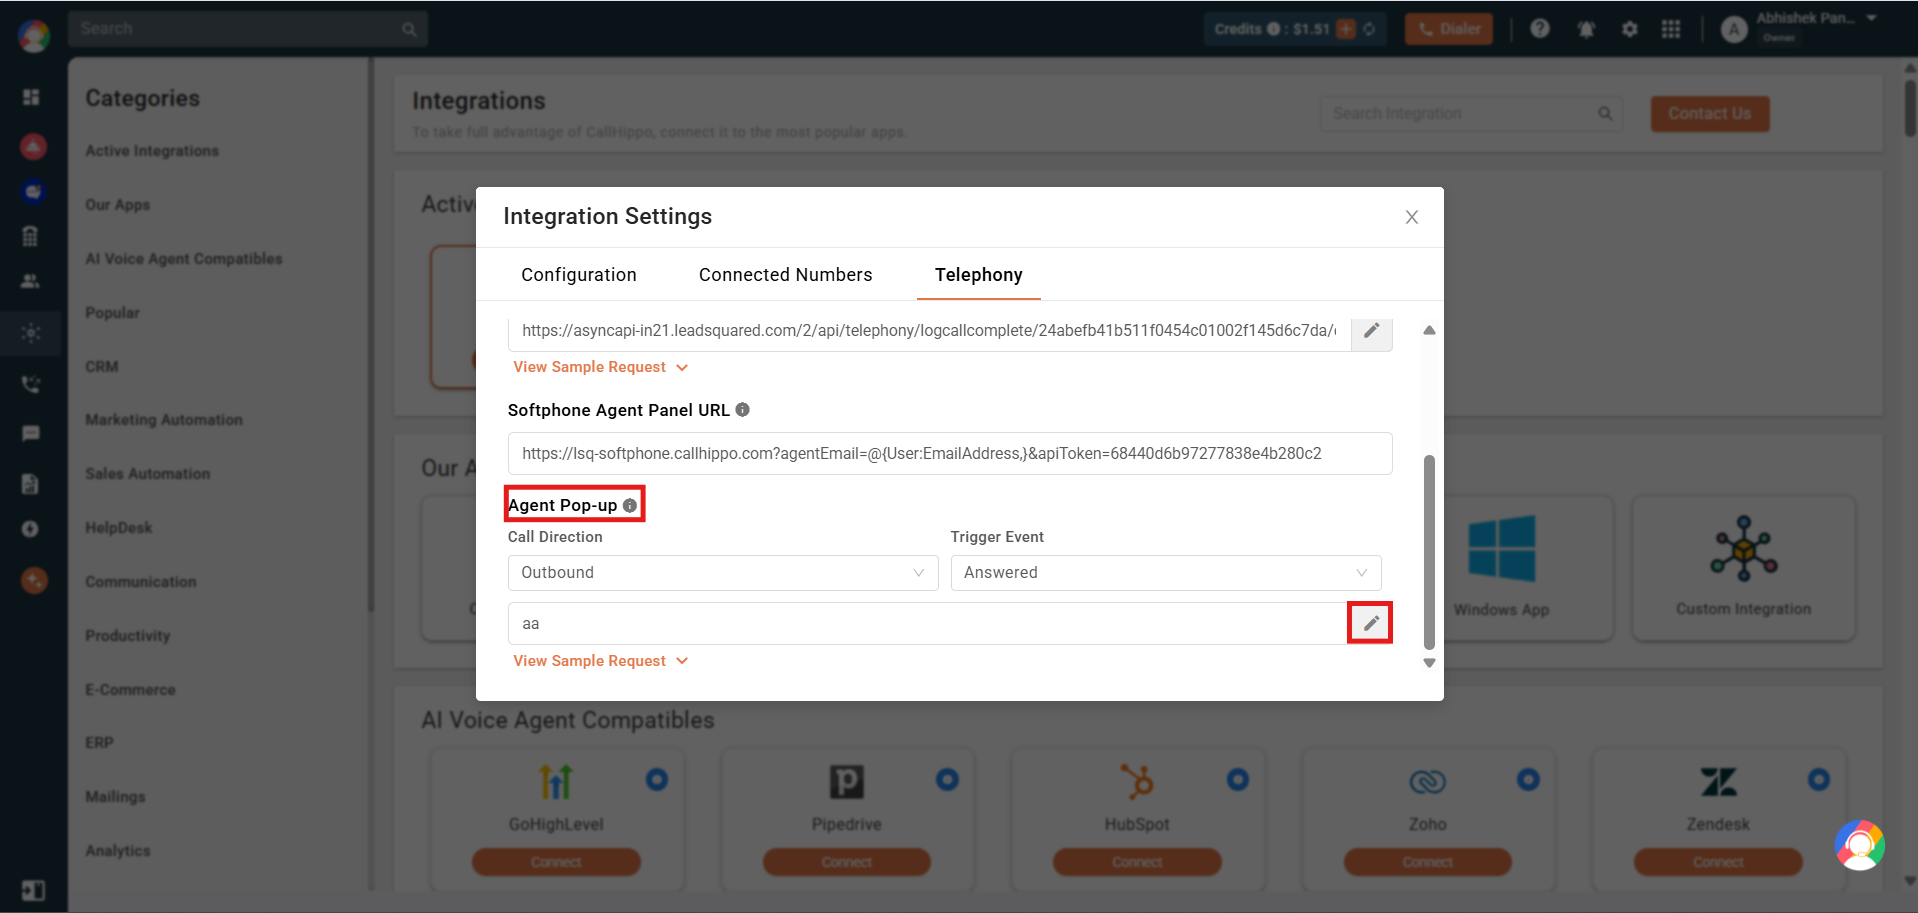
Additional Authentication header
On the LeadSquared side, in the Universal Telephony Connector, enable the Additional Authentication toggle and copy the header value.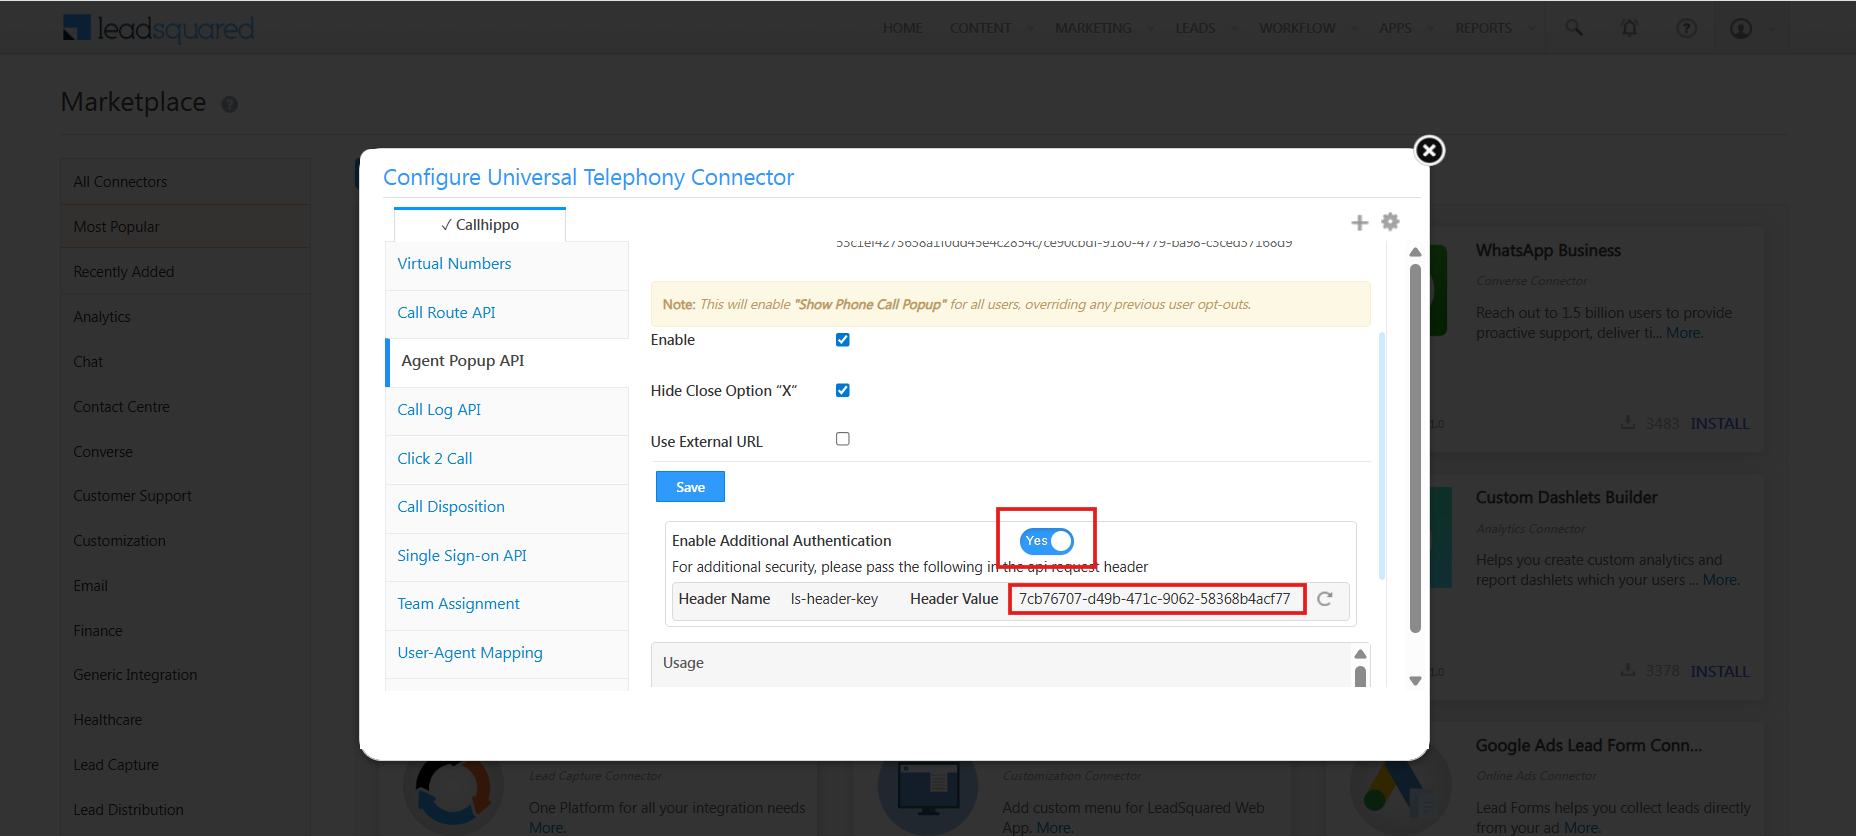
Then, in CallHippo, open the LeadSquared integration settings. On the Telephony tab, click the edit icon for Enter the header key of agent popup and paste the header value copied from the connector. The Agent Popup is now enabled.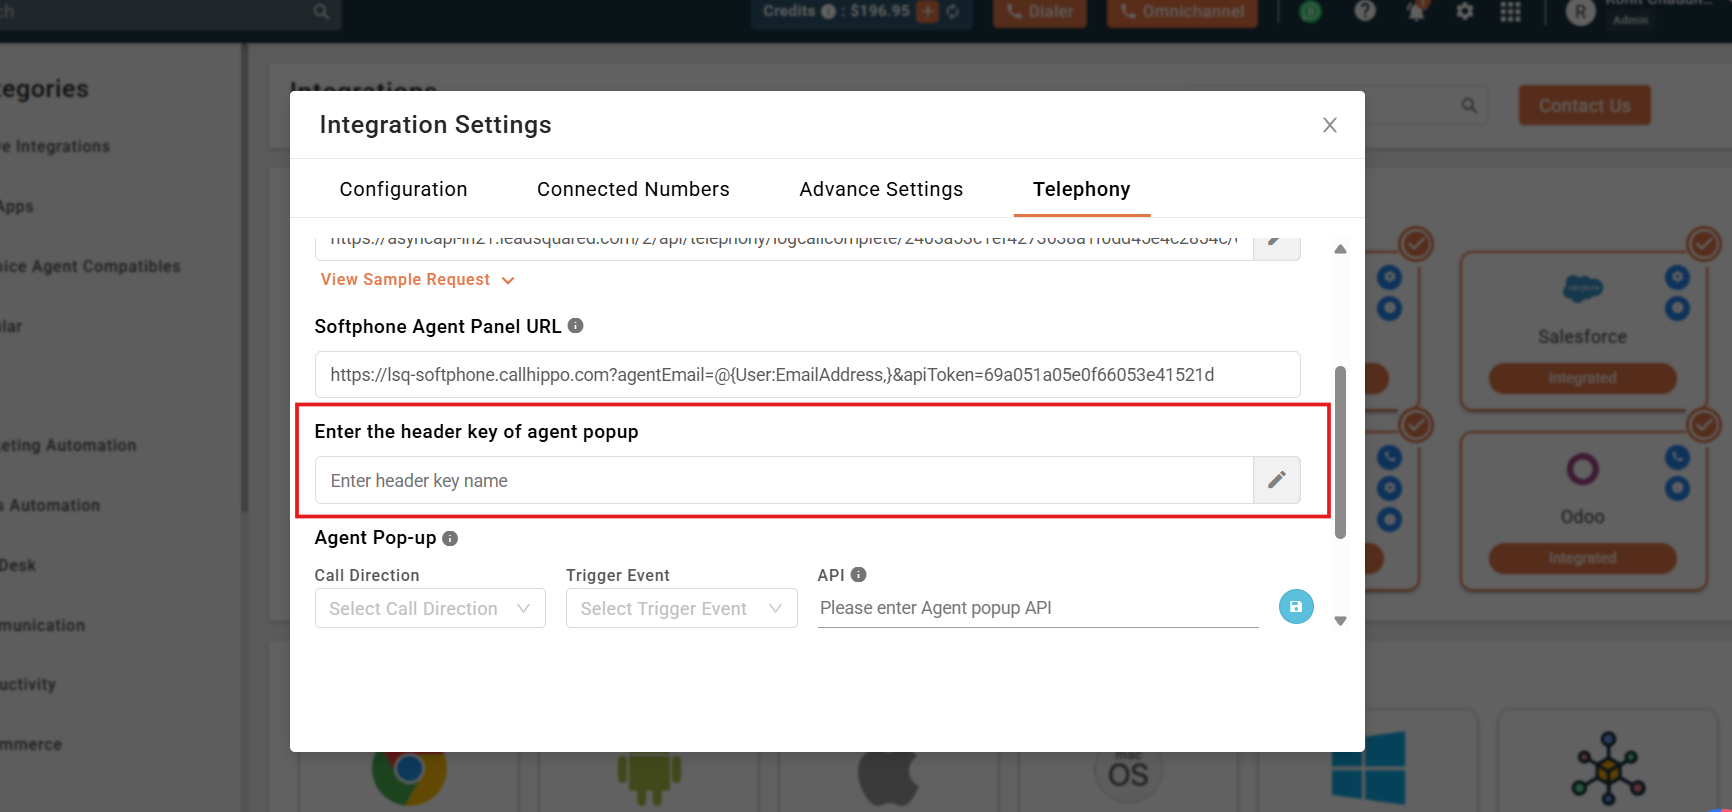
Direction-Specific and Event-Based Agent Popup Triggers
CallHippo lets you customize when the Agent Popup appears, based on call direction and call event. This is available under CallHippo → Integrations → LeadSquared → Telephony tab.
- Call direction: incoming calls, outgoing calls, or both
- Call event: ringing, answered, or hangup
This flexibility lets you fine-tune popup behavior to your workflow. For example, show the popup only when an incoming call is answered, or suppress popups for outgoing calls until the call connects.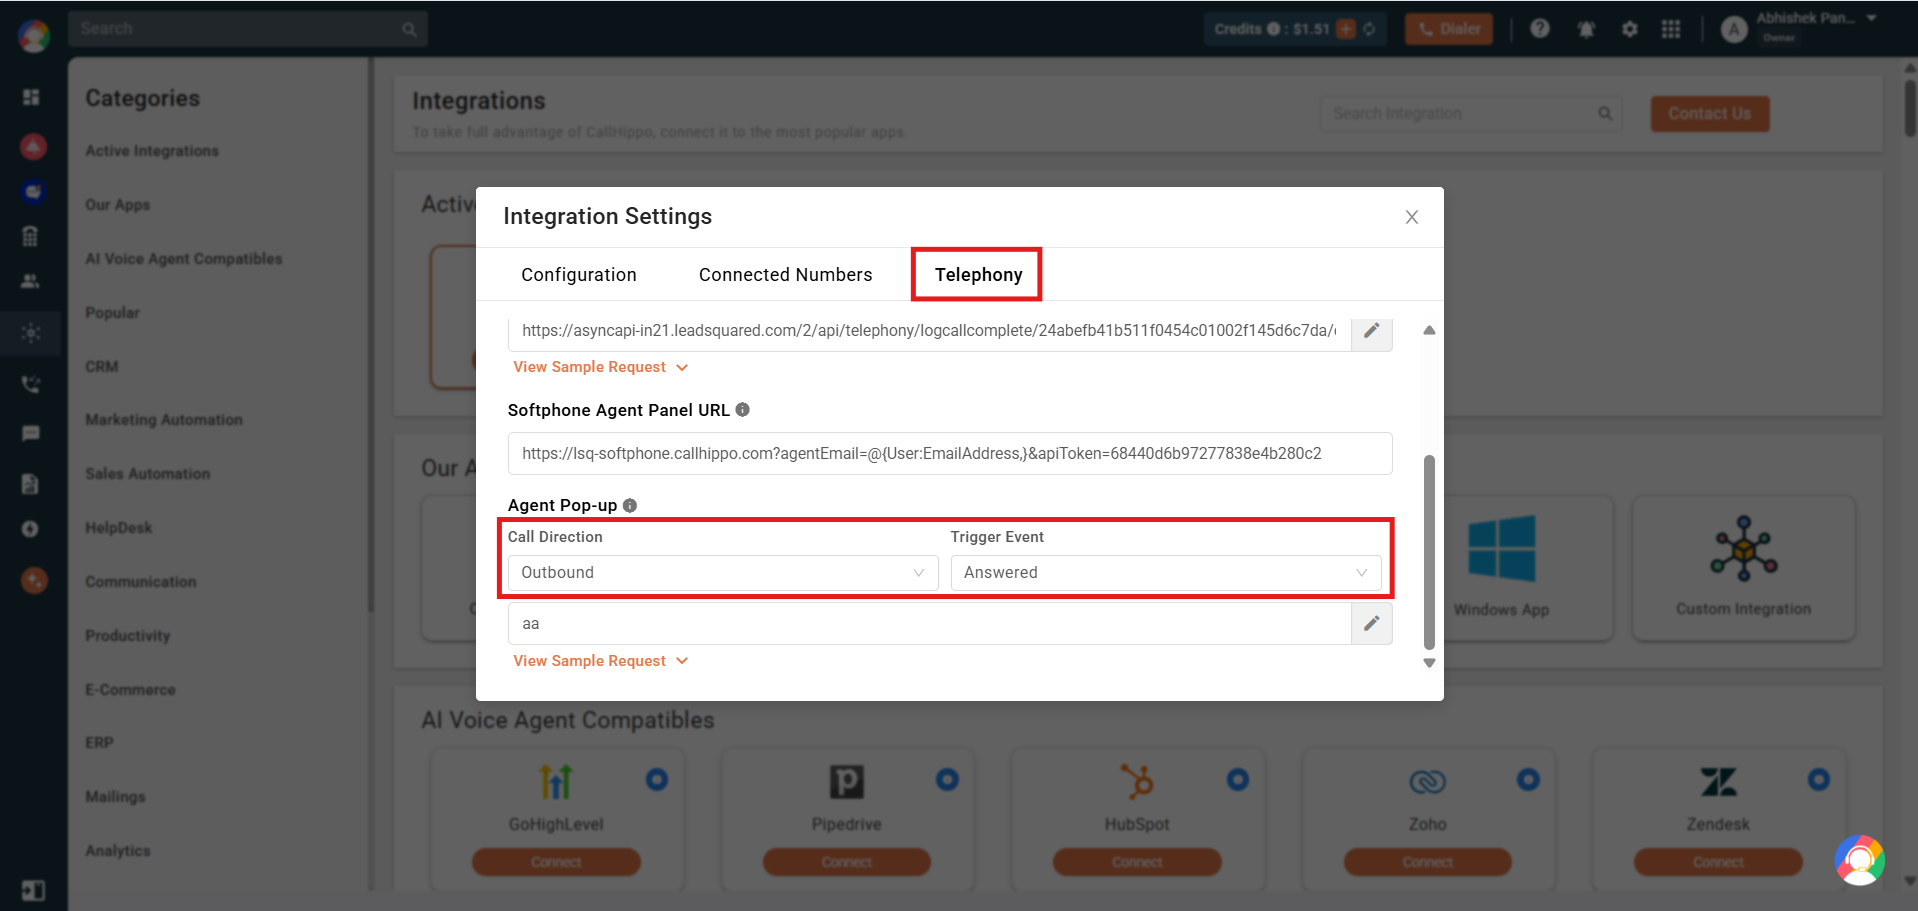
Enable the CallHippo Dialer Inside LeadSquared
- First, enable Softphone from your LeadSquared profile settings (turn on Is Softphone Enabled).
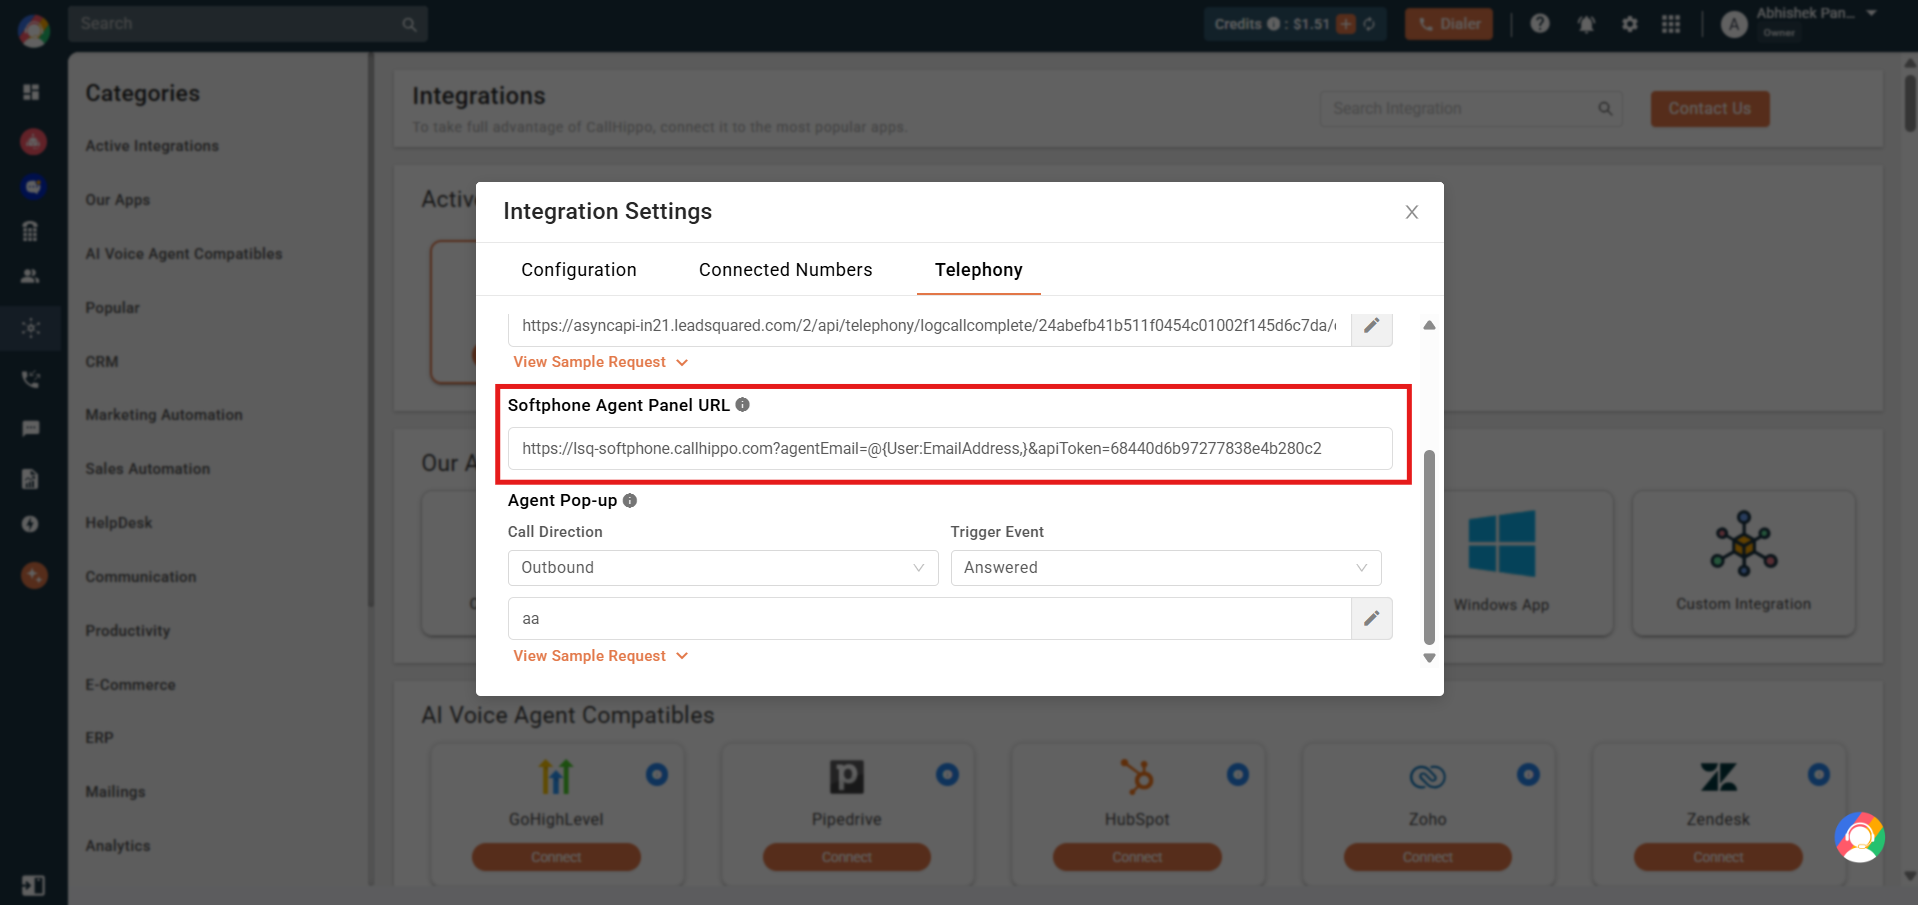
- Go to Universal Telephony Connector → Agent Popup API → Agent Panel Settings and set the Panel URL. Get this link from the CallHippo LeadSquared integration settings (the Softphone Agent Panel URL).
- Configure the remaining panel fields:
- Panel Permissions:
allow=geolocation;microphone;camera - Panel Title: CallHippo
- Panel Height: 670
- Panel Width: 400
- Enable Agent Panel
- Enable Show on Top
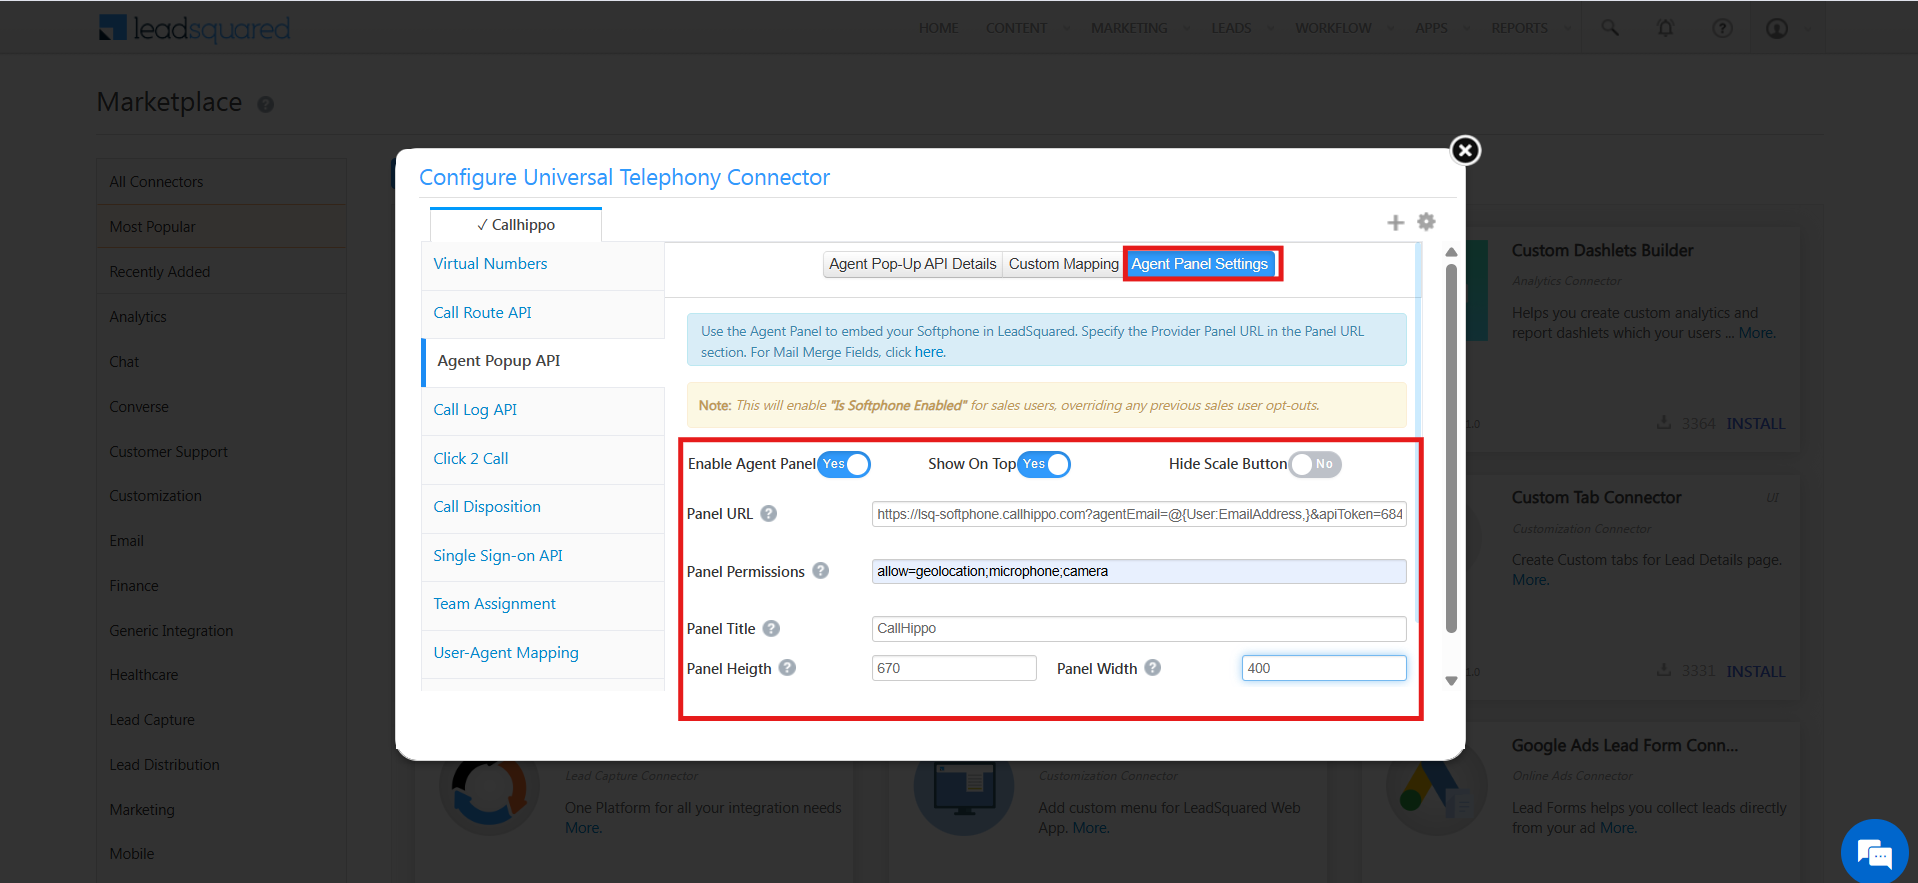
- Panel Permissions:
- Save the configuration. The CallHippo dialer now appears inside LeadSquared and can be expanded to make or receive calls.
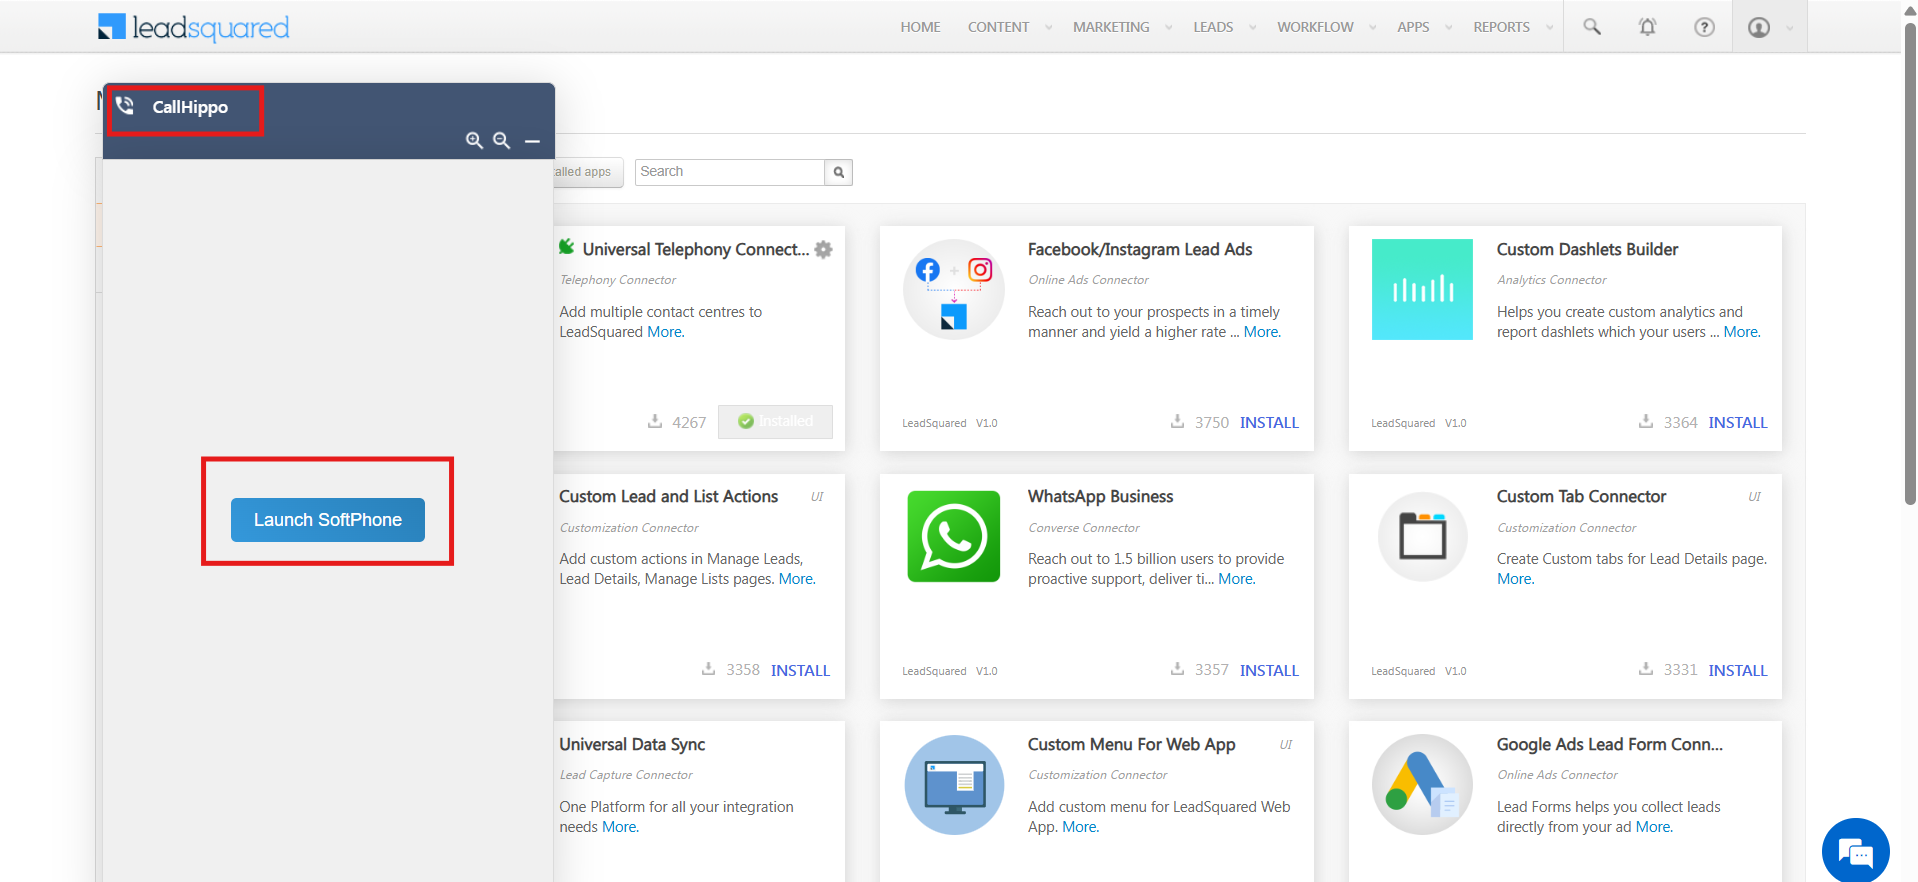
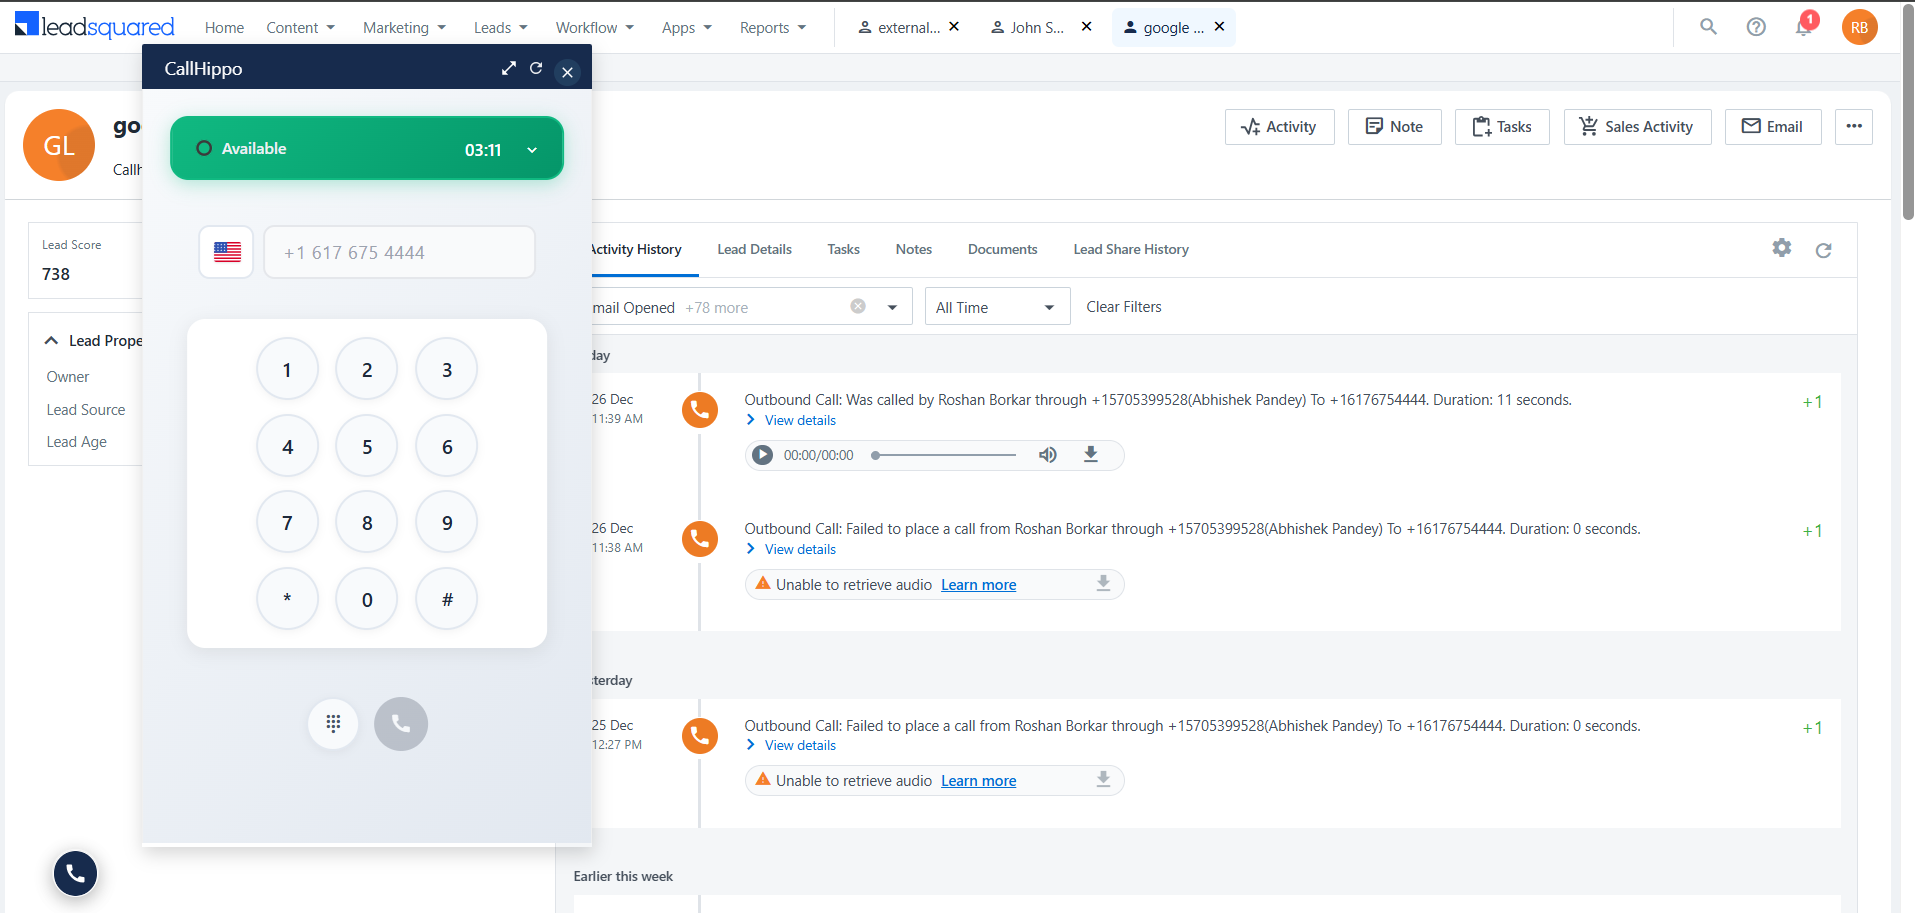
Note: If the softphone fails to populate initially, refresh the external window once and the dialer will populate correctly.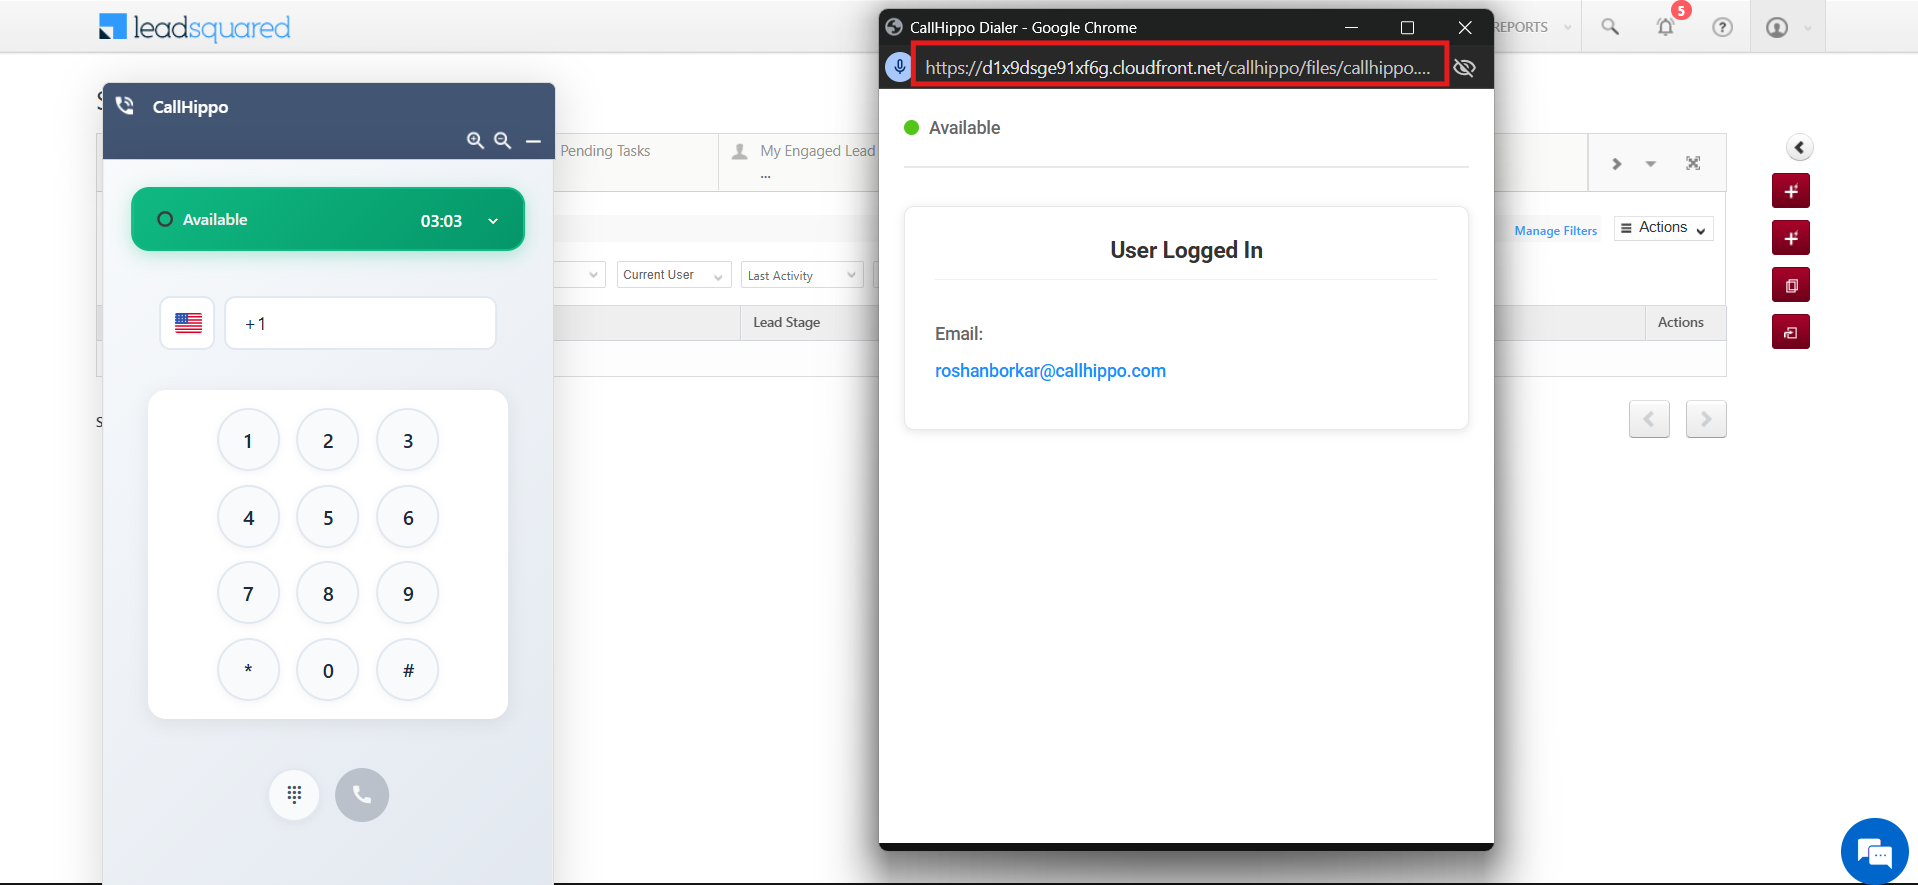
Enhanced Telephony Behavior Inside LeadSquared
With the embedded CallHippo dialer enabled, you get:
- The dialer automatically pops up on incoming calls, with no manual interaction needed.
- Active calls stay connected even if the LeadSquared page is refreshed.
- Agents continue calls seamlessly, without call drops.
Click-to-Call and Agent Popup Usage
- Agents can start calls from Dashboard → Leads → Manage Leads by clicking a lead’s phone number.
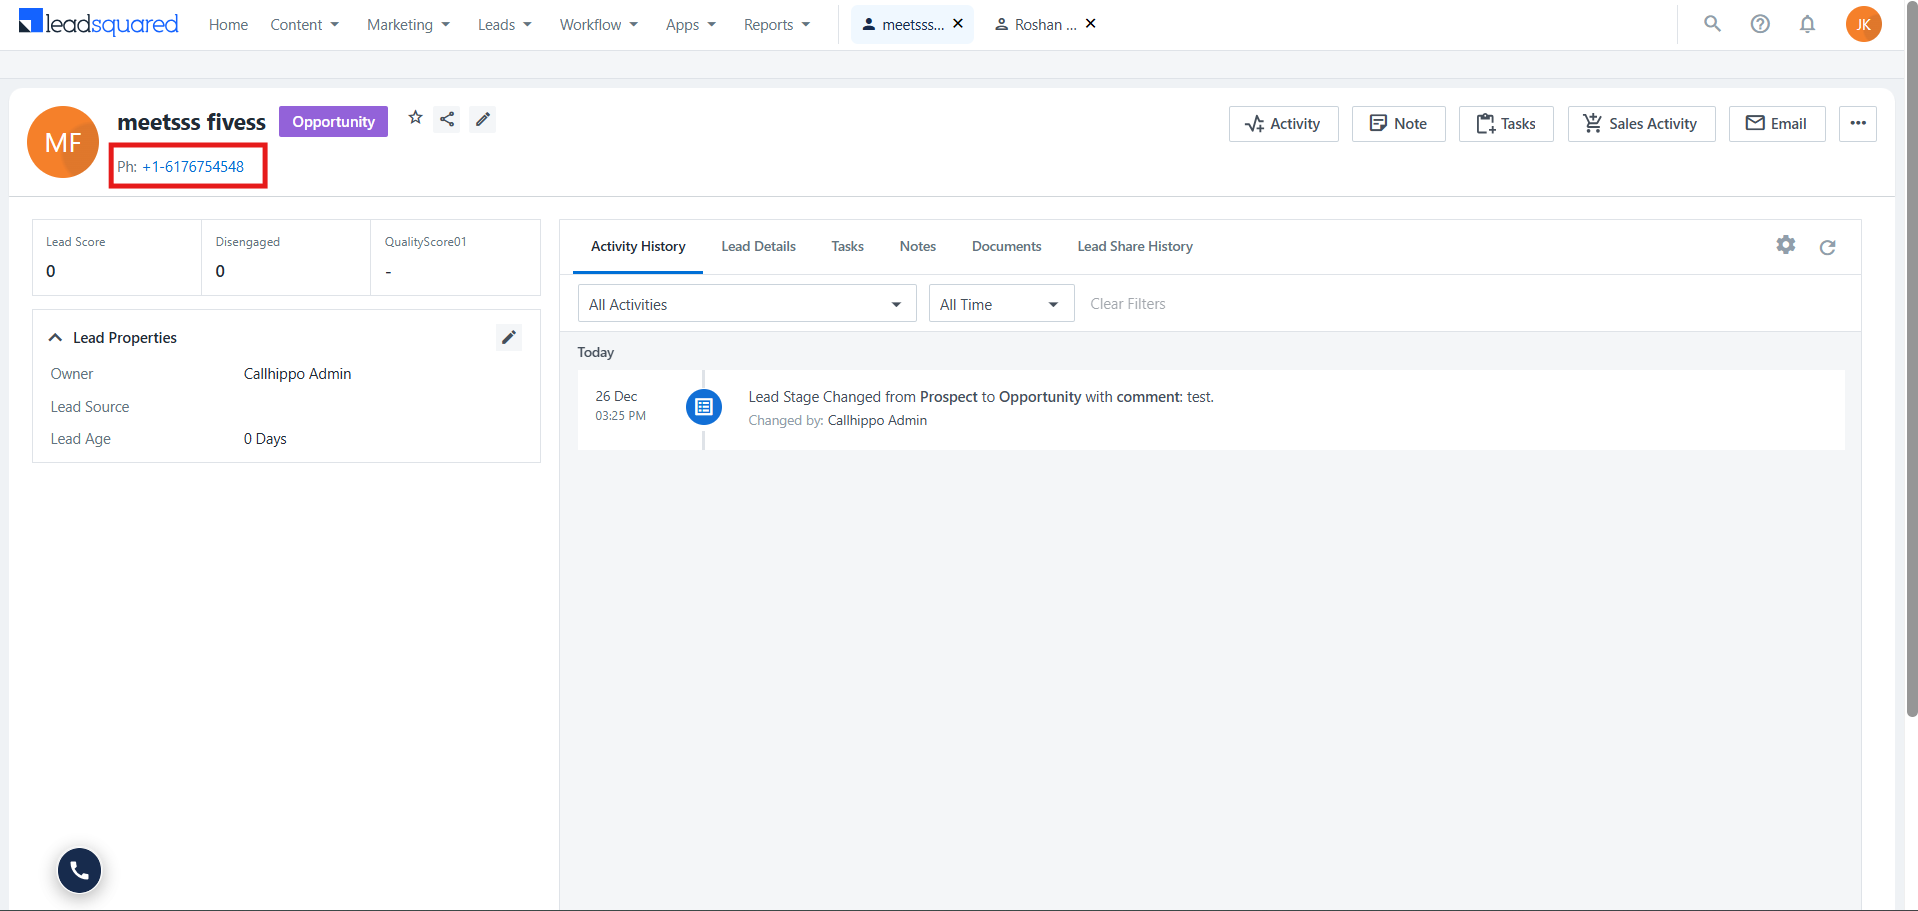
- The call first rings the agent in CallHippo, and once answered it connects to the lead.
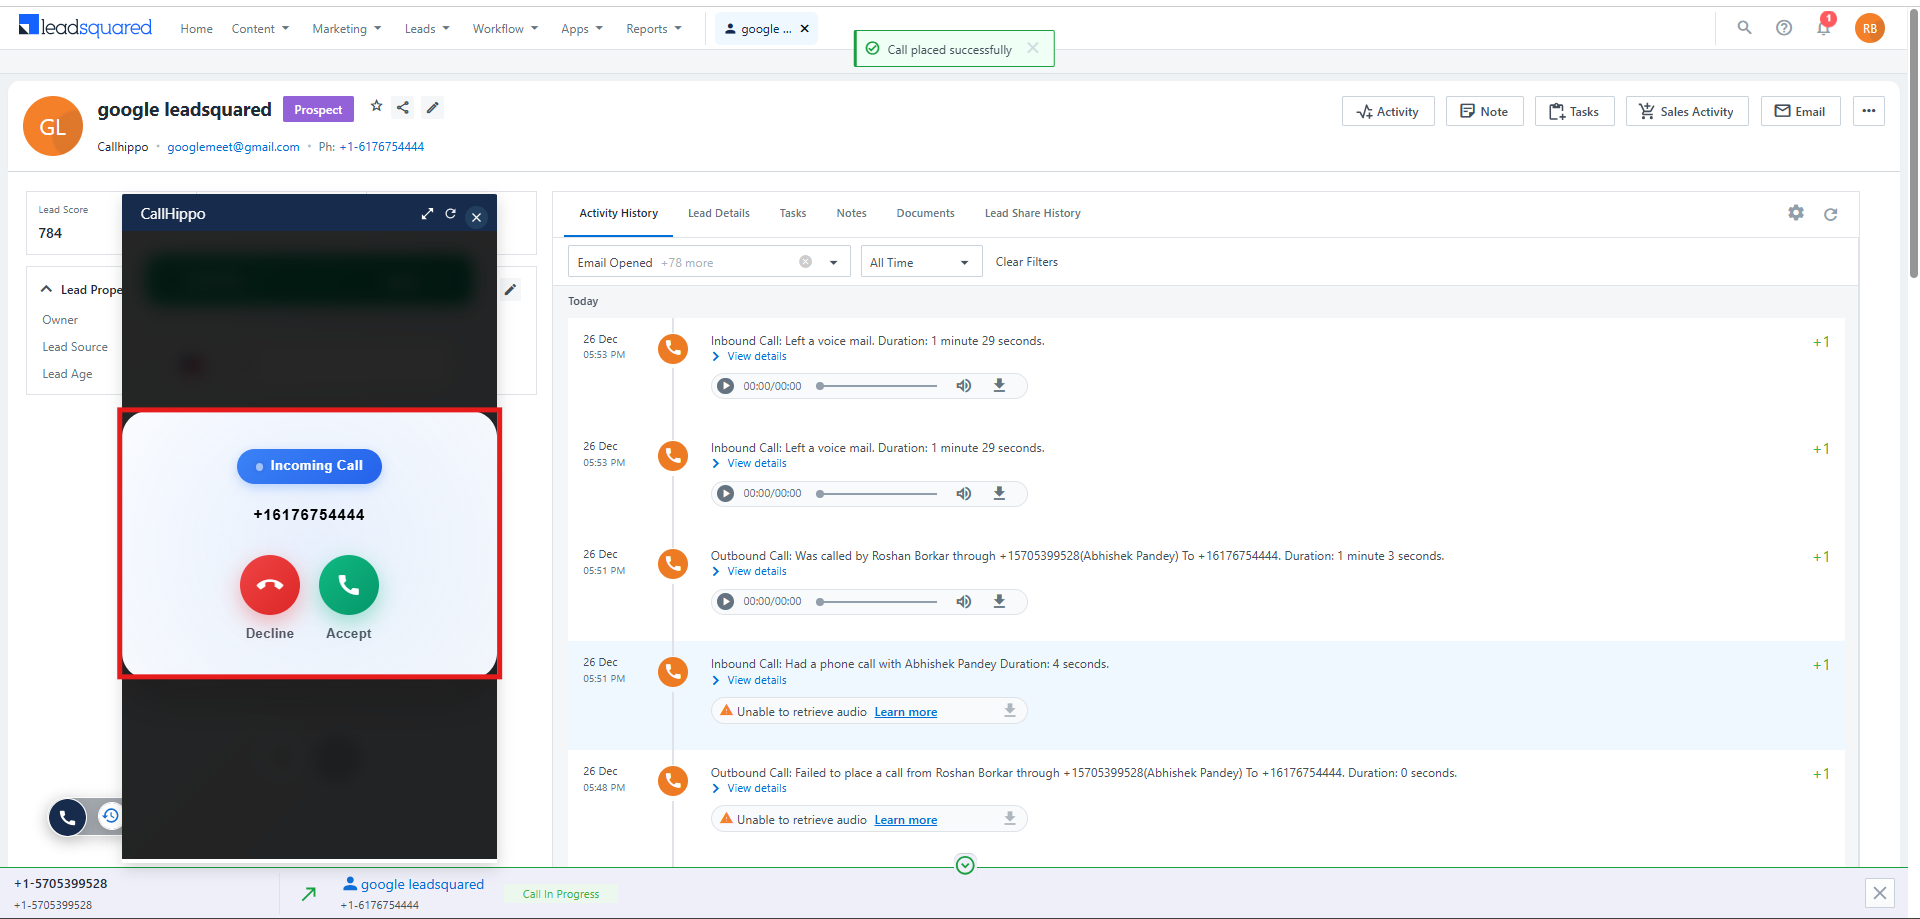
- For incoming and outgoing calls, the Agent Popup displays lead details and lets agents update or save information directly during the call.
Note: To use Click-to-Call and Agent Popup, disable the CallHippo browser extension, as it can interfere with the embedded telephony setup.
Still need help? Reach us at [email protected].