
Number allocation in CallHippo lets you assign a virtual phone number to an individual user (agent) or to a team, controlling who can make and receive calls on that number. This guide explains what allocation means, when to assign a number to a team versus an individual, and walks through every allocation path step by step.
What Does Number Allocation Mean in CallHippo?
Number allocation refers to assigning a virtual phone number to either an individual user (agent) or a team within your organization. This determines who can make and receive calls using that specific number.
What it does:
- Enables call usage — Allocated users or teams can make outbound calls and receive inbound calls on the assigned number.
- Controls call access — Ensures that only authorized agents or teams handle calls from that number.
- Supports call routing — Facilitates efficient distribution of calls based on team structures or individual responsibilities.
- Improves performance tracking — When assigned to individuals, it allows detailed tracking of agent-specific call activities.
In CallHippo, phone numbers can be assigned at two levels: Teams and Users. Here is how they differ.
Allocating a Number to a Team
What it means: The phone number is assigned to an entire team (for example, Sales, Support, or Marketing).
How it works: Any agent within the team can make or receive calls using this number.
Benefits:
- Shared responsibility — All team members can handle incoming calls, reducing wait times.
- Efficient call distribution — Calls can be routed to available team members.
- Better team collaboration — Multiple agents can access and use the same number.
Allocating a Number to an Individual User
What it means: The phone number is assigned to a specific user (agent).
How it works: Only that user can make or receive calls using this number.
Benefits:
- Personalized customer experience — Clients can directly reach a specific agent.
- Better performance tracking — Easy to monitor an agent’s call metrics and productivity.
- Dedicated lines — Ensures high-priority calls are handled by specific team members.
When to Use Each Option
| Scenario | Assign to Team | Assign to Individual User |
|---|---|---|
| High call volume (e.g., support desk) | Yes | No |
| Personalized client relationships | No | Yes |
| Tracking team-wide performance | Yes | No |
| Dedicated salesperson or account manager | No | Yes |
| Need backup for missed calls | Yes | No |
How to Allocate Numbers to Agents
CallHippo provides flexibility by allowing number allocation from two perspectives — number-centric and user-centric. This dual approach is designed to match different administrative workflows and make number management more intuitive based on your needs.
1. Number-Centric Allocation (From Number Settings)
- Use case: Best when managing or updating a specific number.
- How it works: You start from a particular number and choose which agents or teams should have access to it.
- Why it’s useful: Ideal when onboarding a new number or reviewing which users are connected to it. You can easily assign the number to multiple agents at once from the full user list.
2. User-Centric Allocation (From User Settings)
- Use case: Best when managing a specific agent’s access or onboarding new team members.
- How it works: You start from an agent profile and assign one or more available numbers to them.
- Why it’s useful: Makes it easy to control what numbers an individual agent can use, especially when setting up or modifying their role.
Why Two Views Matter
These two entry points reflect different admin mindsets:
- “I have a number — who should use it?” → Use Number Settings
- “I have a user — what numbers should they use?” → Use User Settings
This approach ensures you don’t need to backtrack or switch views unnecessarily — whichever side of the allocation you’re working on, there’s a convenient path to complete the task.
Steps to Allocate Numbers to Agents from Number Settings
- Log in to your CallHippo dashboard.
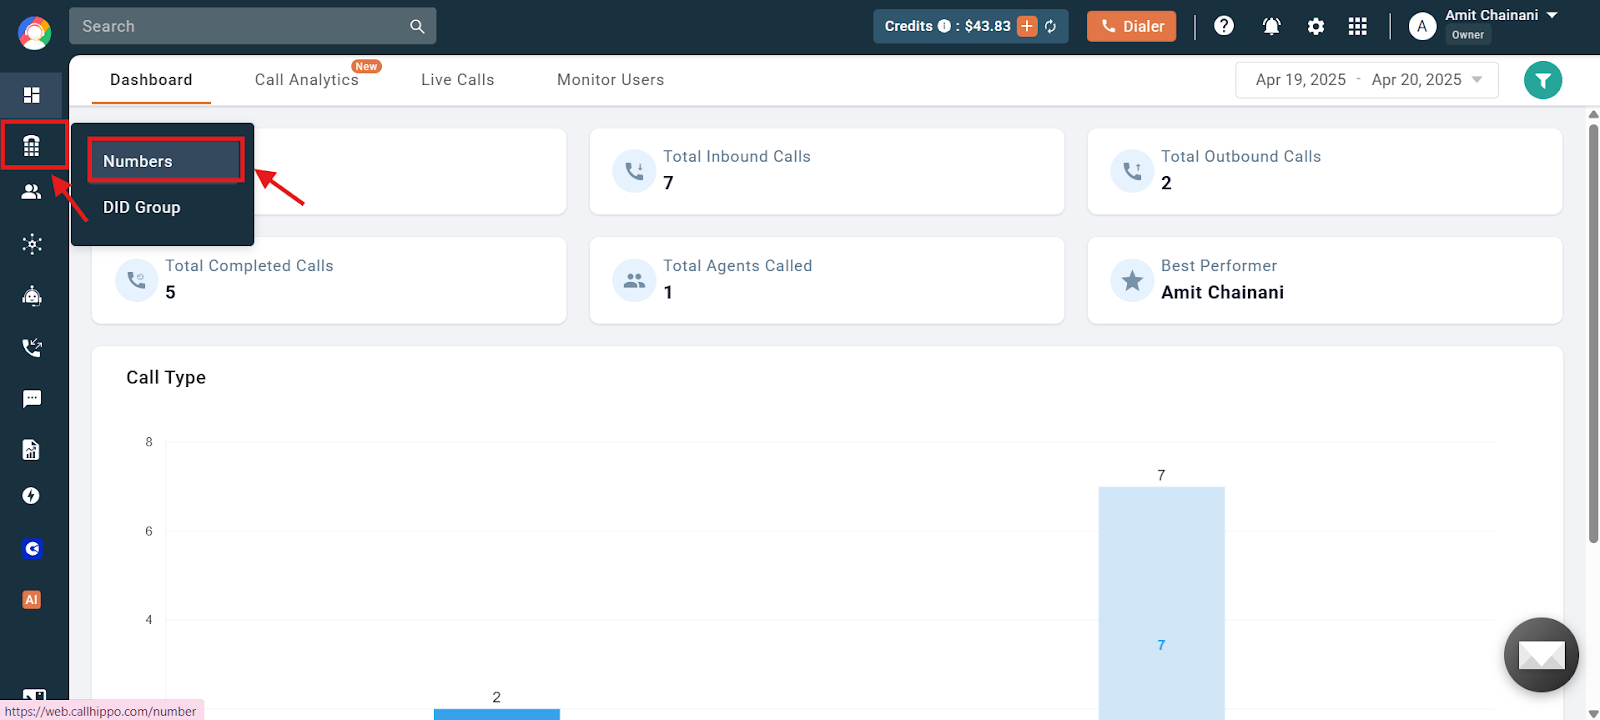
- Navigate to the Numbers and DID section on the left side of the screen and then click on Numbers.
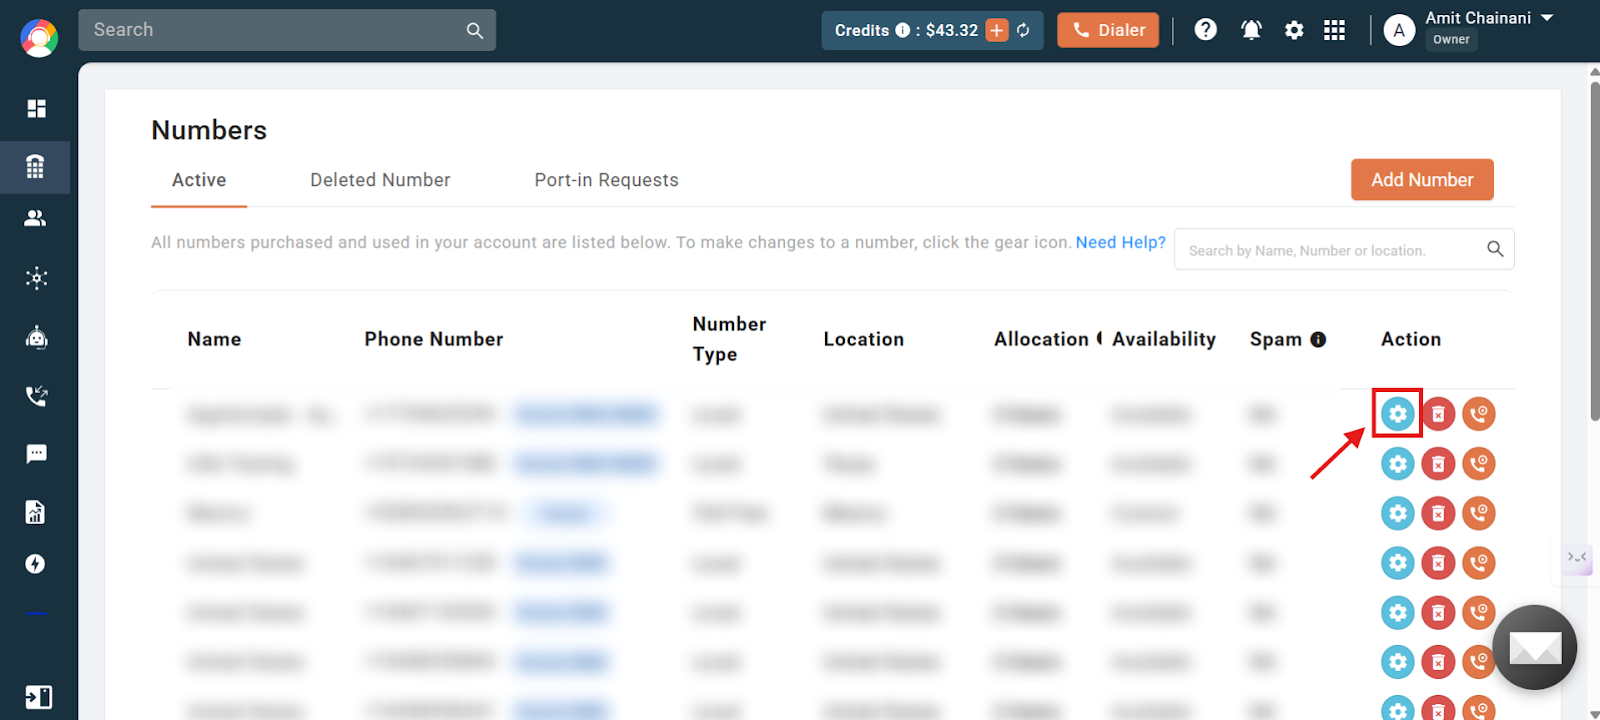
- Click on the settings icon of the number you want to allocate to agent(s).
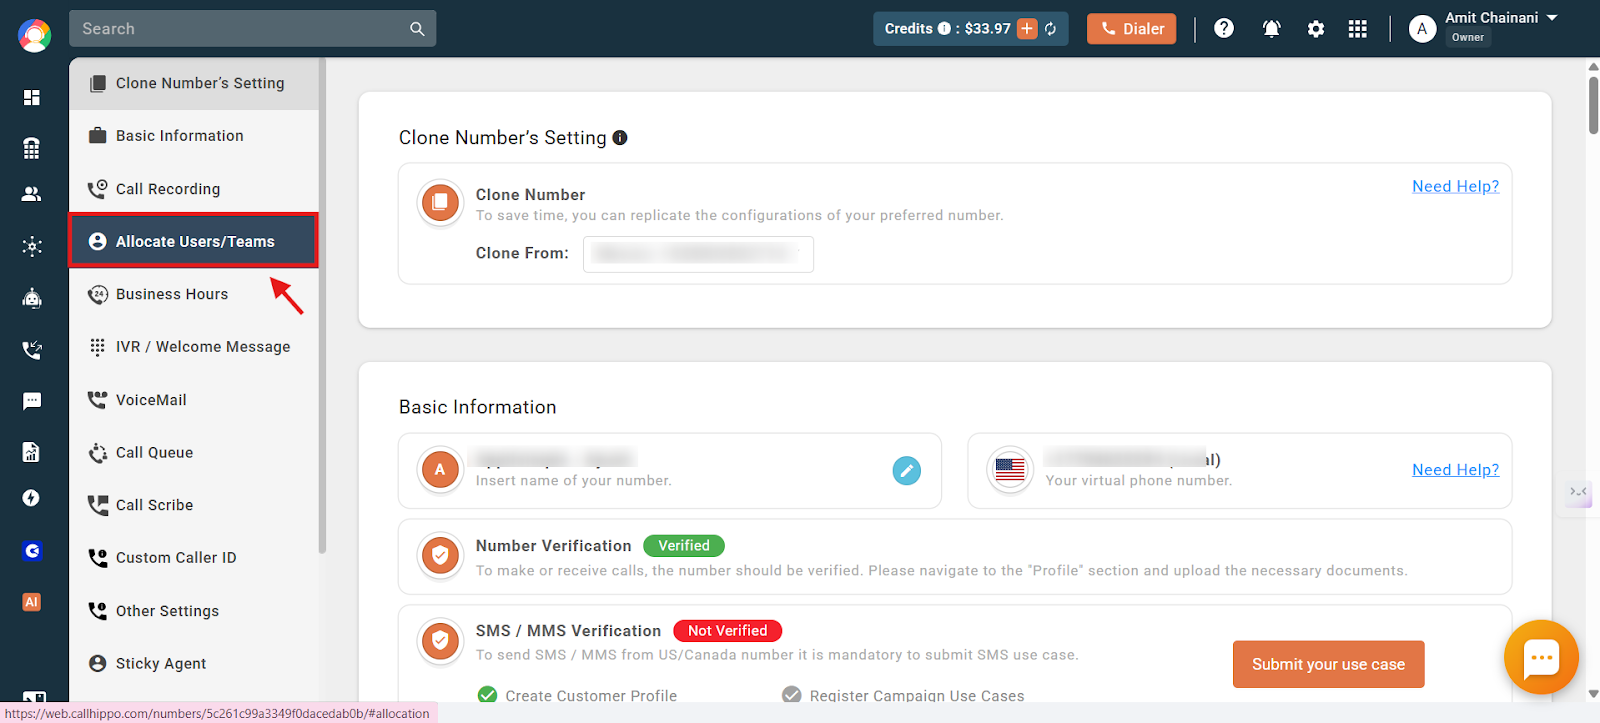
- Click on the Allocate Users/Teams option visible on the left of the dashboard.
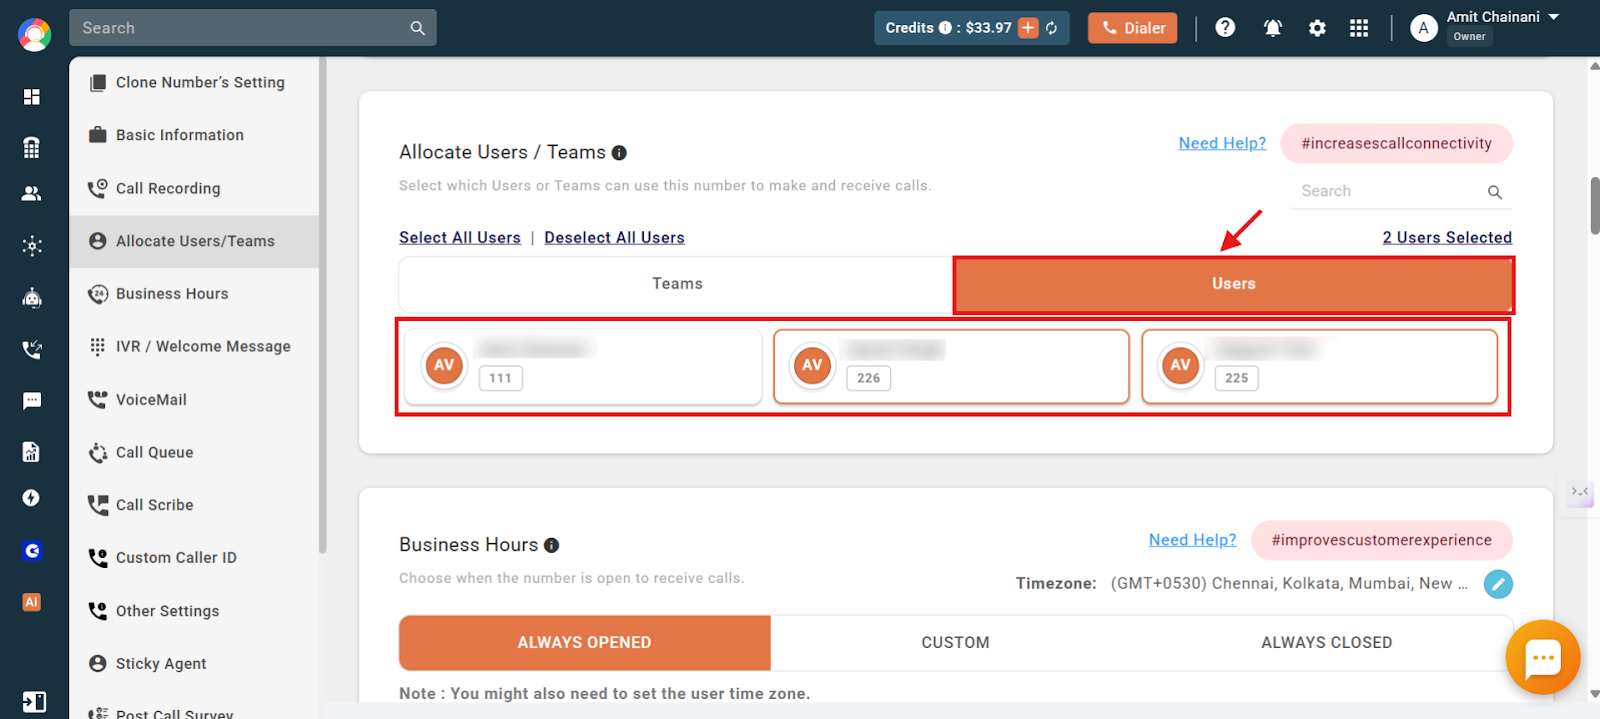
- Click on Users and then click on the users to whom you want to allocate the selected number.
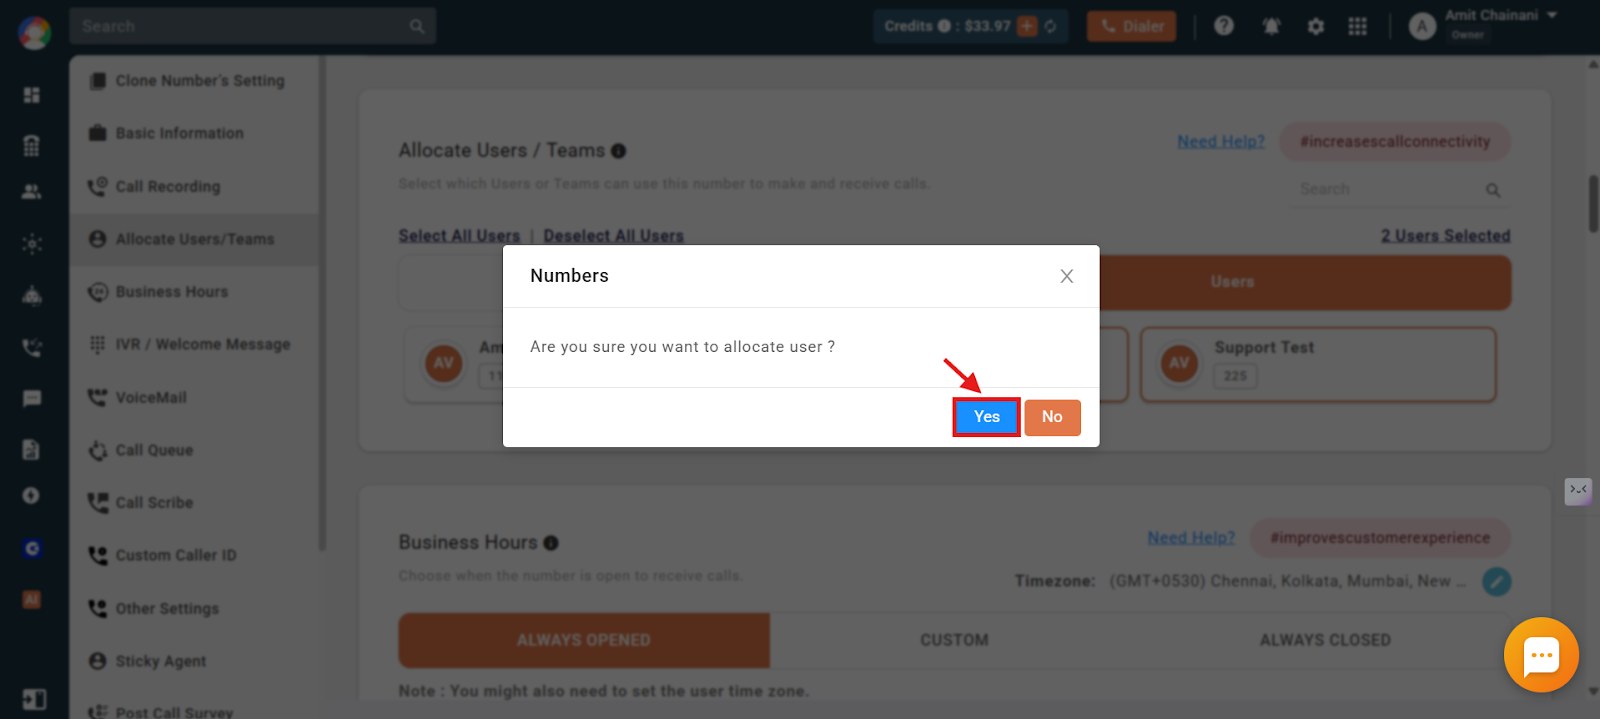
- Click on Yes to confirm the changes.
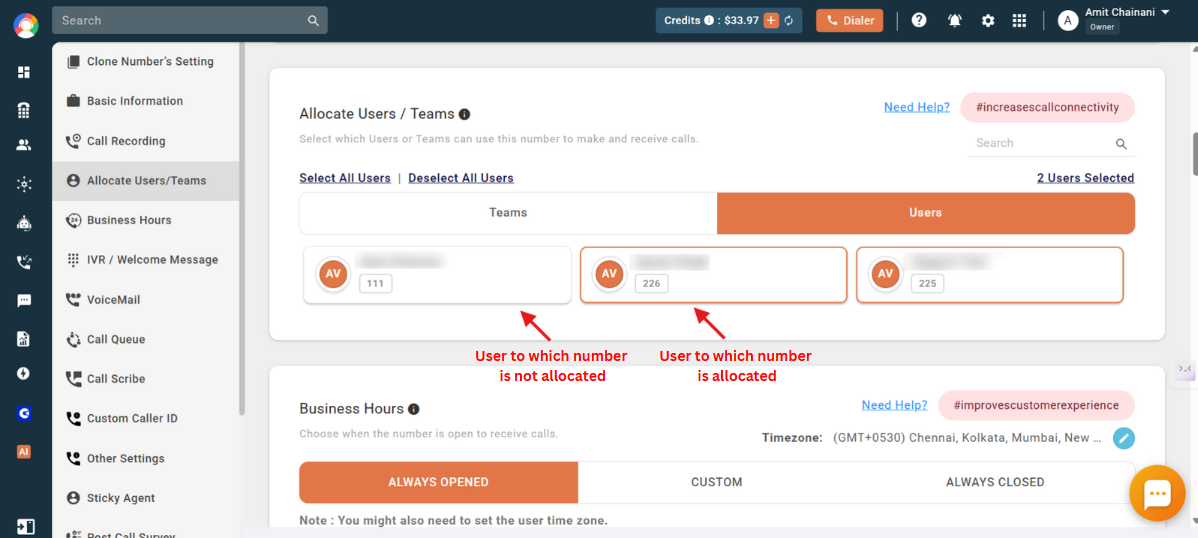
- The users to whom the number is allocated will be highlighted with a box, while the users to whom the number is not allocated will not be highlighted.
Steps to Allocate Numbers to Agents from User Settings
- Log in to your CallHippo dashboard.
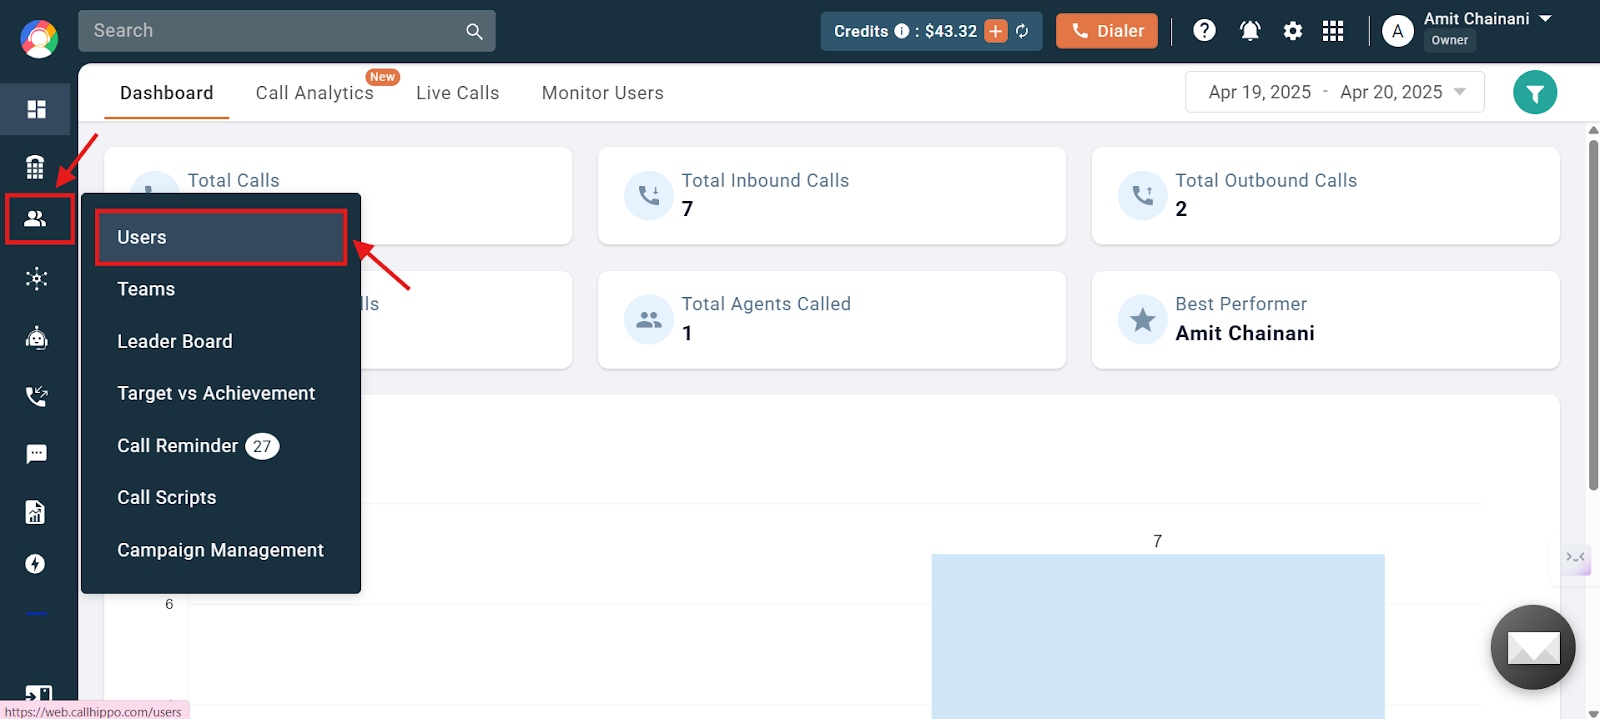
- Navigate to the Users and Performance section on the left side of the screen and then click on Users.
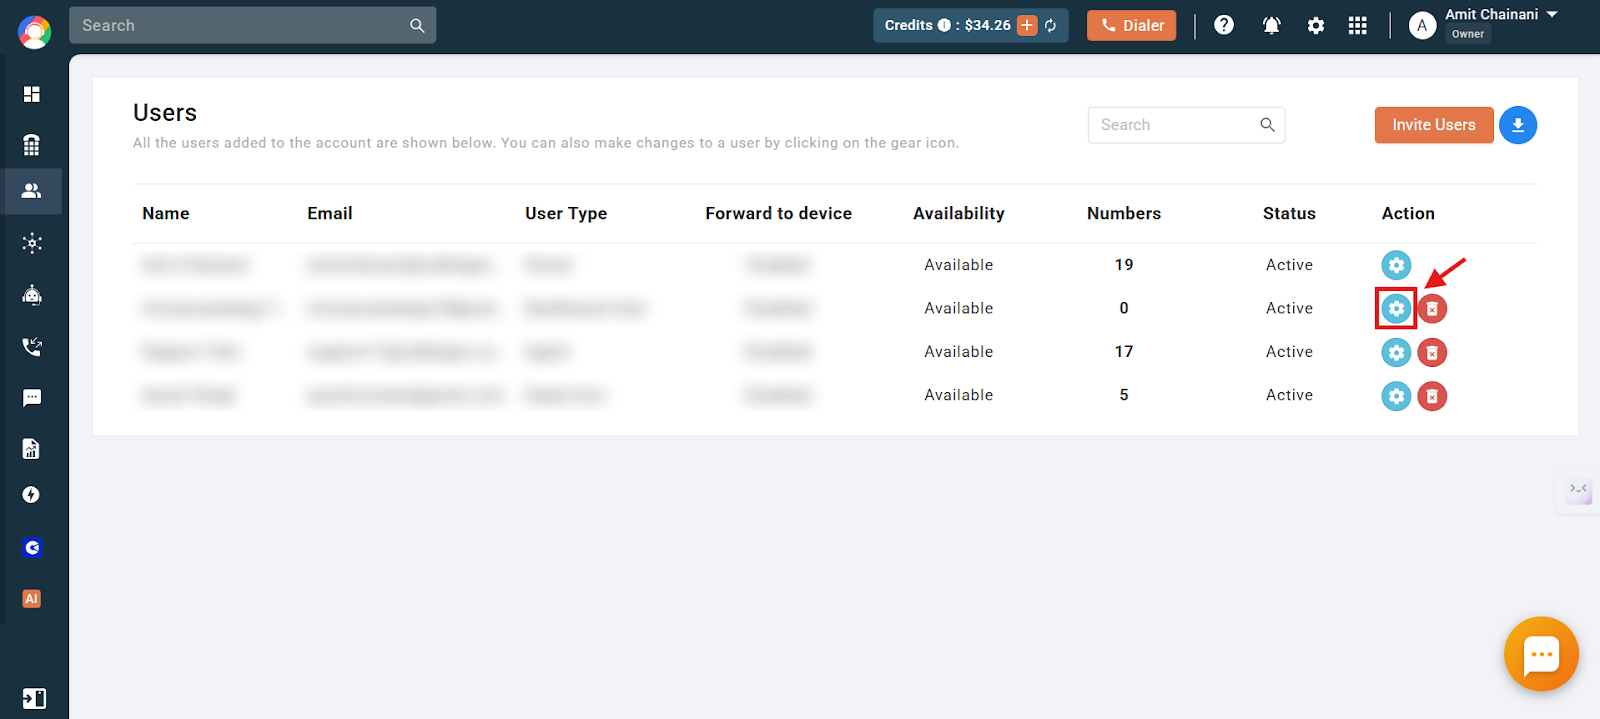
- Click on the settings icon of the user you want to assign the available numbers to.
- Click on the Allocate Numbers option visible on the left side of the dashboard.
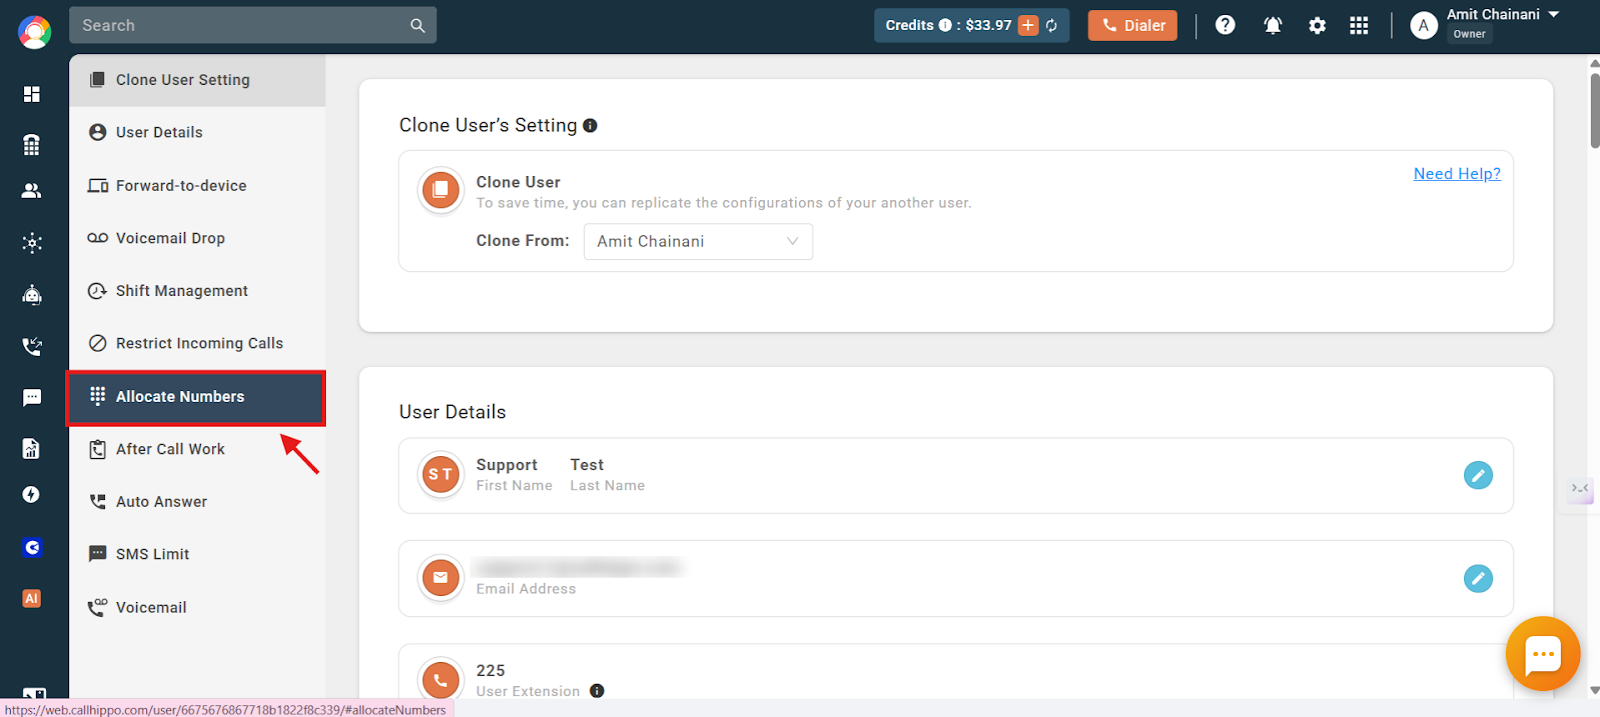
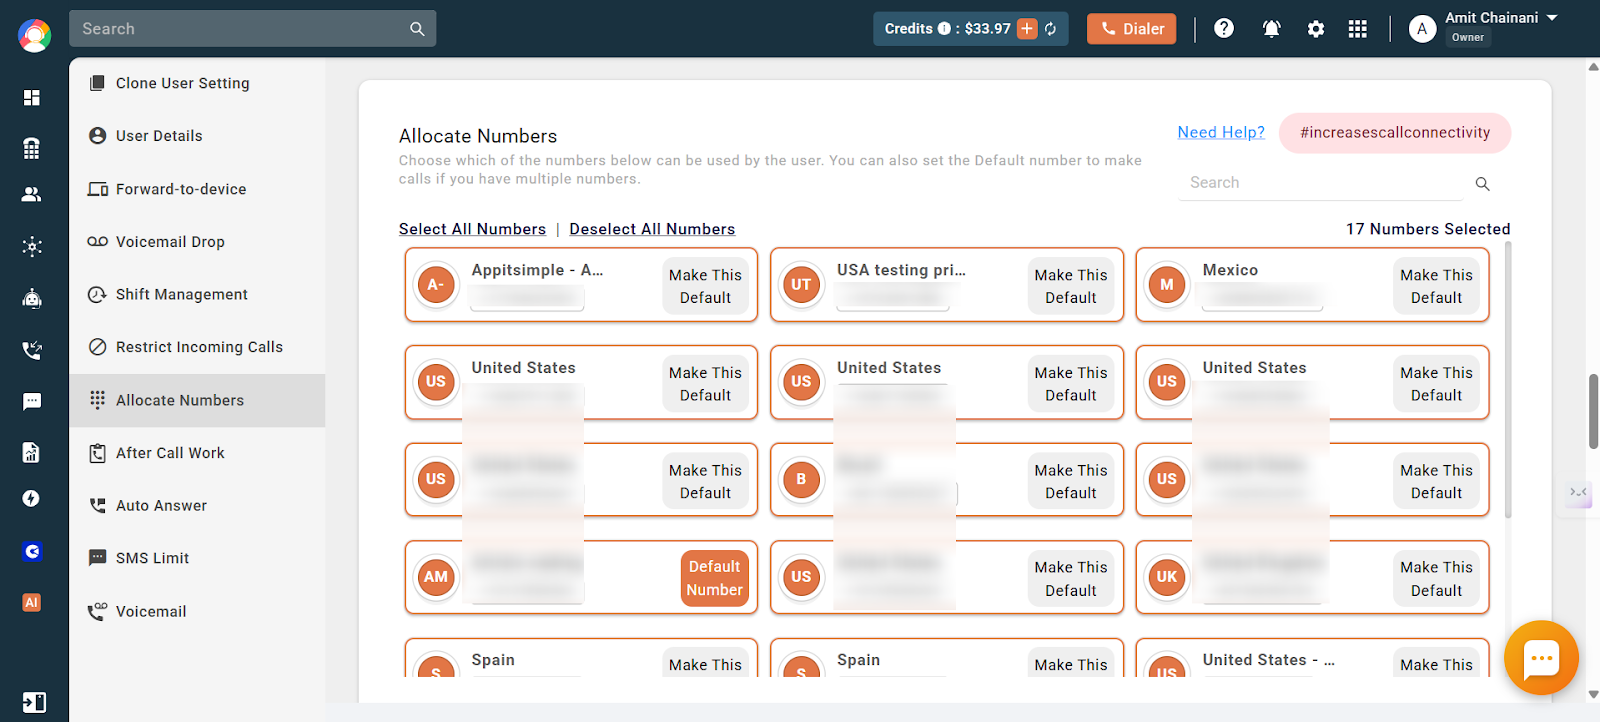
- Click on the numbers you want to allocate to the selected user.
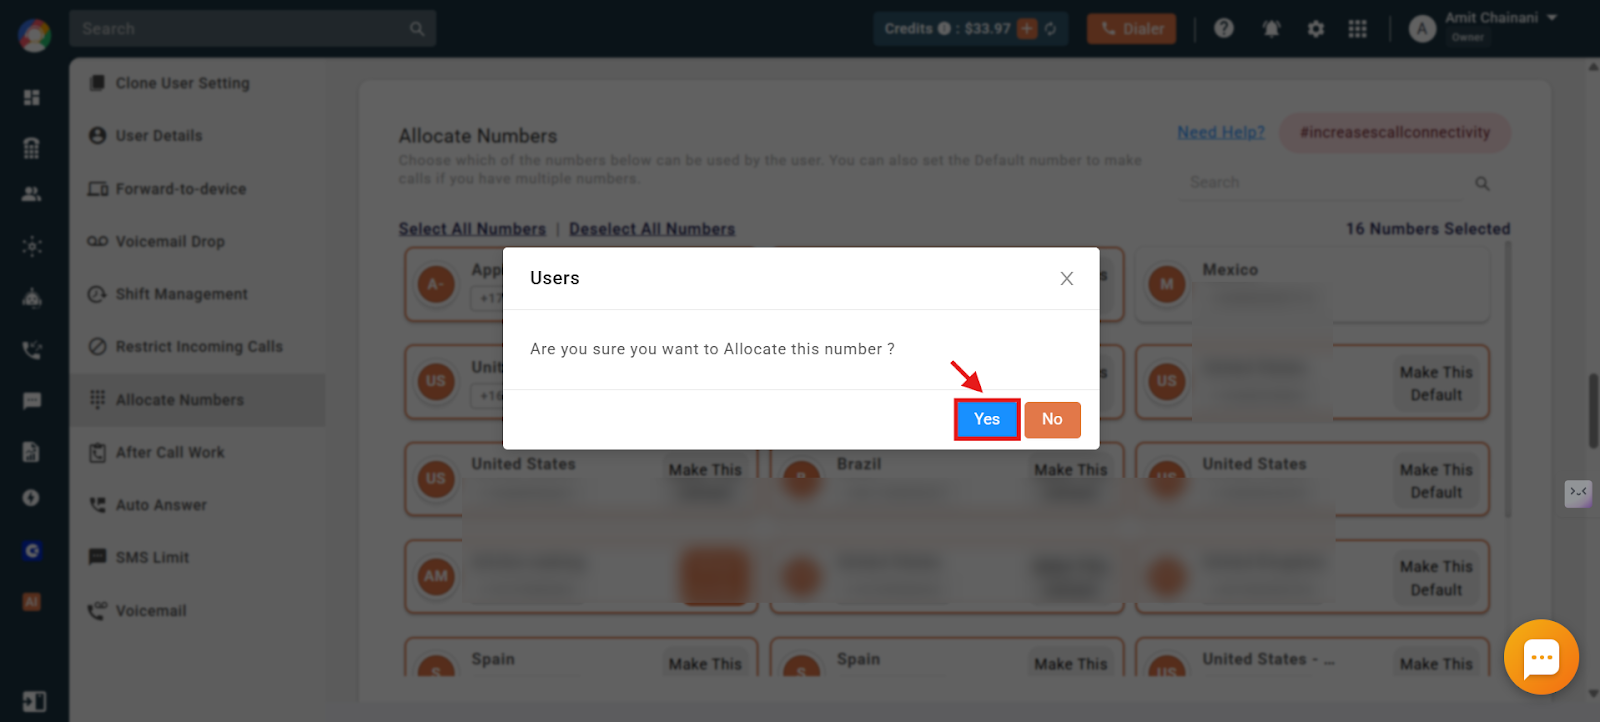
- Click on Yes to confirm the changes.
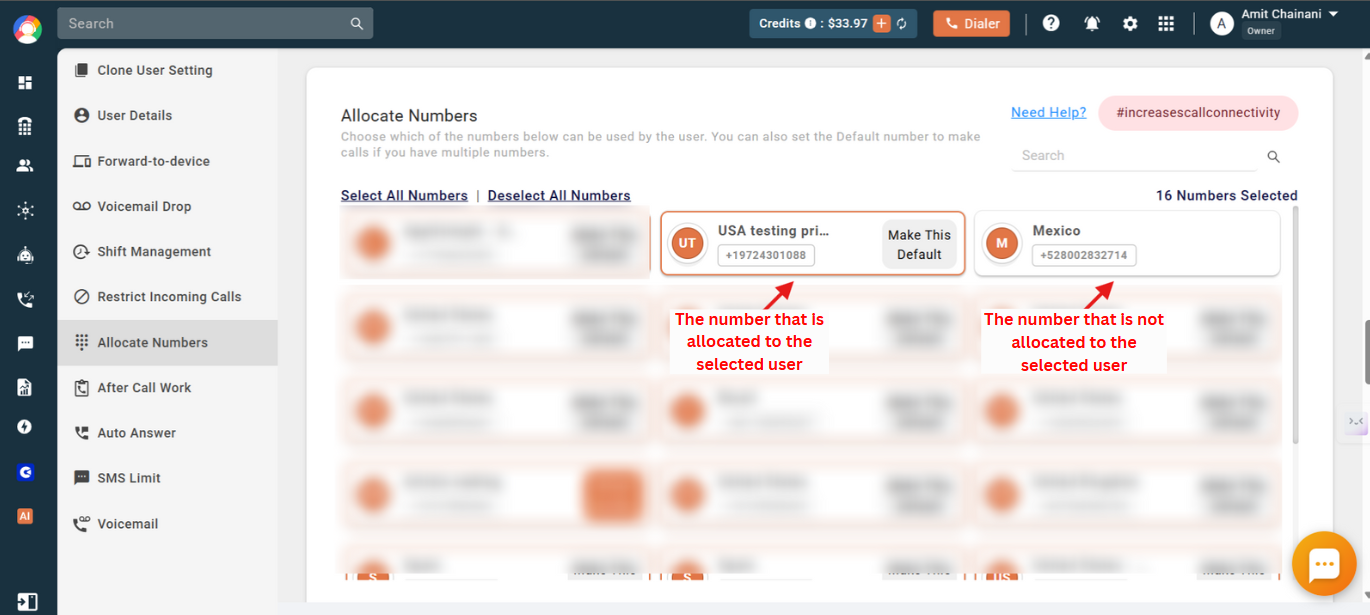
- The numbers already allocated to the selected user will be highlighted with a box, while the numbers that are not allocated will not be highlighted.
How to Allocate Numbers to a Team
- Log in to your CallHippo dashboard.
- Navigate to the Numbers and DID section on the left side of the screen and then click on Numbers.
- Click on the settings icon of the number you want to allocate to team(s).
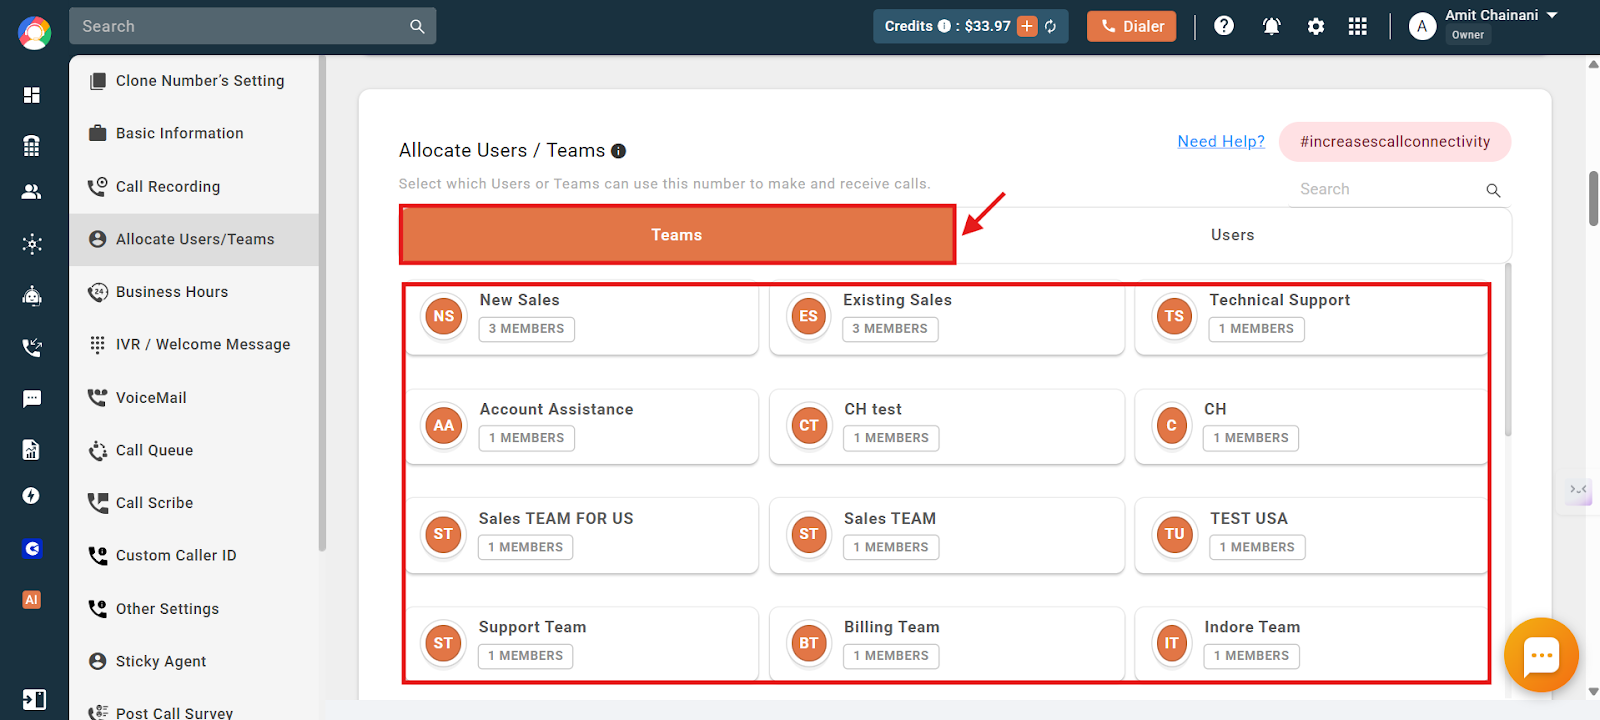
- Click on the Allocate Users/Teams option visible on the left of the dashboard.
- Click on Teams and then click on the name of the teams to whom you want to allocate the selected number.
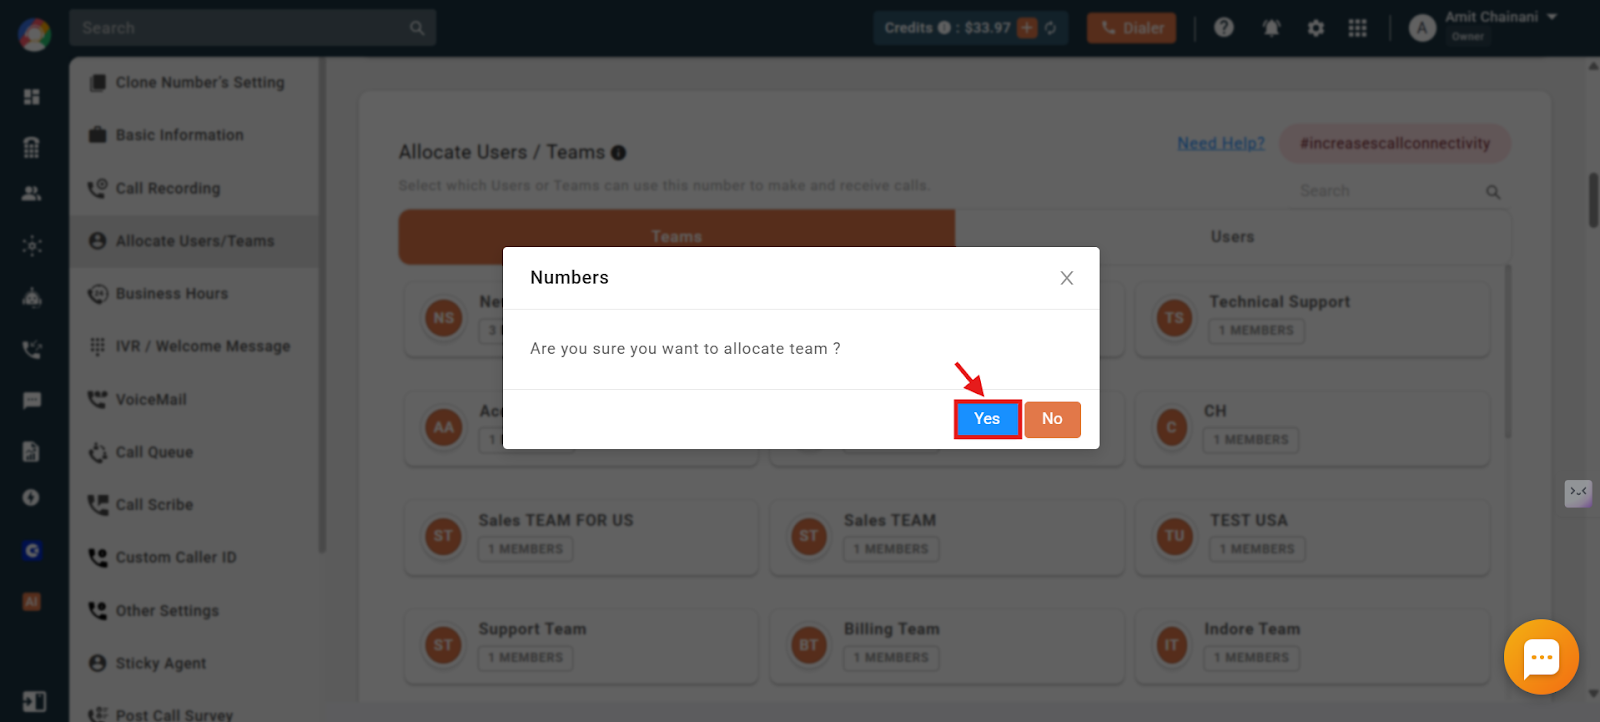
- Click on Yes to confirm the changes.
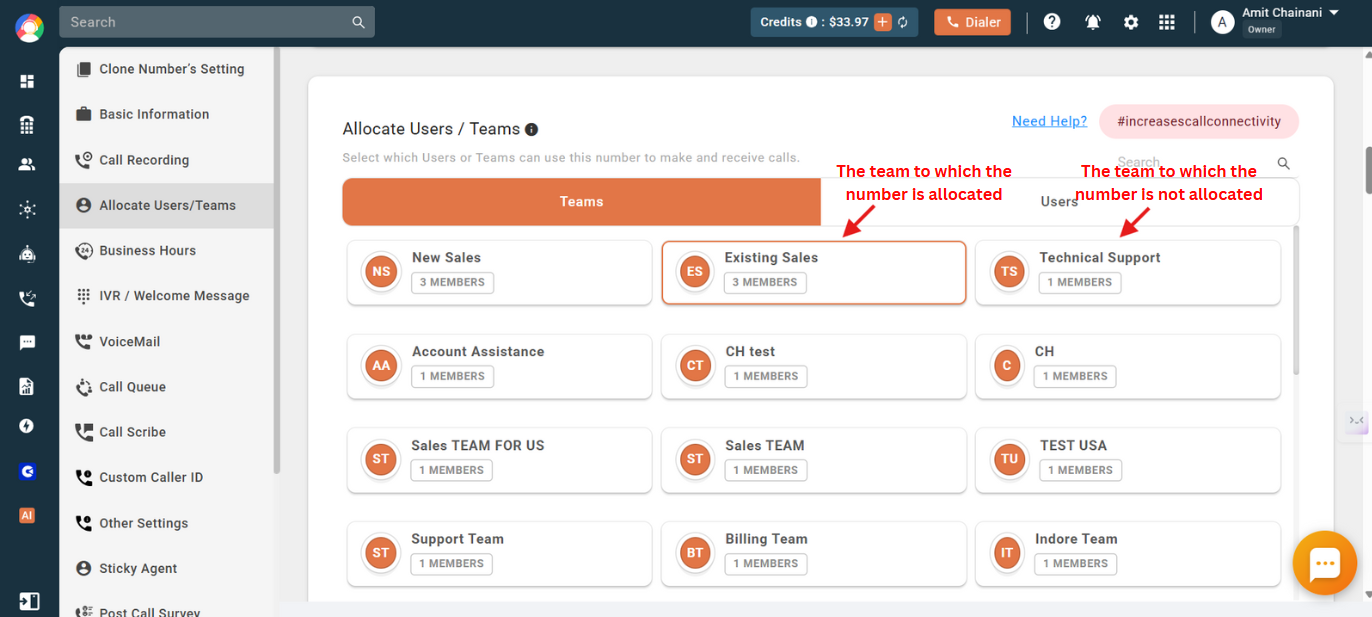
- The teams to whom the number is allocated will be highlighted with a box, while the teams to whom the number is not allocated will not be highlighted.
Can Sub-Users (Agents) Allocate or Deallocate Their Own Numbers?
Yes. Once an Owner, Admin, or Manager allocates multiple phone numbers to a user, that user is granted the ability to allocate or deallocate those numbers to themselves as needed.
- The user can allocate (enable) a specific number for personal use from the list of numbers assigned to them.
- They can also deallocate (disable) numbers they no longer need.
- However, users can only manage numbers that have been explicitly allocated to them by a higher-level role.
- They cannot allocate new numbers beyond what has already been provided.
Why this is useful: This allows users to flexibly manage which numbers they actively use, without admin involvement, while ensuring control remains with account owners or administrators.
How Agents Can Allocate or Deallocate Their Numbers
- Log in to your CallHippo dashboard.
- Navigate to the Users and Performance section on the left side of the screen and then click on Users.
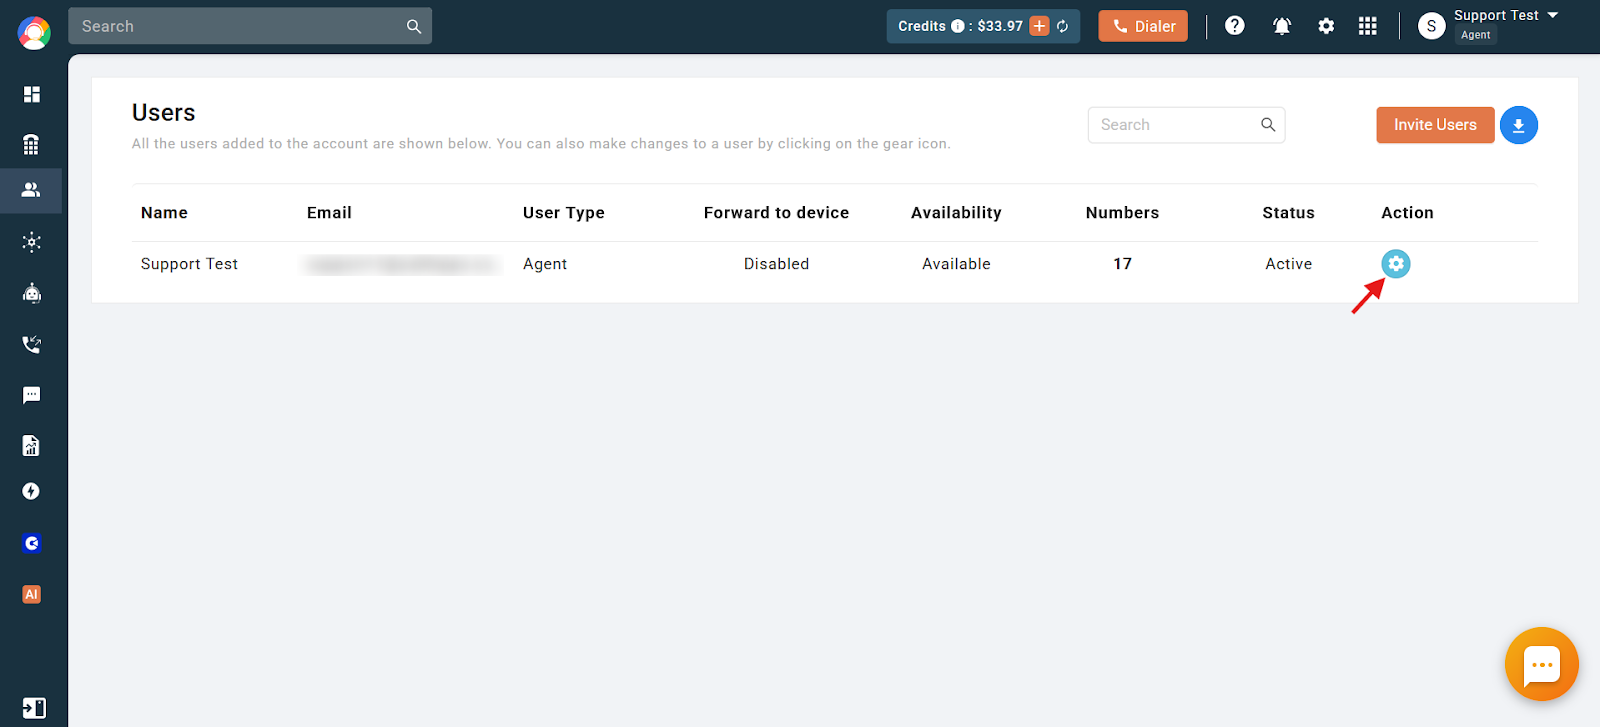
- Click on the settings icon of the user.
- Click on the Allocate Numbers option visible on the left side of the dashboard.
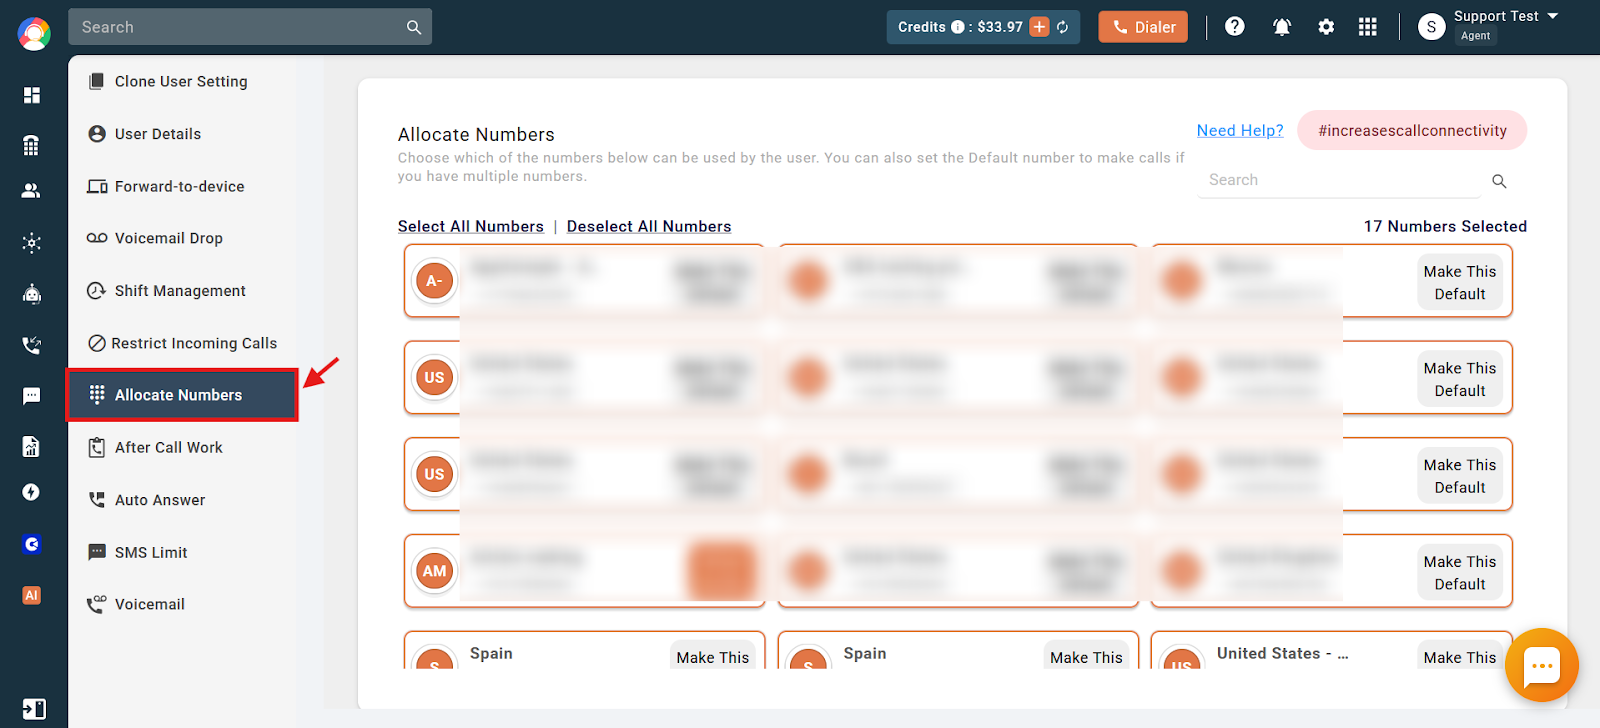
From here, the user or agent can allocate or deallocate the numbers assigned to them.
How to Check the Numbers Allocated to You from the Dialer
- Log in to your CallHippo dialer.
- Click on the upward arrow.
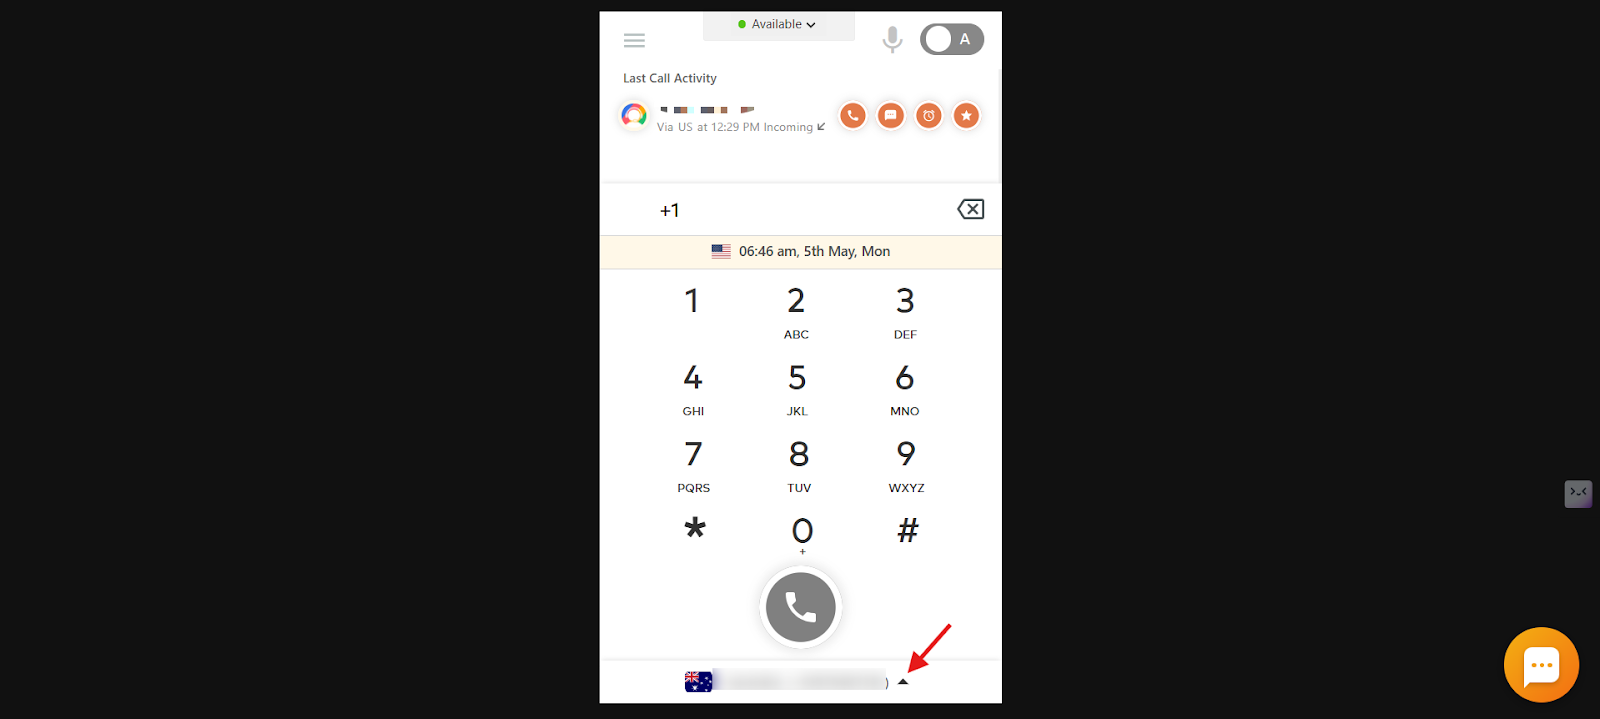
- The allocated numbers will show as below.
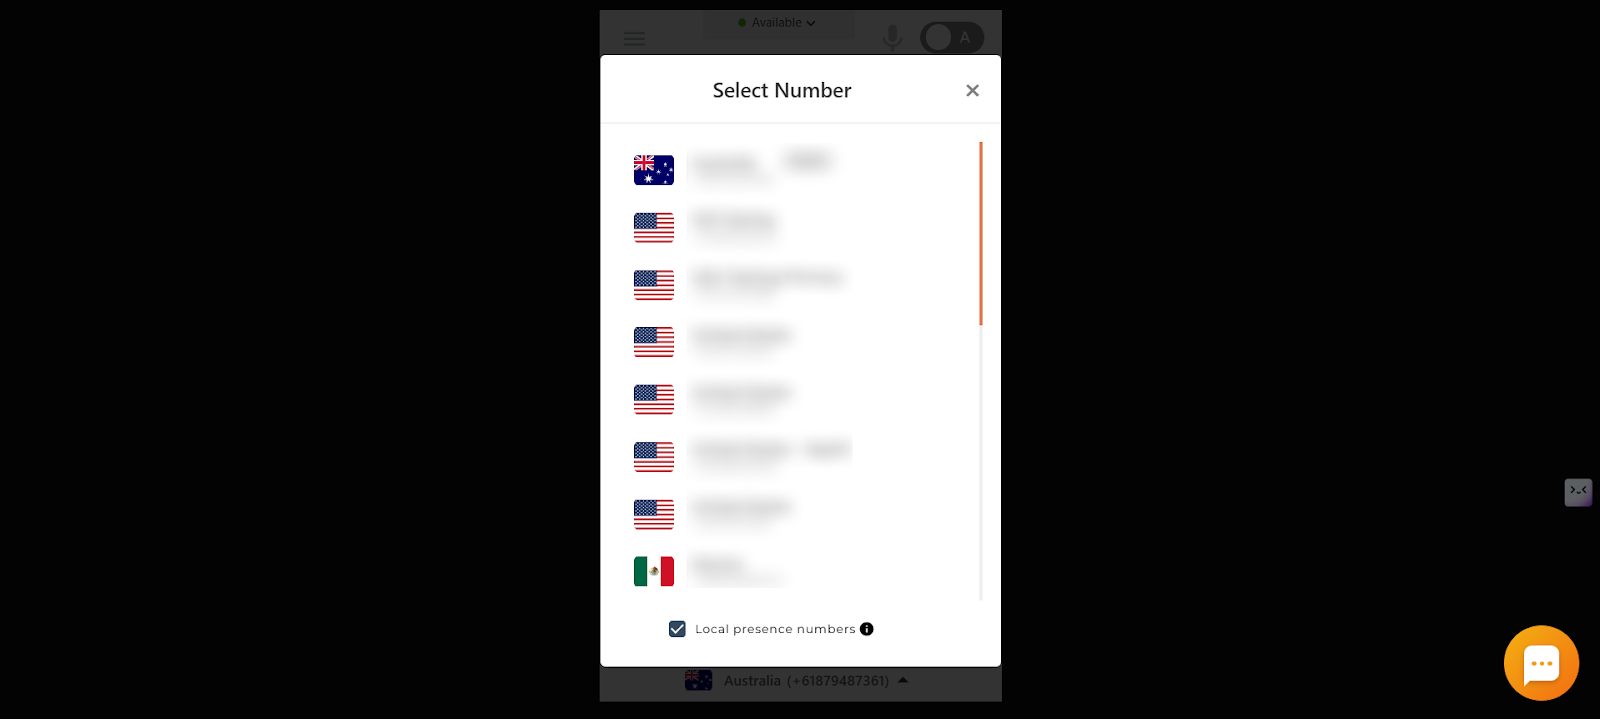
Important: Please note that you need to log out and log in once the allocations are done so that the changes reflect in your dialer.
Frequently Asked Questions
Q: Can I assign multiple numbers to a single agent in CallHippo?
A: Yes, CallHippo allows you to assign multiple numbers to a single agent by following the same steps mentioned above.
Q: Is there a specific user management section for assigning numbers in CallHippo?
A: Yes, there is a user management section where you can add, edit, and allocate phone numbers to specific agents. Follow the steps from “Allocate Users/Teams” mentioned above.
Q: Why am I still seeing the “number not assigned” error, even though I just purchased the number?
A: This can happen because the number hasn’t been allocated to any user or team yet. Go to the number settings and assign it to the appropriate agent or group. After that, make sure to log out and log back in for the changes to reflect in your dialer.
Q: Why am I still seeing the “number not assigned” error, even though I just allocated the number to myself?
A: You likely need to log out and log back in to the dialer after making the allocation. This refresh ensures that the newly assigned number syncs correctly with your dialer.
Q: Can I use a single number for multiple agents?
A: Yes, a single number can be assigned to multiple agents. This is ideal for shared roles like support or sales teams to ensure calls are handled promptly.
Q: If the same number is allocated to multiple users, will they be able to make concurrent calls using the same number on their separate dialers?
A: Yes, multiple users can use the same number concurrently from different dialers without any conflict.
Q: I allocated a number, but it’s still not showing in my dialer — what should I do?
A: Try logging out and logging back into your dialer. Allocated numbers may not reflect until a fresh login is performed.
Q: Will agents lose call history if they log out to sync number allocations?
A: No, logging out and back in only refreshes the session and syncs your settings. It does not affect your call history or data.
We hope this helps. If you still have questions, feel free to reach out at [email protected].