
Interactive Voice Response (IVR) turns your CallHippo number into an automated menu that greets callers and routes them to the right team using simple keypad inputs.
What Is IVR?
IVR is an automated phone system that lets callers interact using keypad inputs or voice commands. It is commonly used in VoIP systems to direct calls, collect information, or provide quick answers without needing a live agent.
Example: A customer calls your support line. The IVR greets them with “Press 1 for Sales, 2 for Support, 3 for Billing” and routes the call instantly based on their input.
- Boosts efficiency by sending every caller to the right place faster.
- Reduces wait times and handles high call volumes gracefully.
- Presents a professional experience, especially for businesses with multiple departments.
Set Up a Simple IVR
A simple IVR uses a single menu level. For example: “Welcome to CallHippo. Please press 1 for Sales, or press 2 for Support.” Callers who press 1 reach Sales; callers who press 2 reach Support.
- Log in to your CallHippo dashboard.
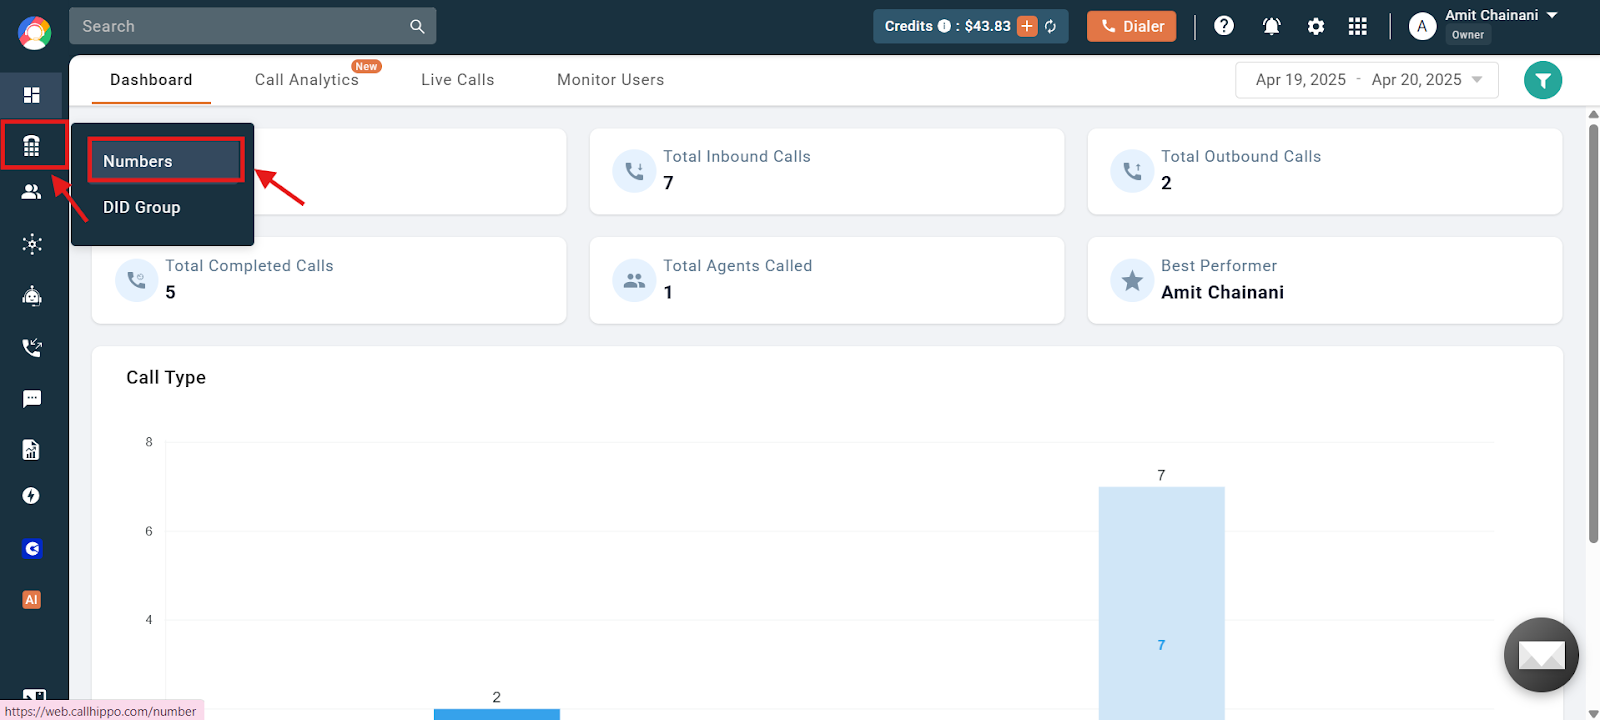
- Open Numbers. In the left menu, go to Numbers and DID and click Numbers.
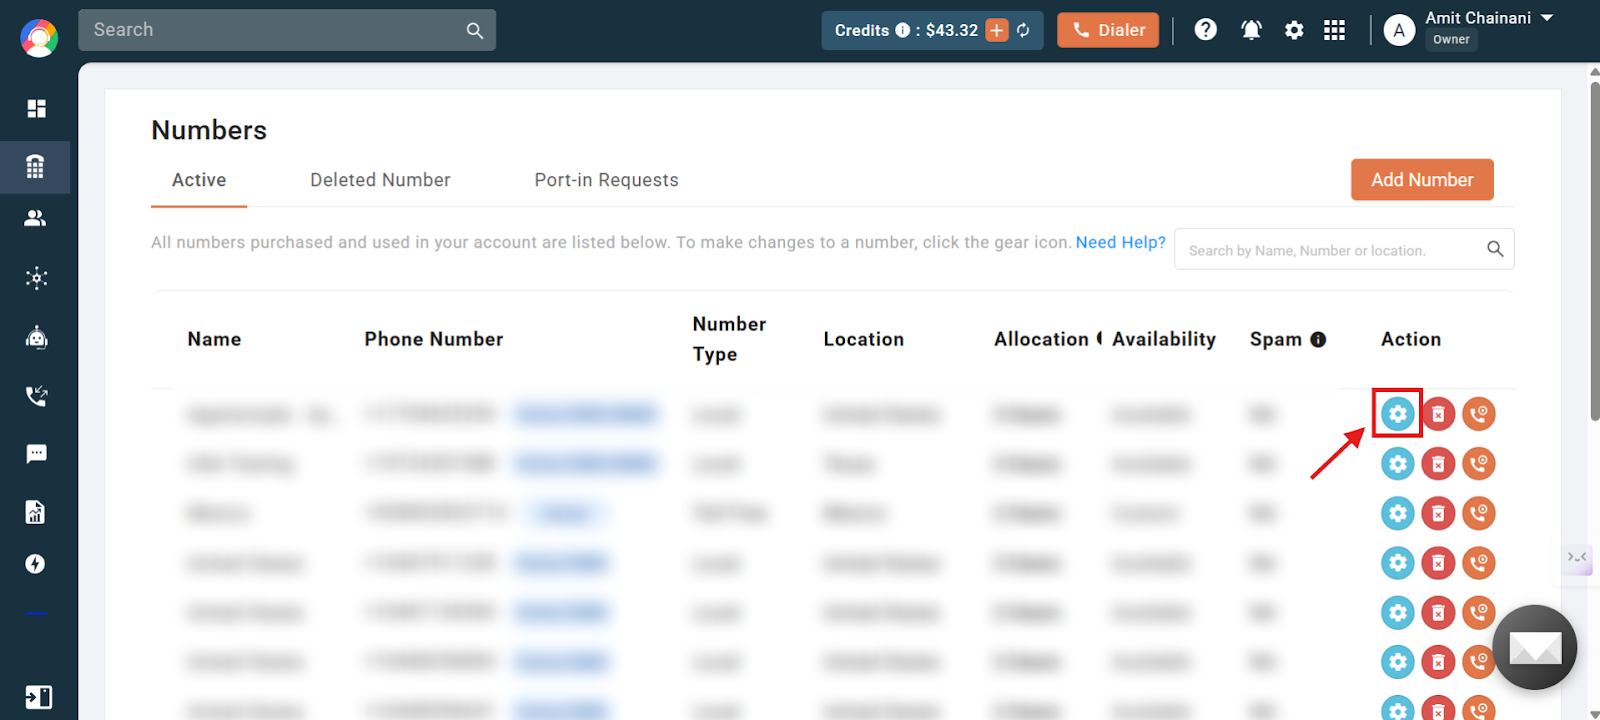
- Open number settings. Click the settings (gear) icon of the number you want to configure.
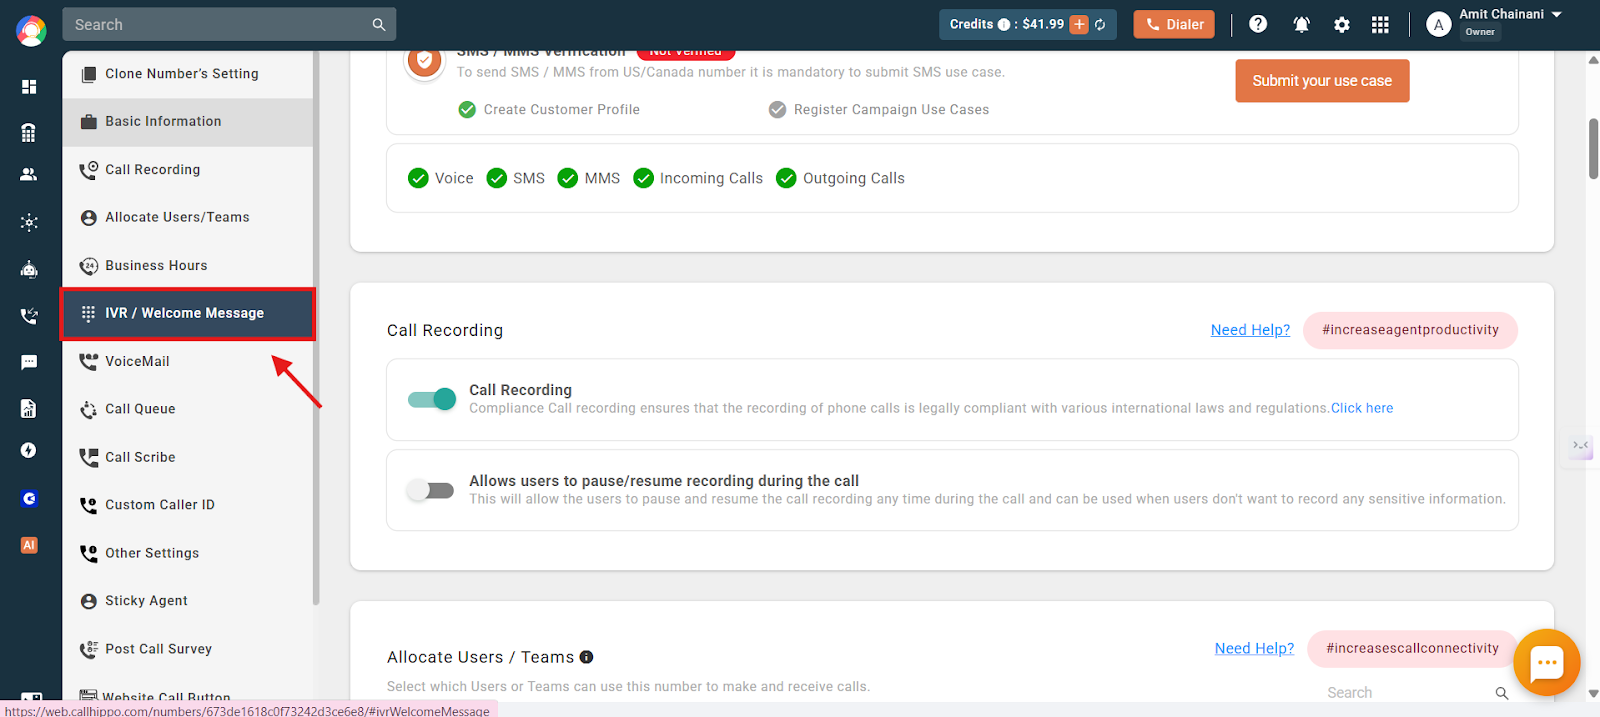
- Go to IVR / Welcome Message from the left side of the number settings.
- Enable IVR. Open the IVR tab and click the toggle to turn it on.
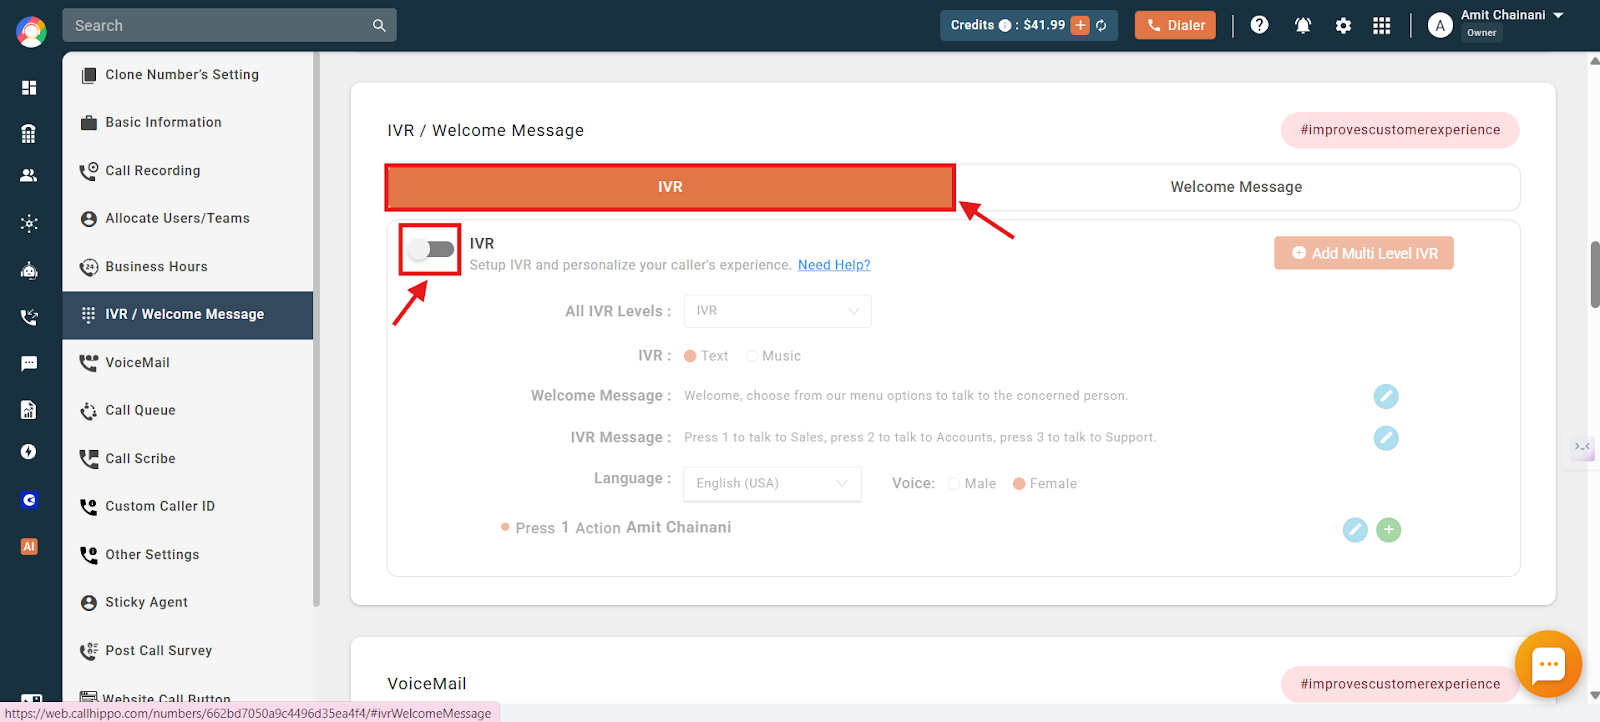
- Set your messages. Enter a Welcome Message (the first greeting the caller hears, for example “Welcome to CallHippo”) and an IVR Message (the menu options, for example “Please press 1 for Sales, or press 2 for Support”). You can pick the language and a male or female voice from the dropdowns, or upload your own audio file instead of typing.
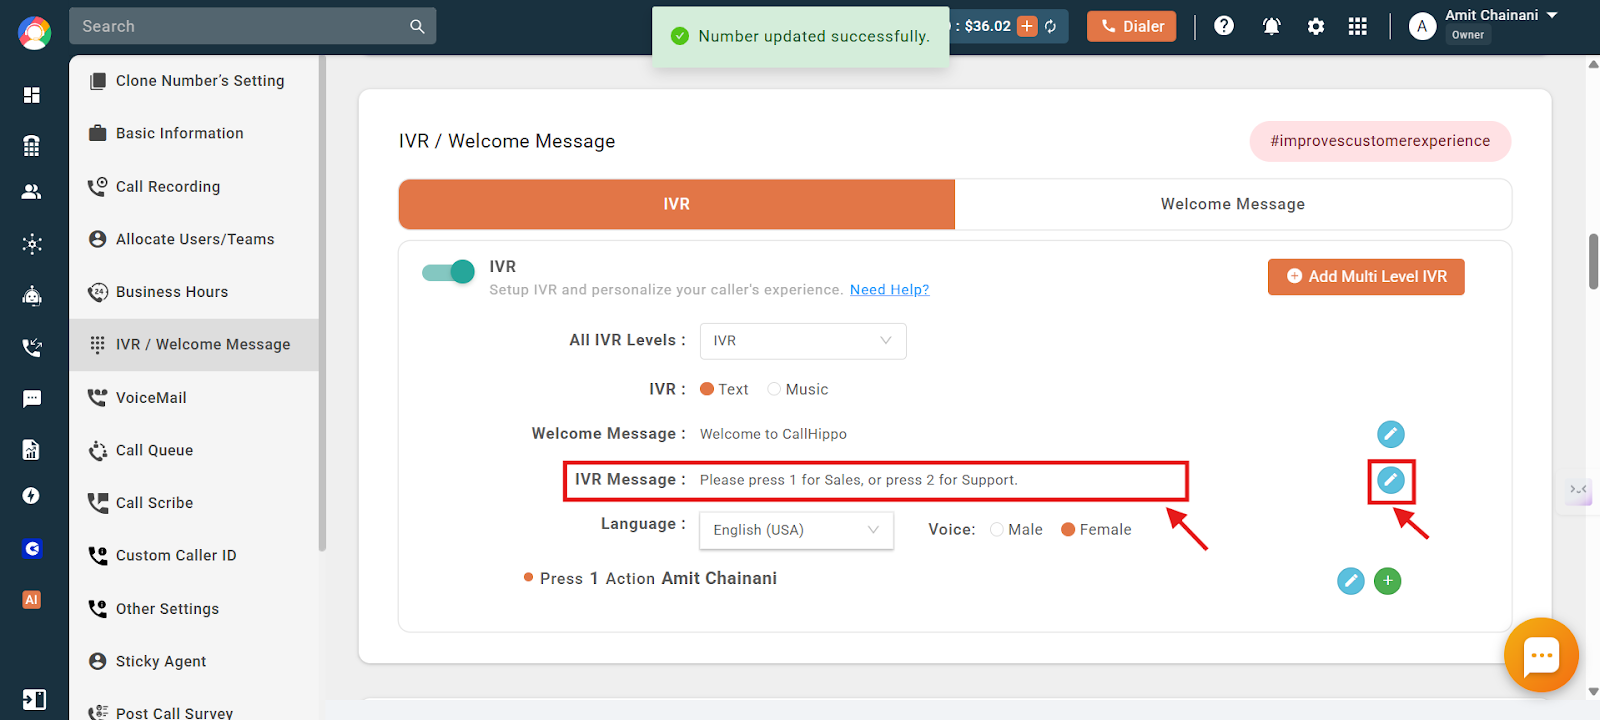
- Assign an action to each keypress. Click the pencil icon, choose the user, number, or team for that input (here Press 1 routes to the Sales team), then click the blue save icon.
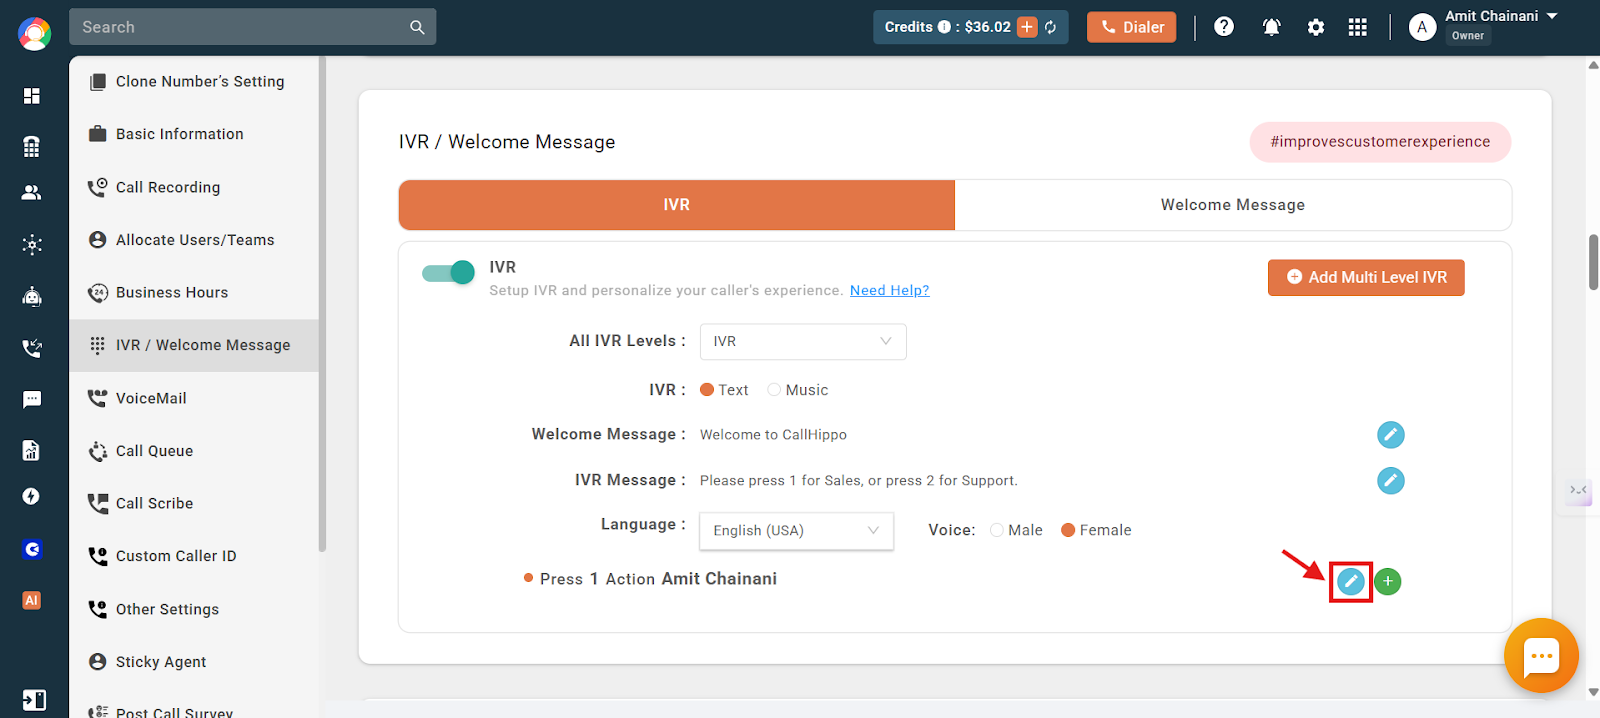
- Add more inputs. Click the green (+) icon to add another input, such as Press 2 for Support, and save it. Repeat for every menu option.
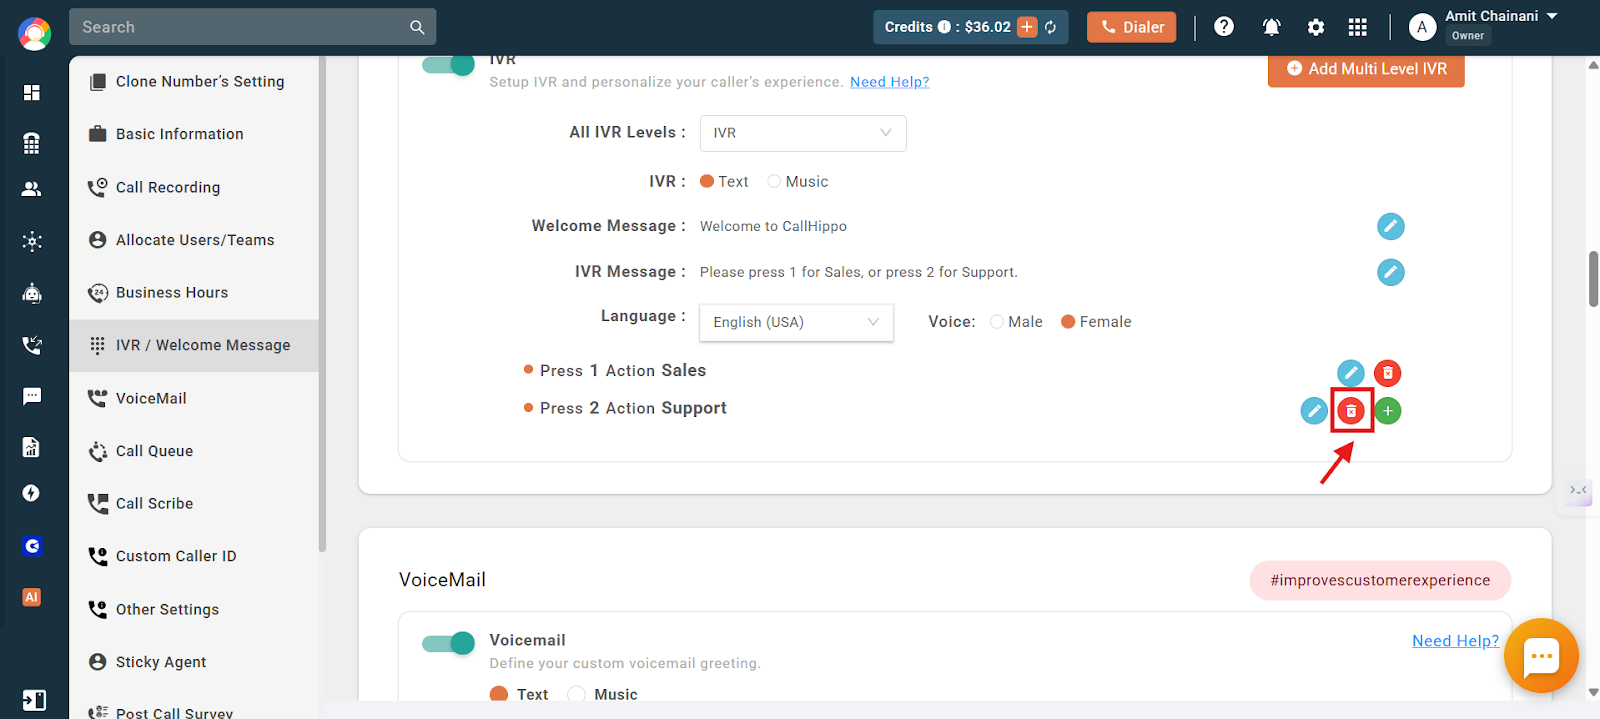
Anyone who calls this number will now hear the IVR first and be directed to the correct team, user, or number based on the key they press. If you entered a wrong action for an input, simply delete that action and add it again.
Set Up a Multilevel IVR
A multilevel IVR (also called a nested IVR) creates a structured, multi-layered menu. Each selection leads to a more specific set of choices, like a tree menu, helping callers reach the exact department or resource they need.
Example (2-step IVR): The main menu offers Press 1 for Sales and Press 2 for Support. Choosing Sales opens a sub-menu (New Sales / Existing Sales); choosing Support opens another (Technical Support / Account Assistance).
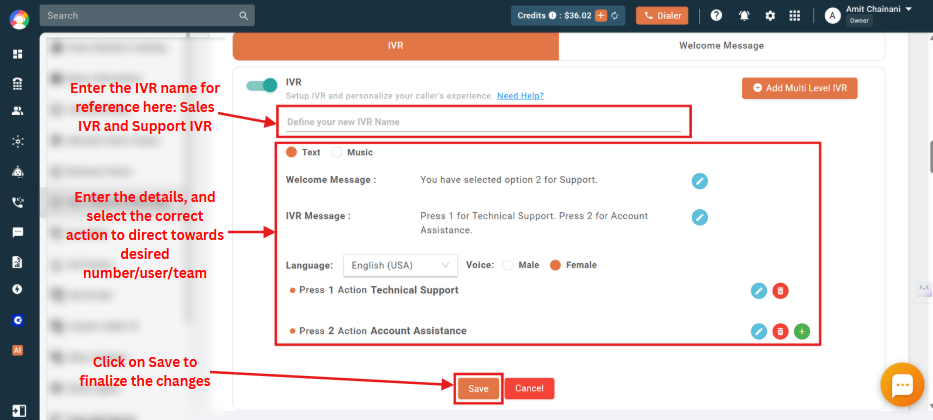
Build a multilevel IVR from the bottom up.
Step 1: Create the bottom-level IVRs first
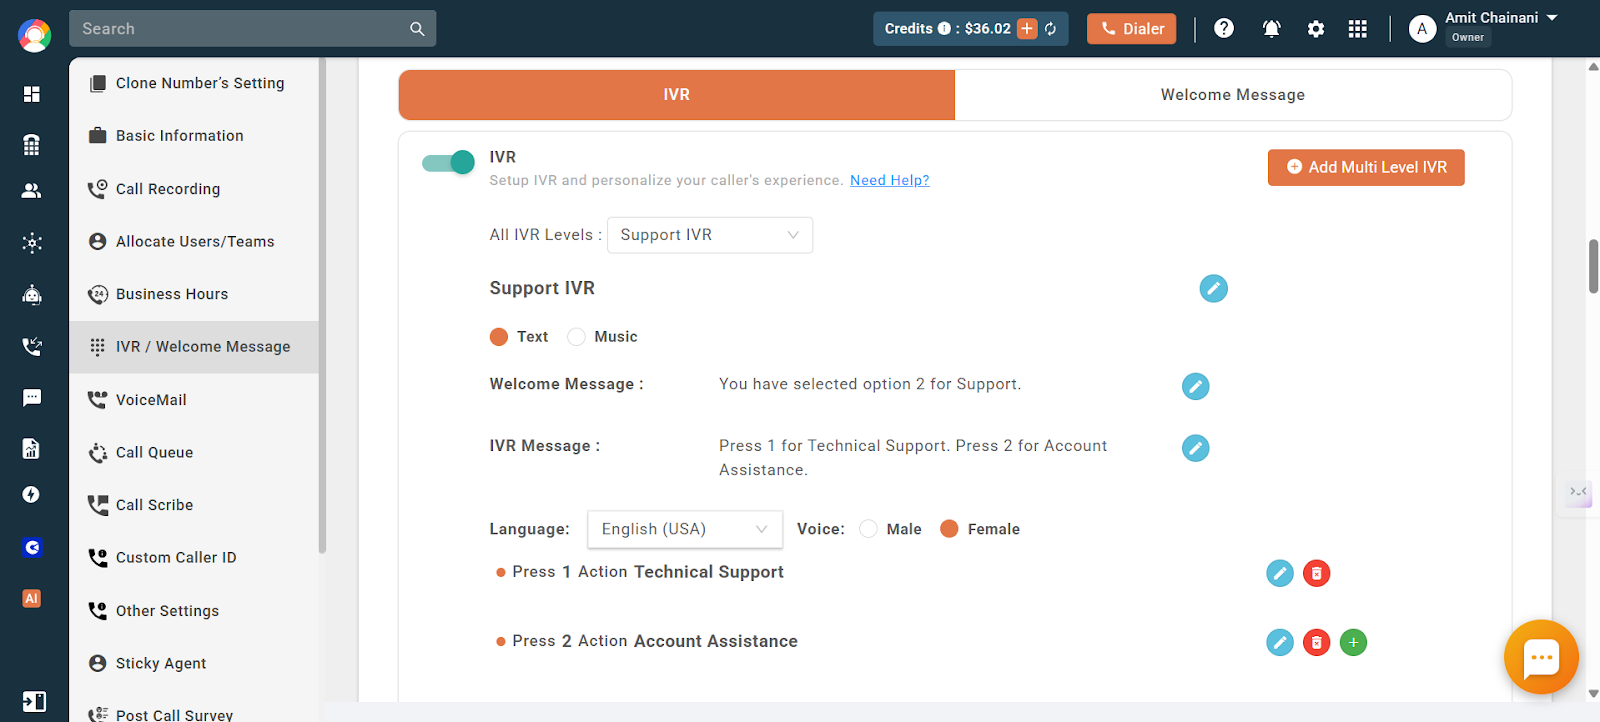
Create the IVRs that directly route calls to your teams. Click Add Multi Level IVR, enter the details and actions, and give each IVR a clear name for your own reference (for example, “Sales IVR” and “Support IVR”). Save each one.
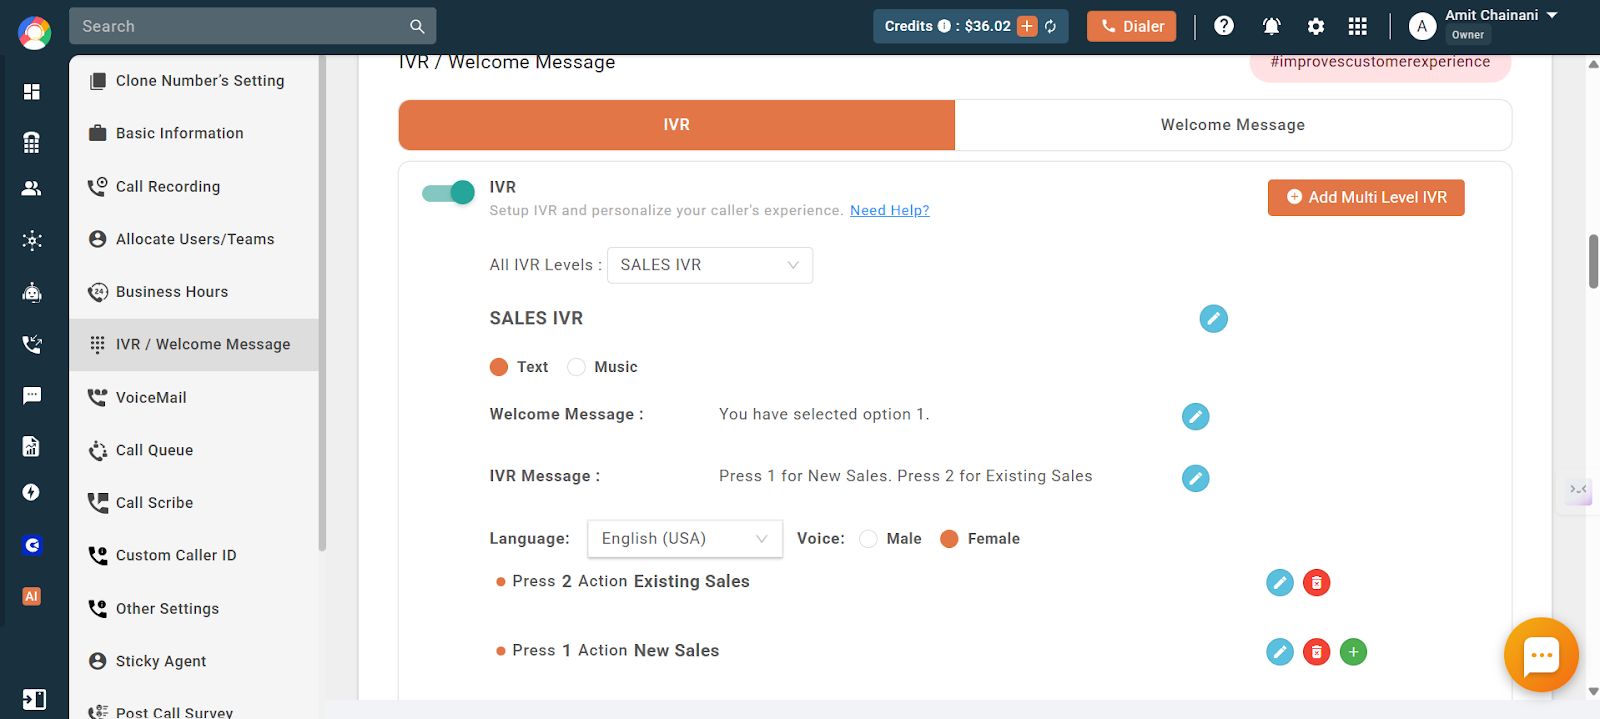
Once saved, each bottom-level IVR appears in the All IVR Levels dropdown so you can review or edit it at any time.
Step 2: Create the main (top-level) IVR
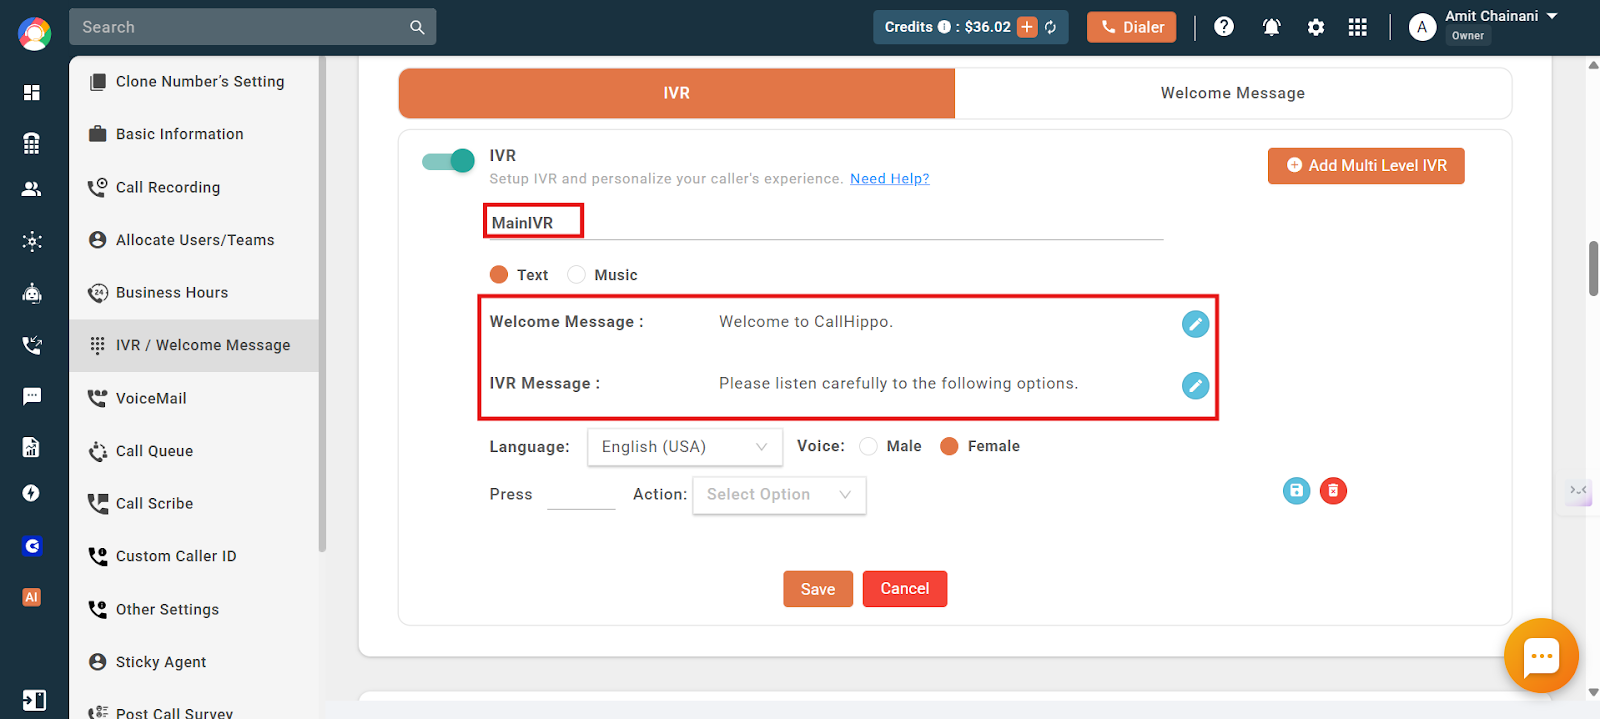
With the lower-level IVRs ready, click Add Multi Level IVR again and create the Main IVR. Enter its name, welcome message, and IVR message.
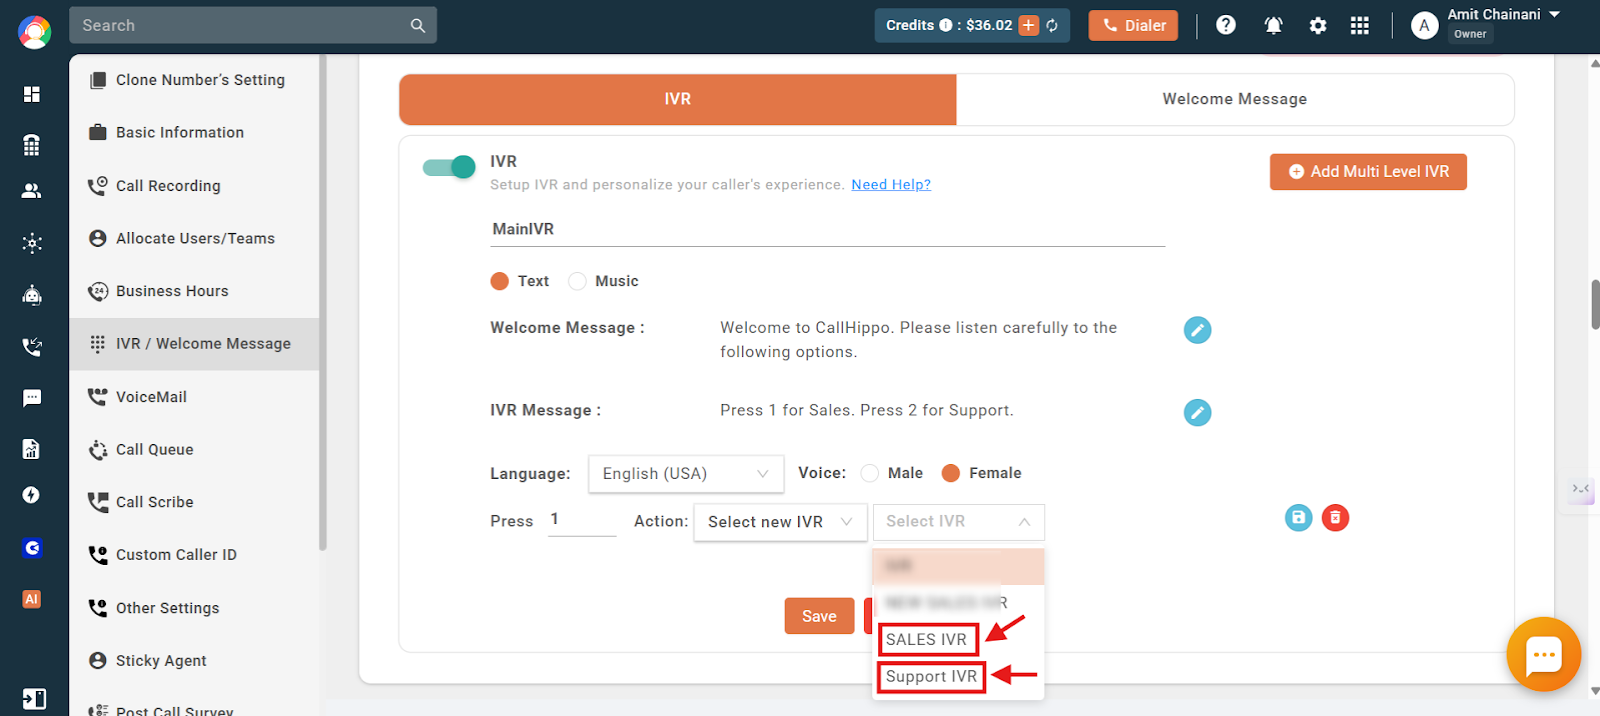
When assigning the action against each key pressed, choose Select new IVR in the action dropdown, then pick the correct sub-IVR by name (for example, Sales IVR for Press 1). Click Save to finalize. Your multilevel IVR is now live.
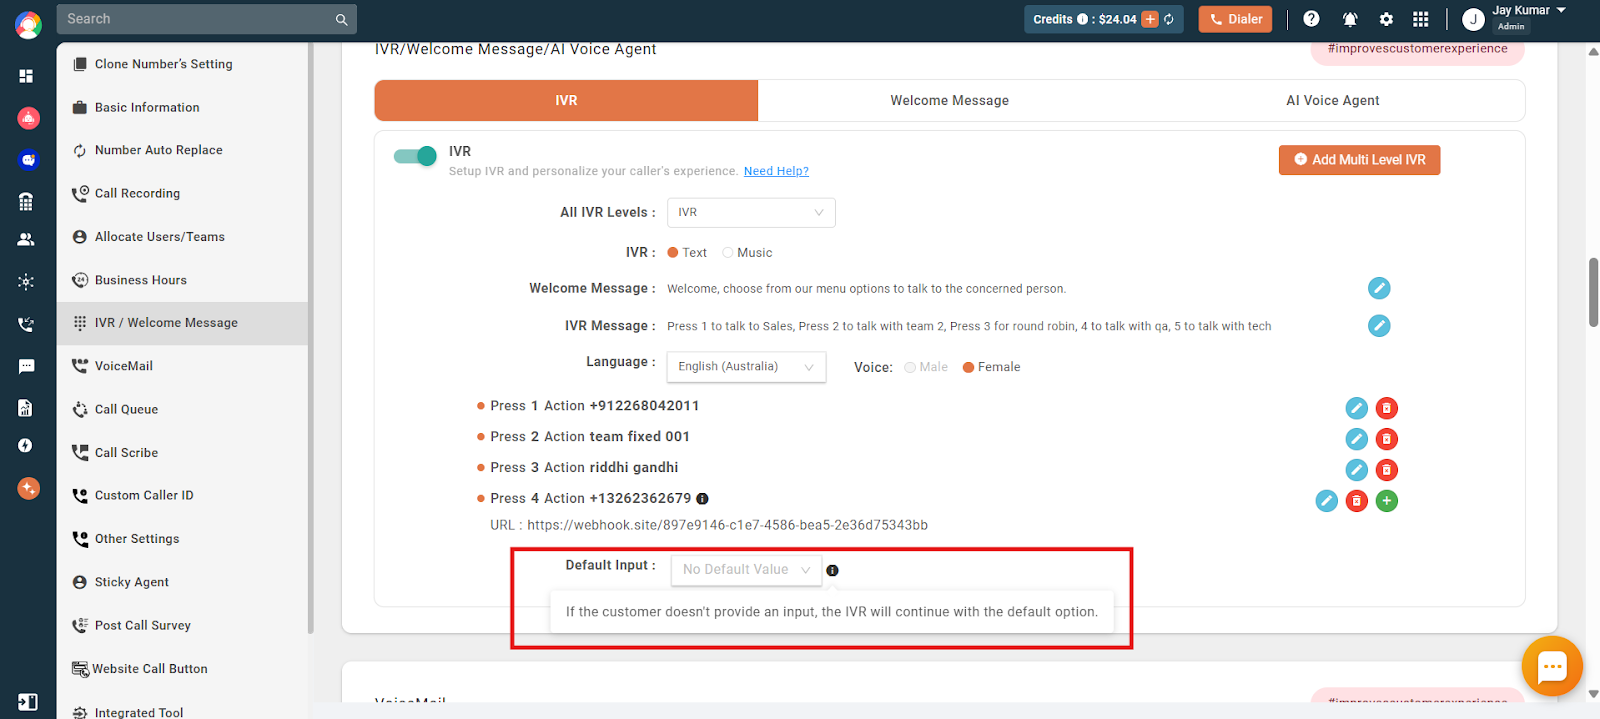
New: Default Input in IVR
You can now set a Default Input for each IVR level. If a caller does not make a selection, the IVR automatically follows the action defined under the default input. This prevents calls from hanging up or looping and keeps routing smooth even when the caller is silent. The feature is available in both simple and multilevel IVRs.
Frequently Asked Questions
What happens if I make a mistake while setting up the IVR?
You can easily delete the incorrect action and reassign the correct user, number, or team for that keypress.
What is a multilevel IVR?
A multilevel IVR, also known as a nested IVR, creates a layered menu system where initial selections lead to more specific sub-menus, helping callers reach the exact department or resource they need.
The IVR does not pick up inputs properly when we paste text or type quickly. How can we fix it?
IVR systems detect DTMF tones (keypress inputs) or voice commands, not pasted text. Enter digits at a moderate pace so the system can register each one. Slowing down slightly, or using the touch-tone dial pad on a phone, resolves this.
If someone calls my number with IVR enabled, will the system automatically answer and play the script?
Yes. Once IVR is set up for a number, incoming calls are answered automatically and the welcome and IVR messages play without manual intervention. The caller hears the greeting and menu options, then chooses an input to be routed.
I want callers to hear a two-language menu, then choose from three voicemail options based on their language. How do I set that up?
Use a multilevel IVR. Configure a top-level IVR where callers choose their language, then link each language selection to a second-level IVR with three voicemail options, routing each to the right voicemail or team inbox.
The system asks for input or plays an IVR message. I want it to just ring normally instead. How can I do that?
Disable the IVR for that number. Go to the number’s settings, click IVR / Welcome Message, and toggle off the IVR feature. Incoming calls will then ring directly to the assigned user or team without a menu.
What happens if a caller does not press any input during the IVR menu?
With the updated IVR system you can set a Default Input at each level. If a caller does not make a selection, the system follows the action defined under the default input, preventing calls from hanging up or looping.